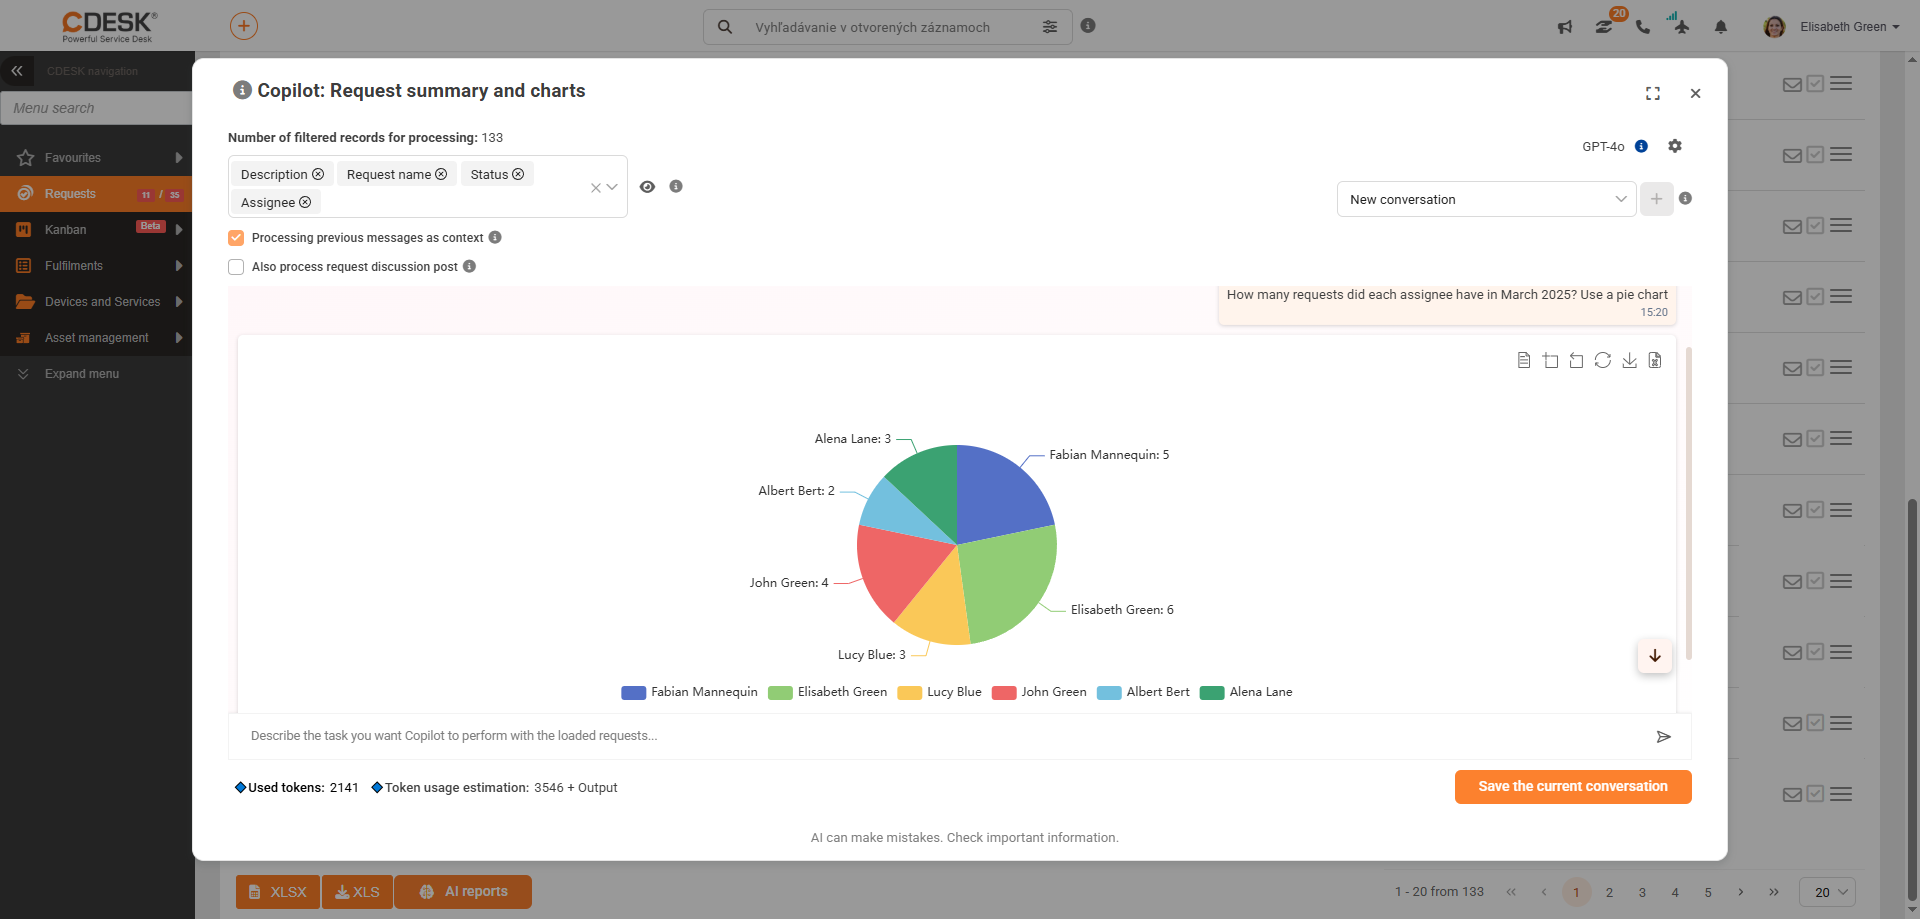
AI Reports in Requests – new feature for generating reports
Let artificial intelligence create customized reports for you. The Requests module now includes AI powered by the ChatGPT language model, which generates specialized outputs based on your text commands in a short time. In the next version, we plan to expand AI functions to include request handling and task/fulfilment creation.
Clicking on ![]() in the request details will display the familiar ChatGPT interface. Before entering a text command, you must select at least one column from the request list, which will provide data for further processing. The AI can also use data from discussion posts in the request if allowed in the settings.
in the request details will display the familiar ChatGPT interface. Before entering a text command, you must select at least one column from the request list, which will provide data for further processing. The AI can also use data from discussion posts in the request if allowed in the settings.
Thanks to the ability to memorize conversations and filters, you can save commands and simply add current data later. This feature is useful, for example, for creating monthly reports. The output can also be visual, such as in the form of a chart.
Note: When working with larger datasets, a higher number of tokens is used, which may slow down the system and reduce output quality. Before creating an object/report, we recommend optimizing the selected sample to use an appropriate number of tokens. For language models, we always indicate which type of task they are suitable for.
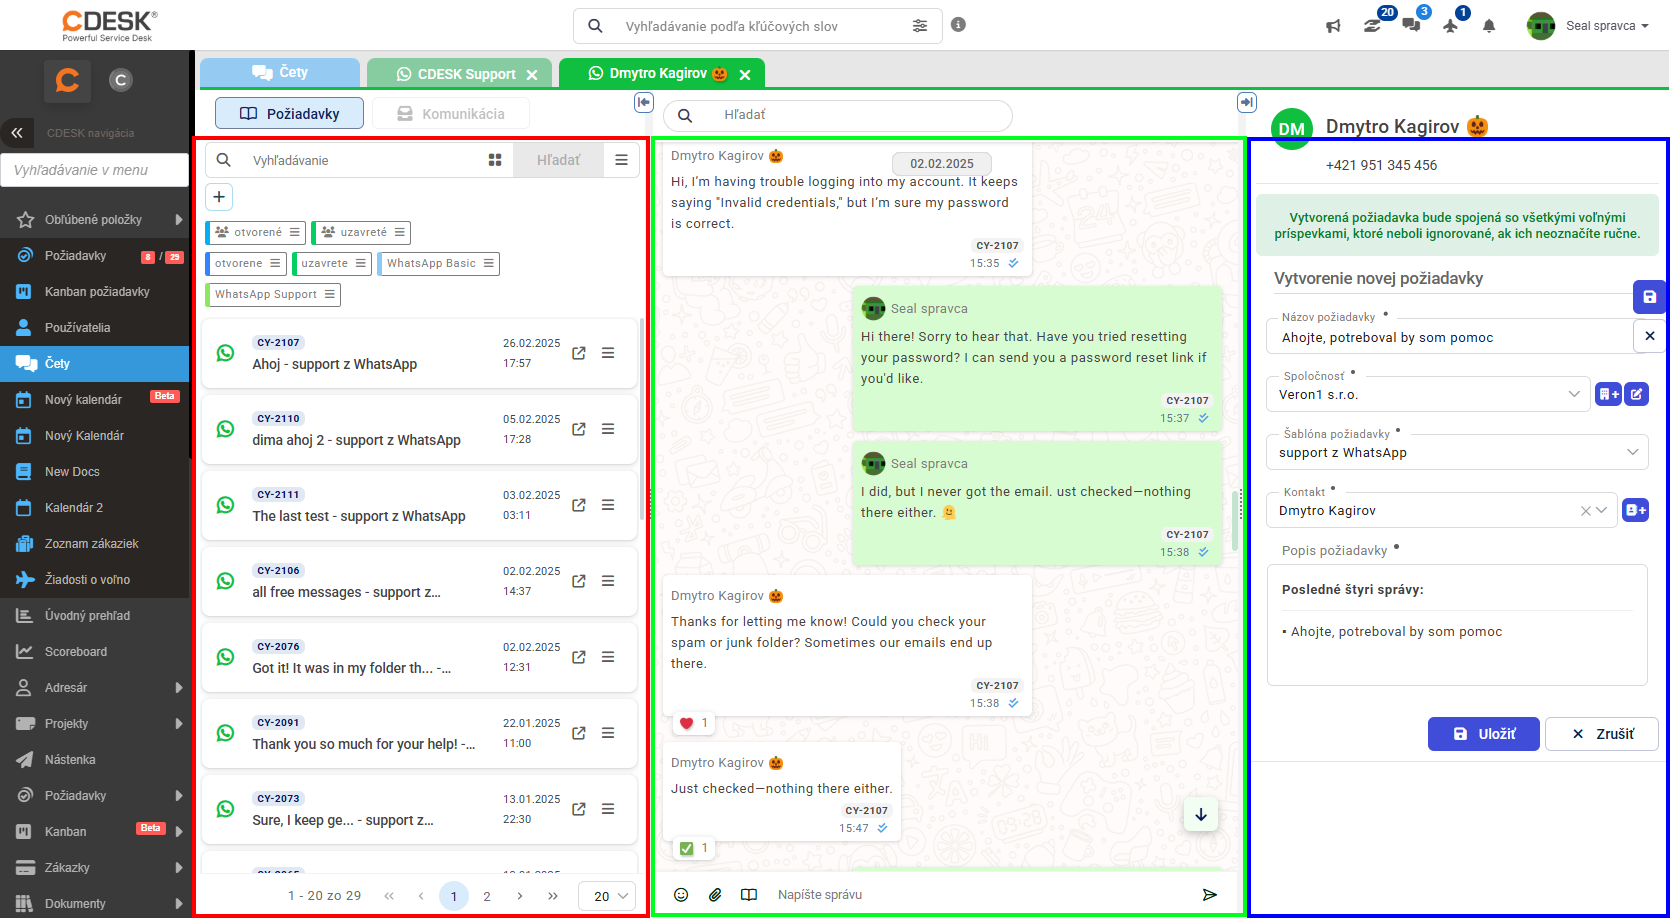
WhatsApp Business Integration – chats with direct request creation
Respond to customer inquiries faster, create new requests directly from conversations, and improve your customer support level. By integrating WhatsApp Business into CDESK, you gain new options for handling online inquiries.

The client sends a message from their WhatsApp app to your business number registered in WhatsApp Business. This message appears in the chat centre under Omnichannel > Chats. Any authorized operator can respond to the conversation. From the conversation, they can create a request, with the title filled from the customer’s first message and the description containing the last 4 messages in the conversation. A new request can be created from any message in the chat.
Within WhatsApp, you can also set up and use marketing messages – saved message templates sent based on WhatsApp service conditions.
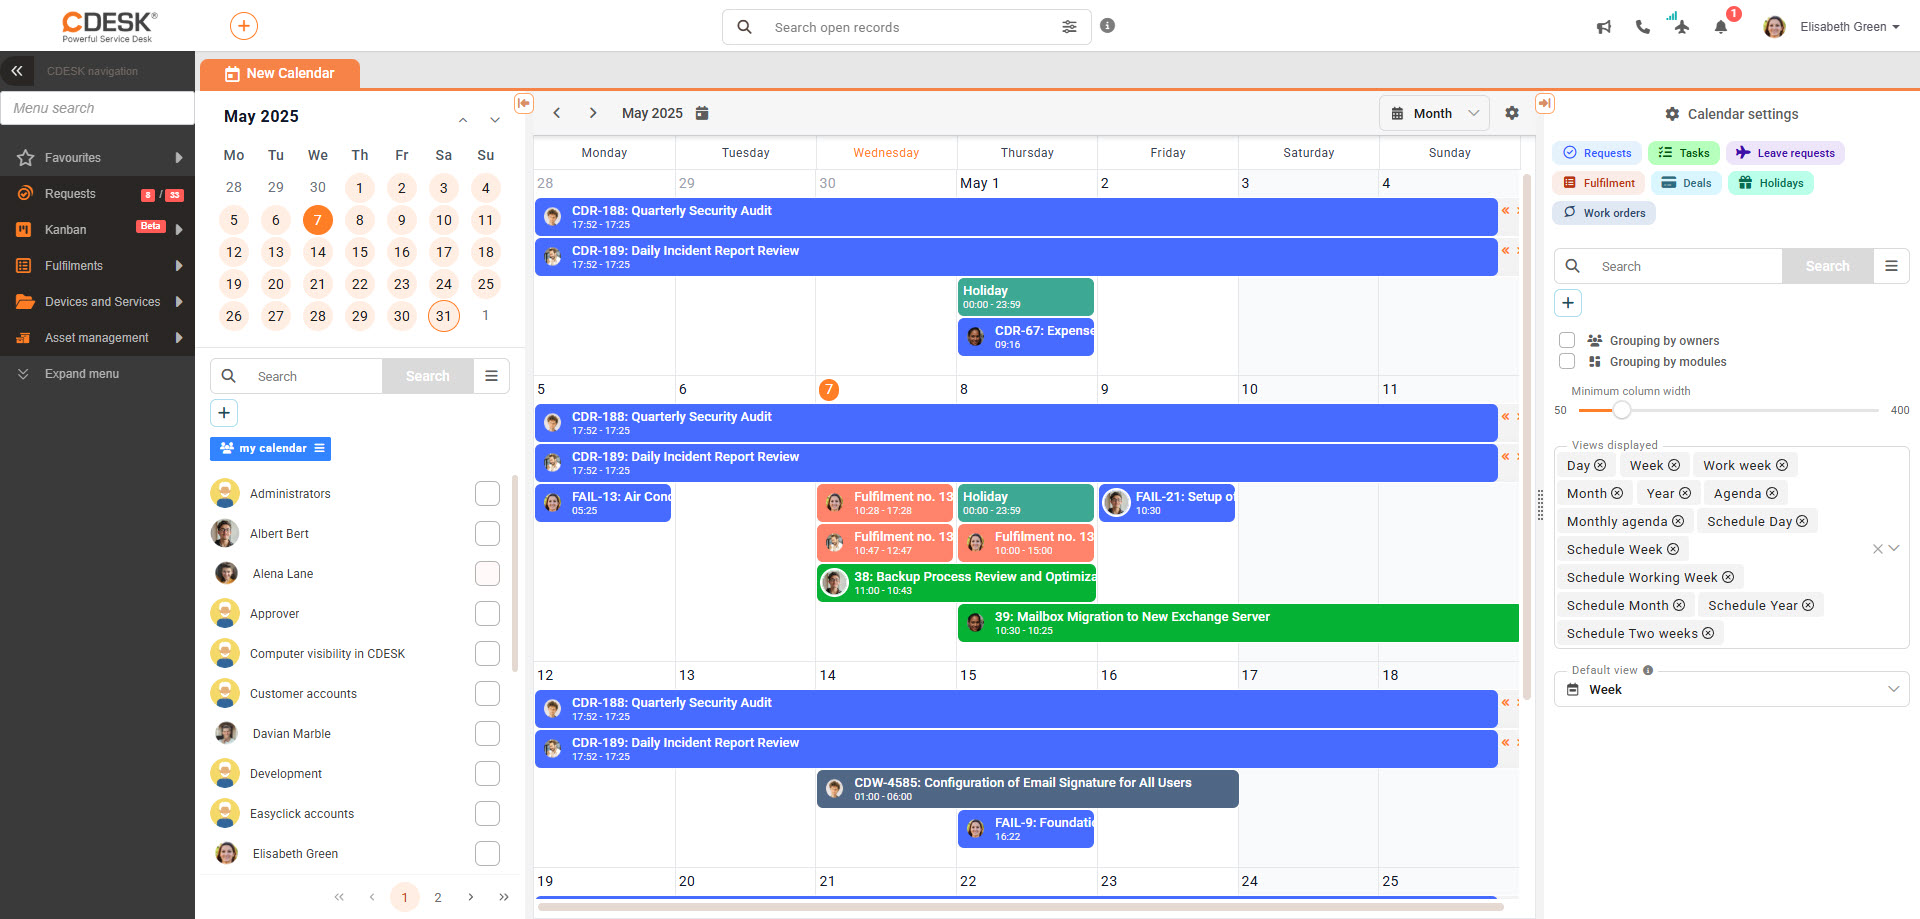
New Calendar – significantly improved, faster version
Note: In version 3.2.8, we plan to discontinue all older versions of the Calendar. Test all familiar operations in the new Calendar. If the functionality you use is not yet part of the new Calendar, please contact our support to ensure its availability in the next version. We will ensure that the discontinuation of the older Calendar version does not cause any issues for you.
The optimized and significantly improved Calendar module embodies our ambition to provide a flexible and reliable tool for time management, team collaboration, and oversight of work processes. We have adjusted the Calendar to handle significantly larger datasets without losing speed. The user interface has also been updated to be more intuitive and divided into 3 sections.
The left section displays the basic monthly calendar and CDESK account selection. By filtering accounts or contacts, you can select which accounts to display. Their linked objects will appear immediately in the calendar interface.
The middle section shows user objects in a columnar schedule. You can set it to yearly, monthly, weekly, daily, or switch to a workweek mode that excludes weekends. After changing the schedule, the section adjusts, and objects are displayed in your preferred layout. The Calendar was designed to minimize scrolling and clicking. Hovering over an object allows you to view basic details in a quick preview.
The right section of the Calendar is for filtering objects and configuring the module. Select which objects to display, set filtering criteria, and choose the Calendar’s form. Objects in the Calendar can be grouped by assigned users, affected modules, or freely based on time data. Additionally, you can adjust column width to improve readability when dealing with a larger number of objects in a column.
Requests
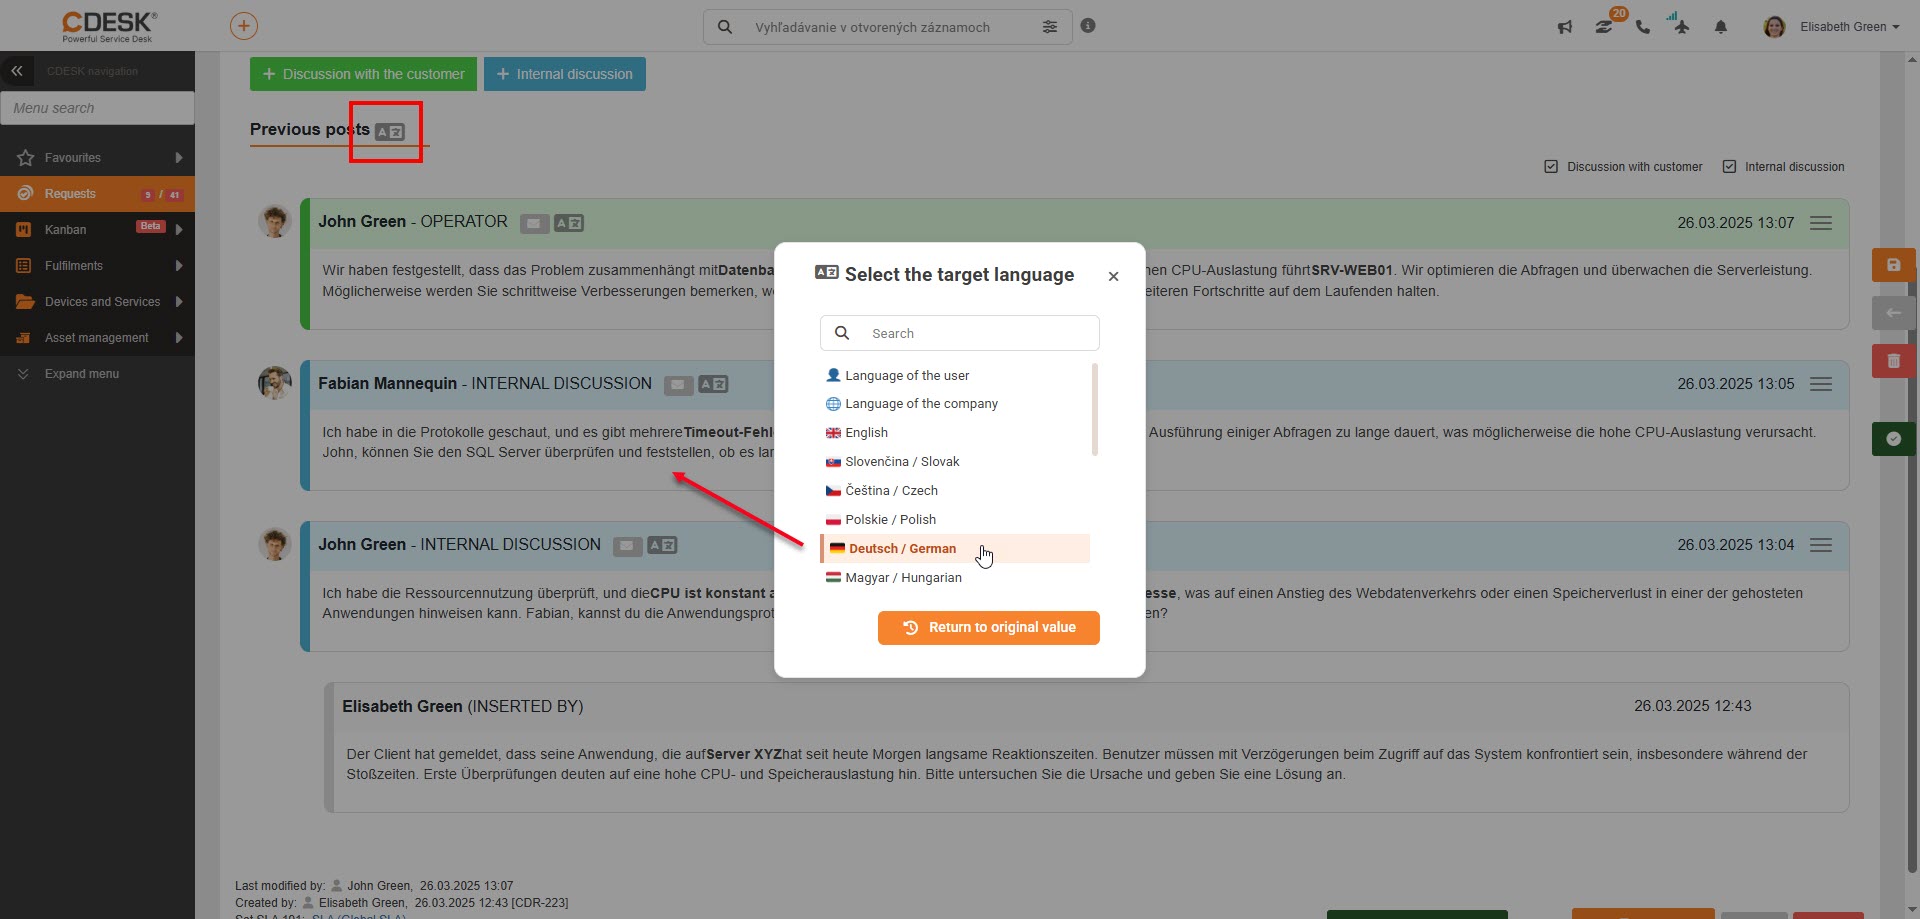
Bulk translation of all discussion posts
In previous versions, we introduced the ability to translate texts using AI. In version 3.2.7, we have expanded this feature. Discussions now include the option to translate the entire conversation. The bulk translation of all posts is done using the translation button with the symbol ![]() , located above the discussion posts. Selecting a language will translate the posts. The translation is only a preview; other users will see the texts in the original language..
, located above the discussion posts. Selecting a language will translate the posts. The translation is only a preview; other users will see the texts in the original language..
As in previous versions, 17 world languages are available, including Chinese, German, Japanese, and Arabic.
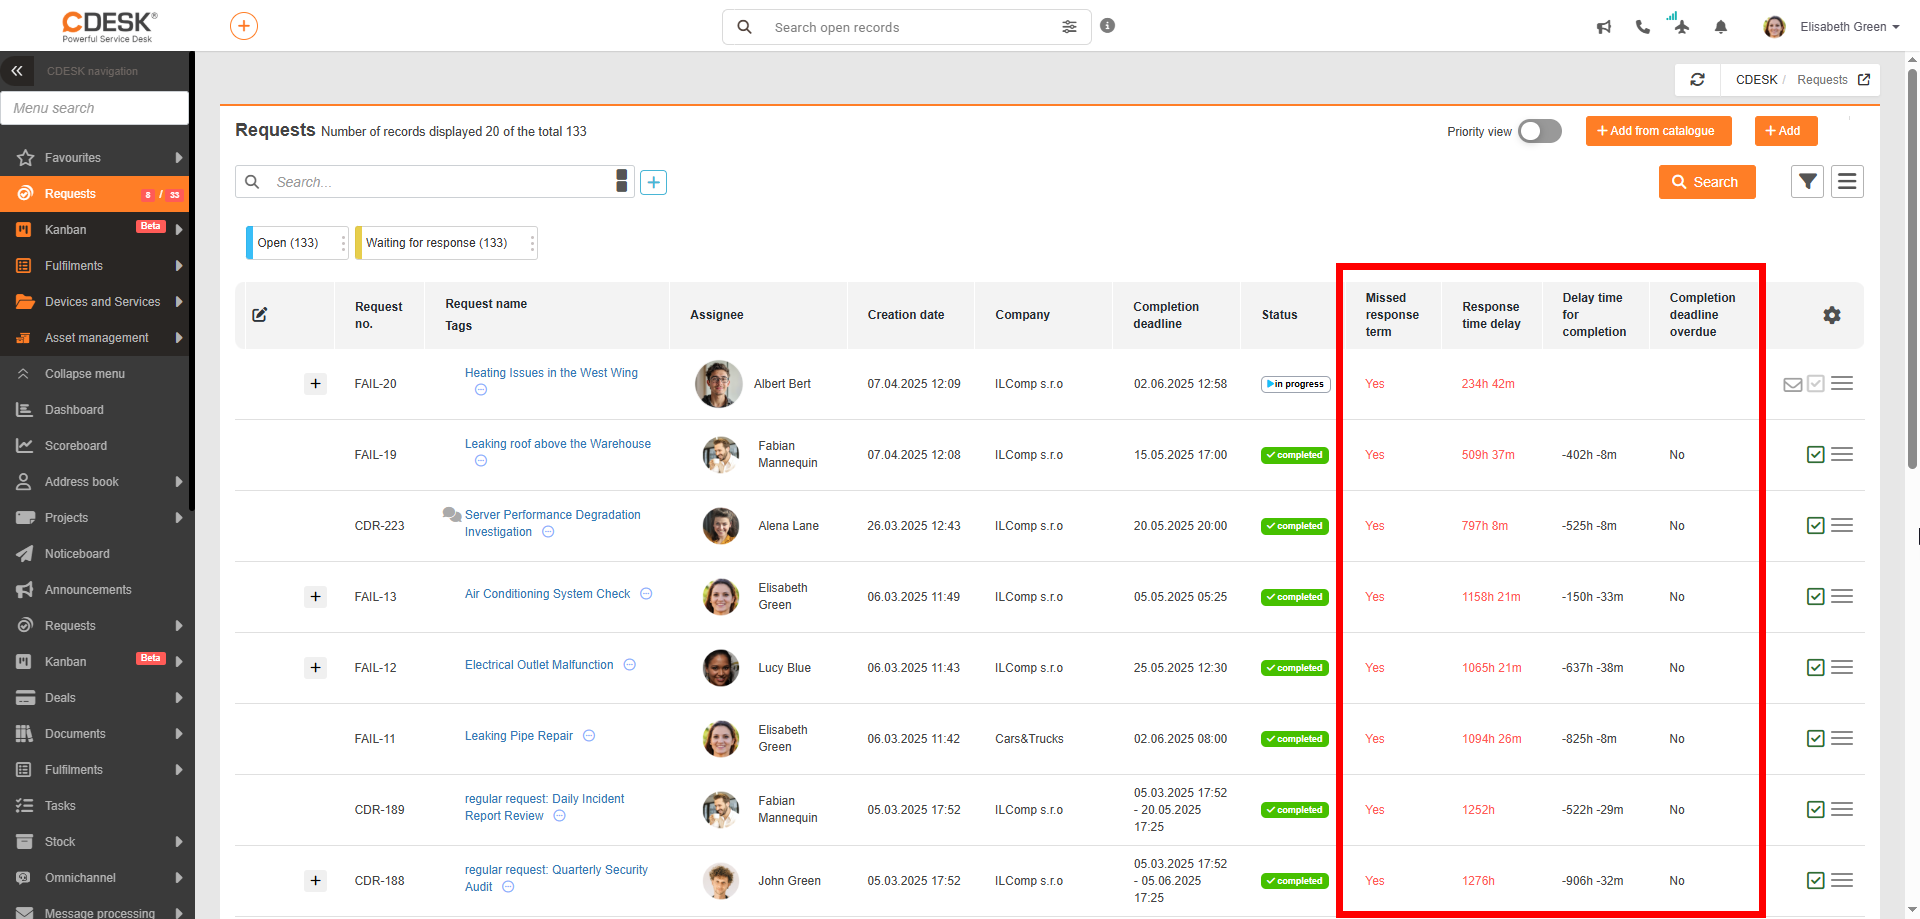
Separate columns in lists for missed deadlines and delay times
Columns have been added to the Requests, Tasks and Work Orders module lists focusing on missed deadlines to simplify the processing of data in XLSX and AI reports. The new columns are:
- Missed response deadline – Contains one of the values: Yes/No
- Response delay time – Time data about the delay. A negative number indicates the time remaining until the response deadline.
- Completion deadline overdue – Contains one of the values: Yes/No
- Completion delay time – Time data about the delay. A negative number indicates the time remaining until the completion deadline
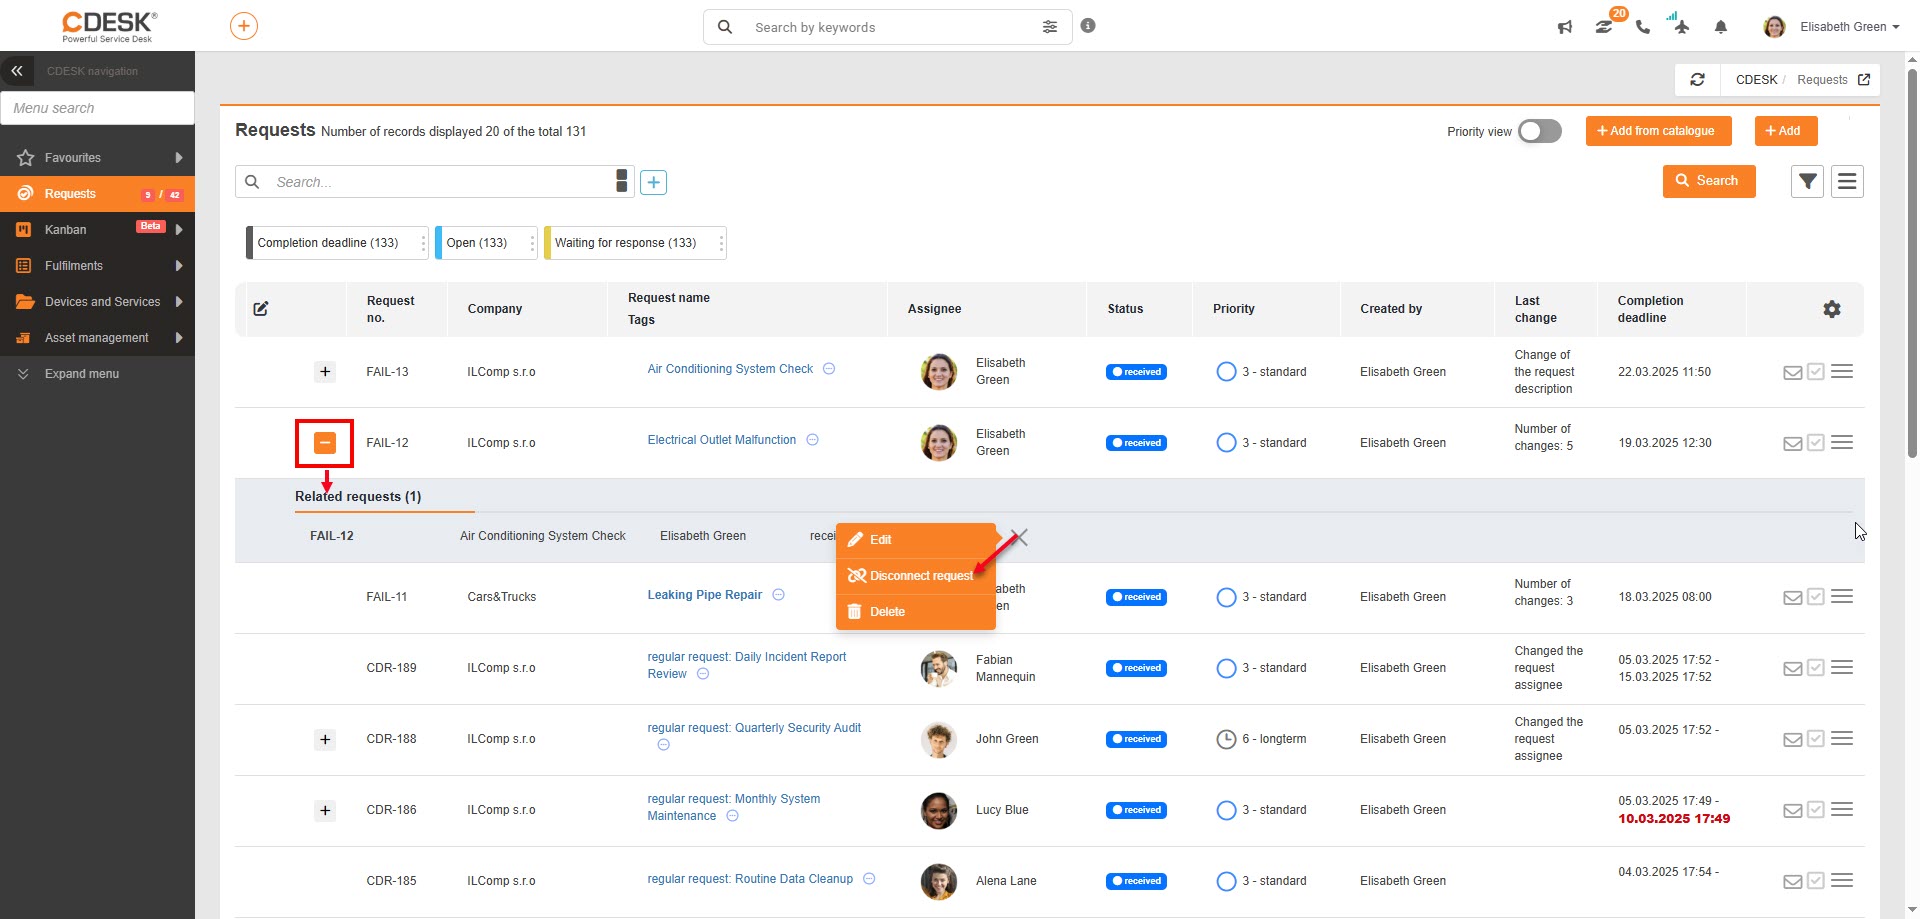
Faster removal of links to related requests
If a request is linked to another request, you can now remove the link directly in the request list. By pressing the „+“ button next to a linked request, the connected request will appear. Clicking the menu icon on the right will give you the option to unlink the request. This function in CDESK is accompanied by the ![]() icon.
icon.
Translations of short and long descriptions for tiles in the request catalogue
For tiles in the request catalogue, you can now create translations not only for the name but also for the long and short descriptions, which appear when hovering over the tile. Translations can be assigned for each language activated in the environment and must be entered manually.
Assigning translations is done in Global Settings > Requests > Request Catalogue. Click the menu icon for a tile and select the „Translations“ option.
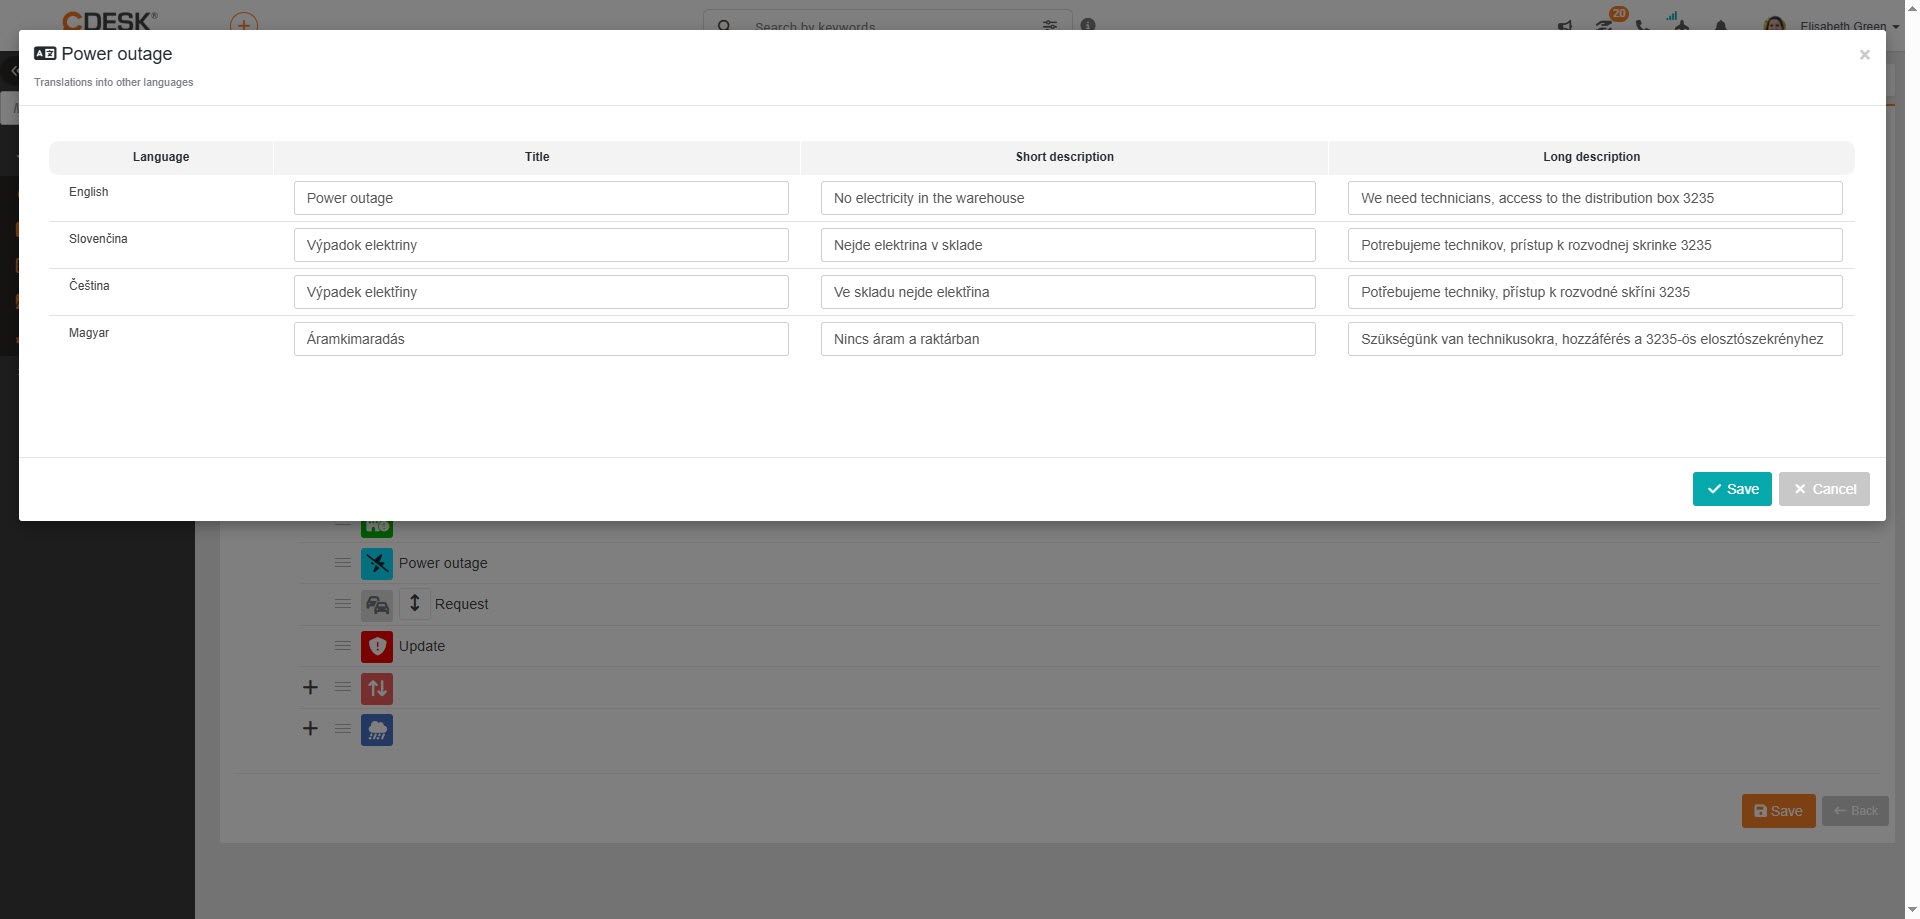
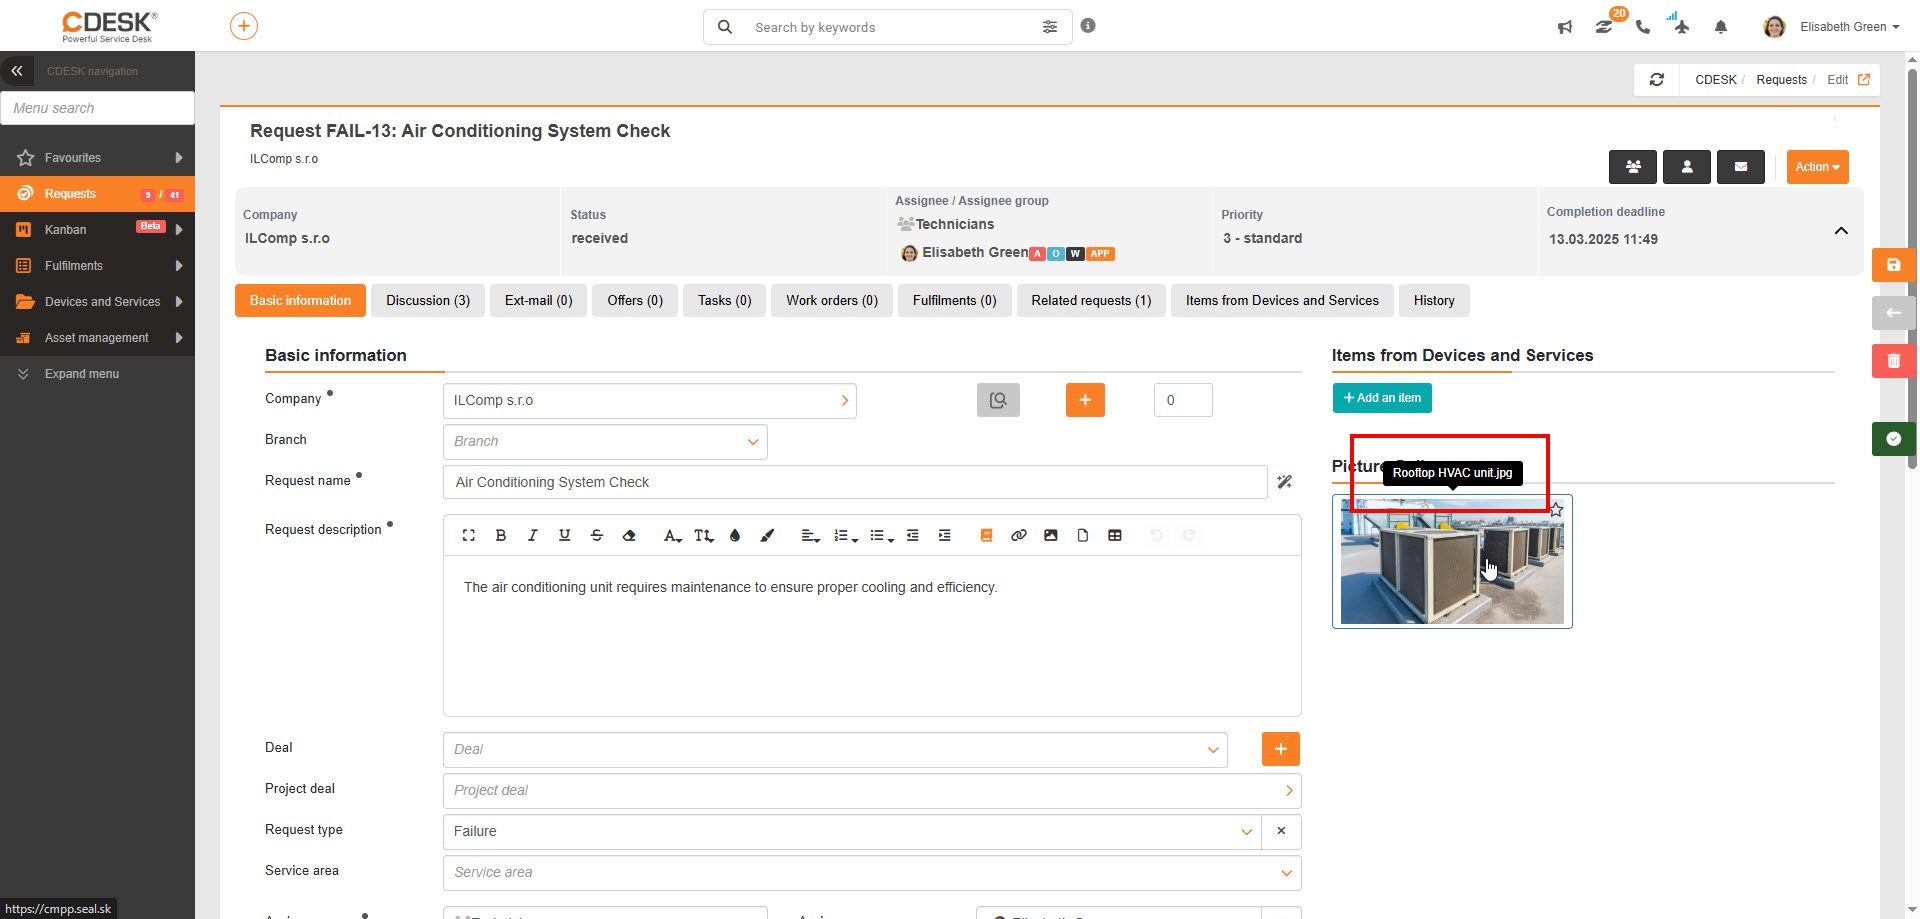
Image preview tooltip in the gallery
Hovering over an image in the gallery will display its name with the extension, without the need to open the image or go to the Attachments section in the request.
General Functions
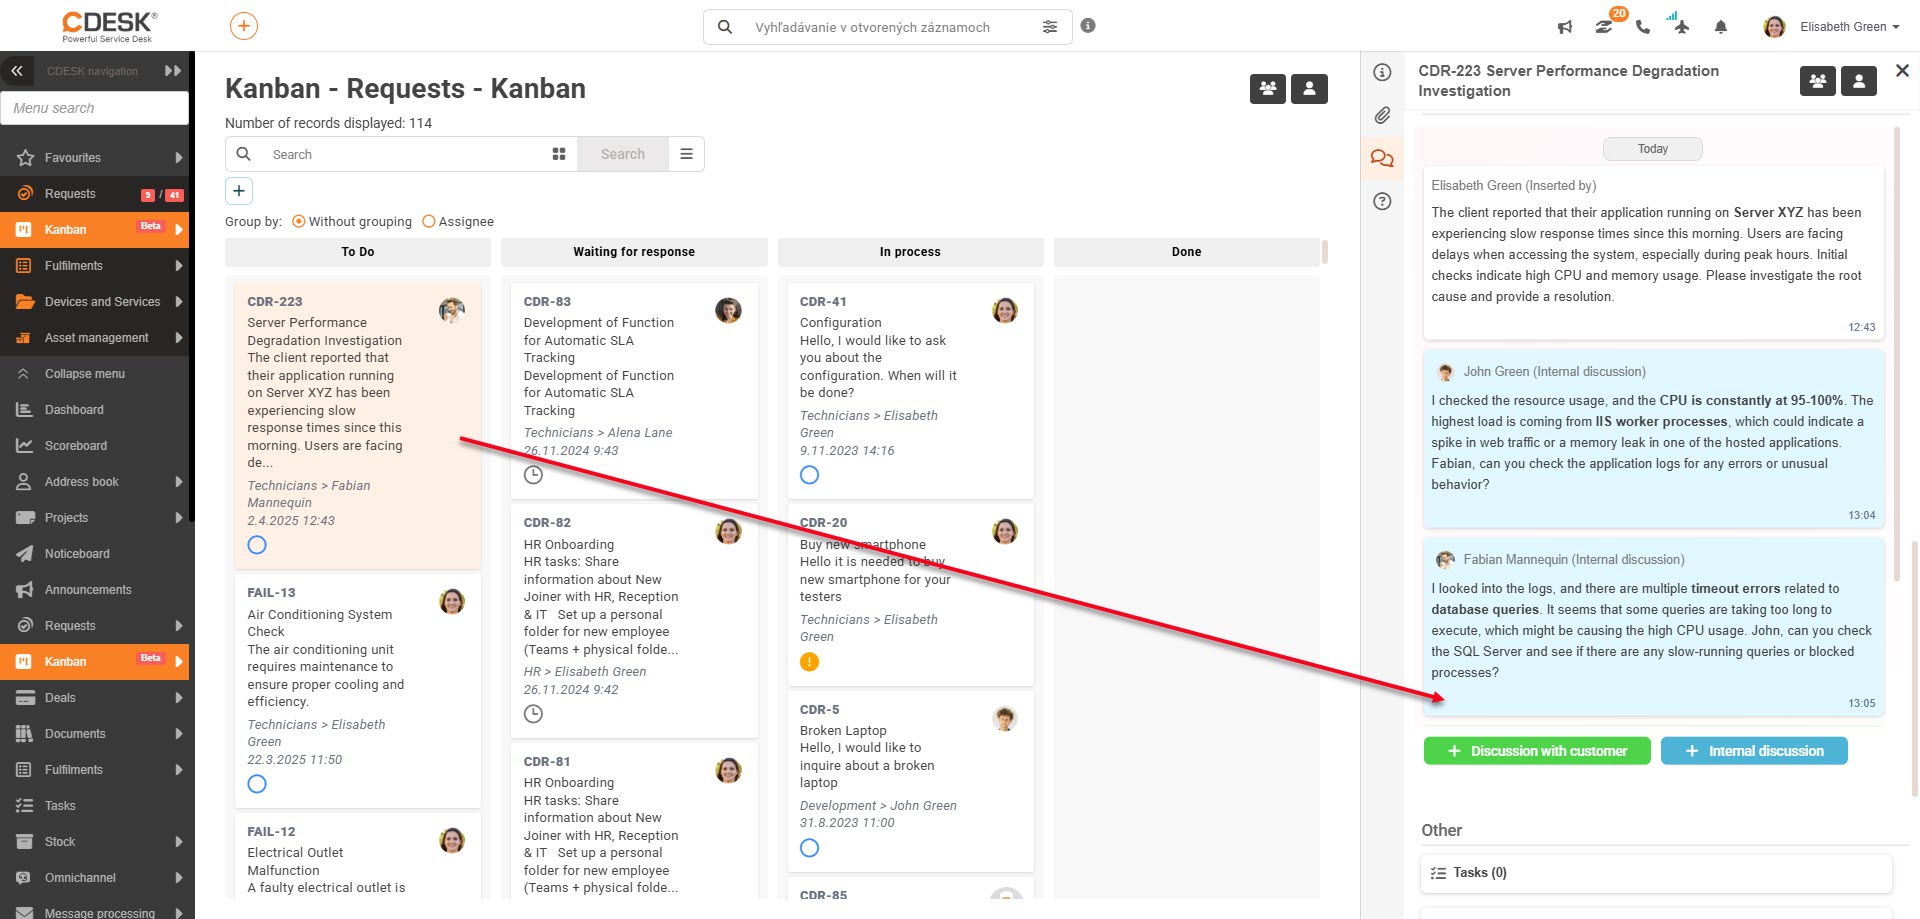
Improvements to the right panel of requests (Kanban, New Calendar, Request List)
Through the right panel, you can now add discussion posts to objects. These can be internal posts or discussions with customers. If the Jira connector is active, you can also publish Jira comments via the right panel. Attachments can also be added to objects.
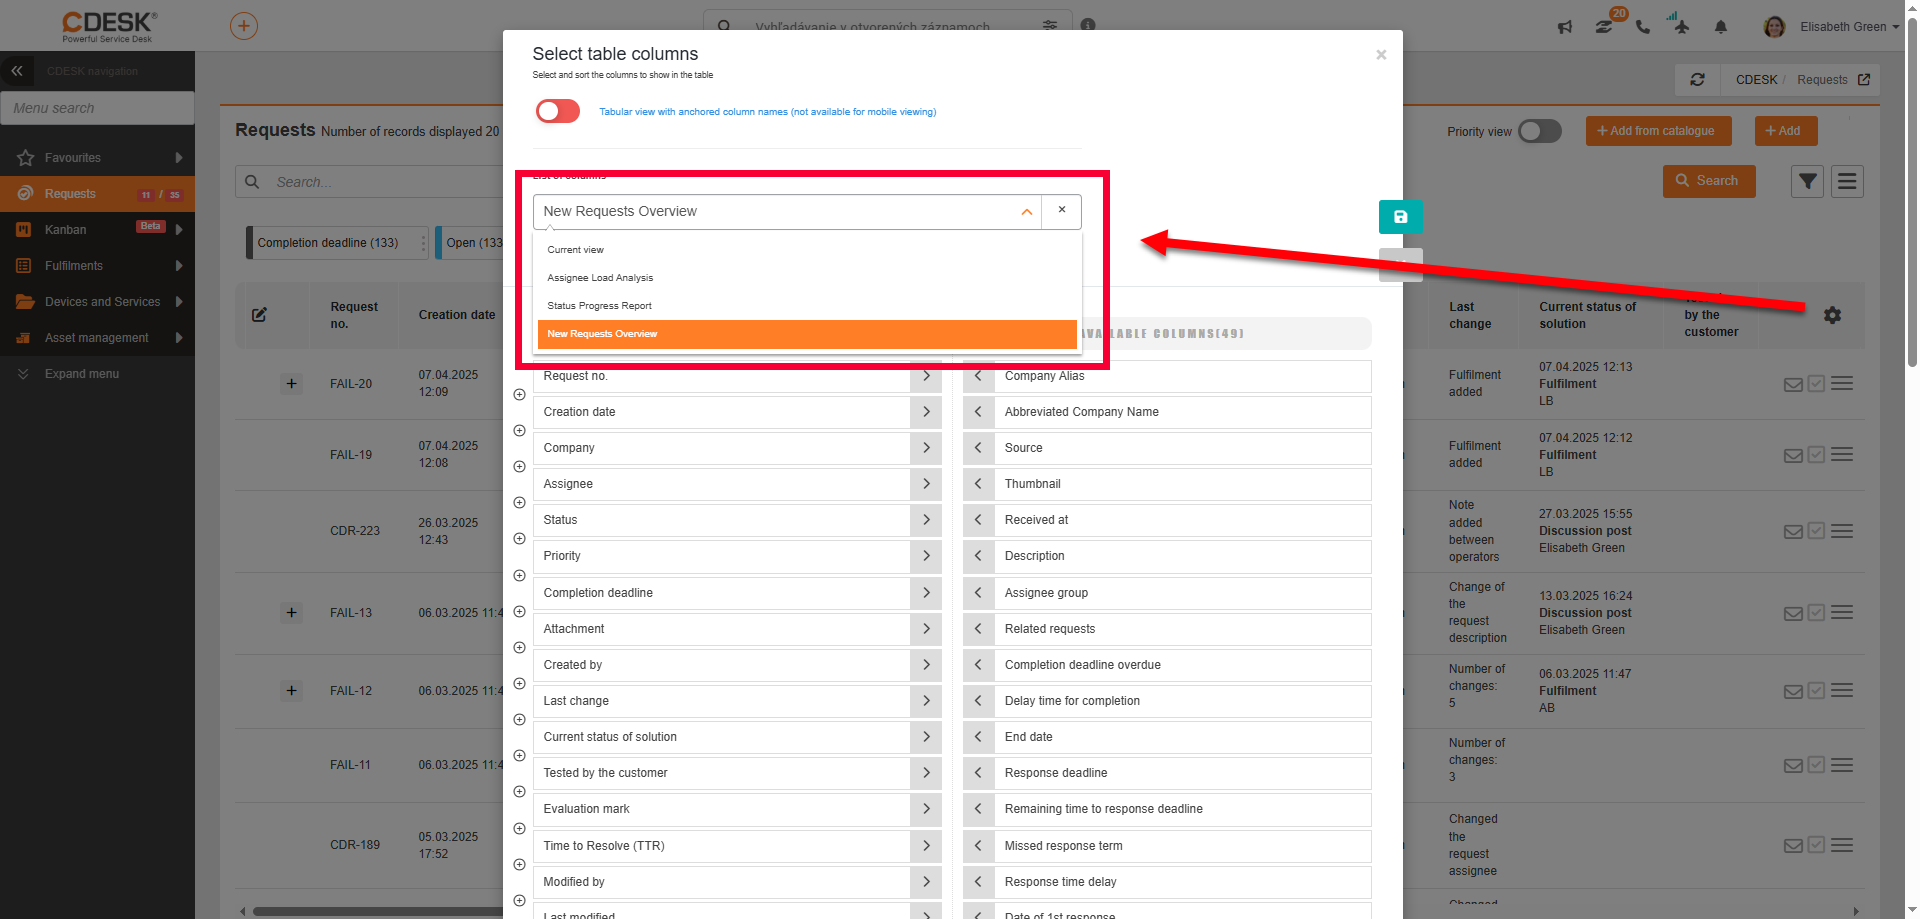
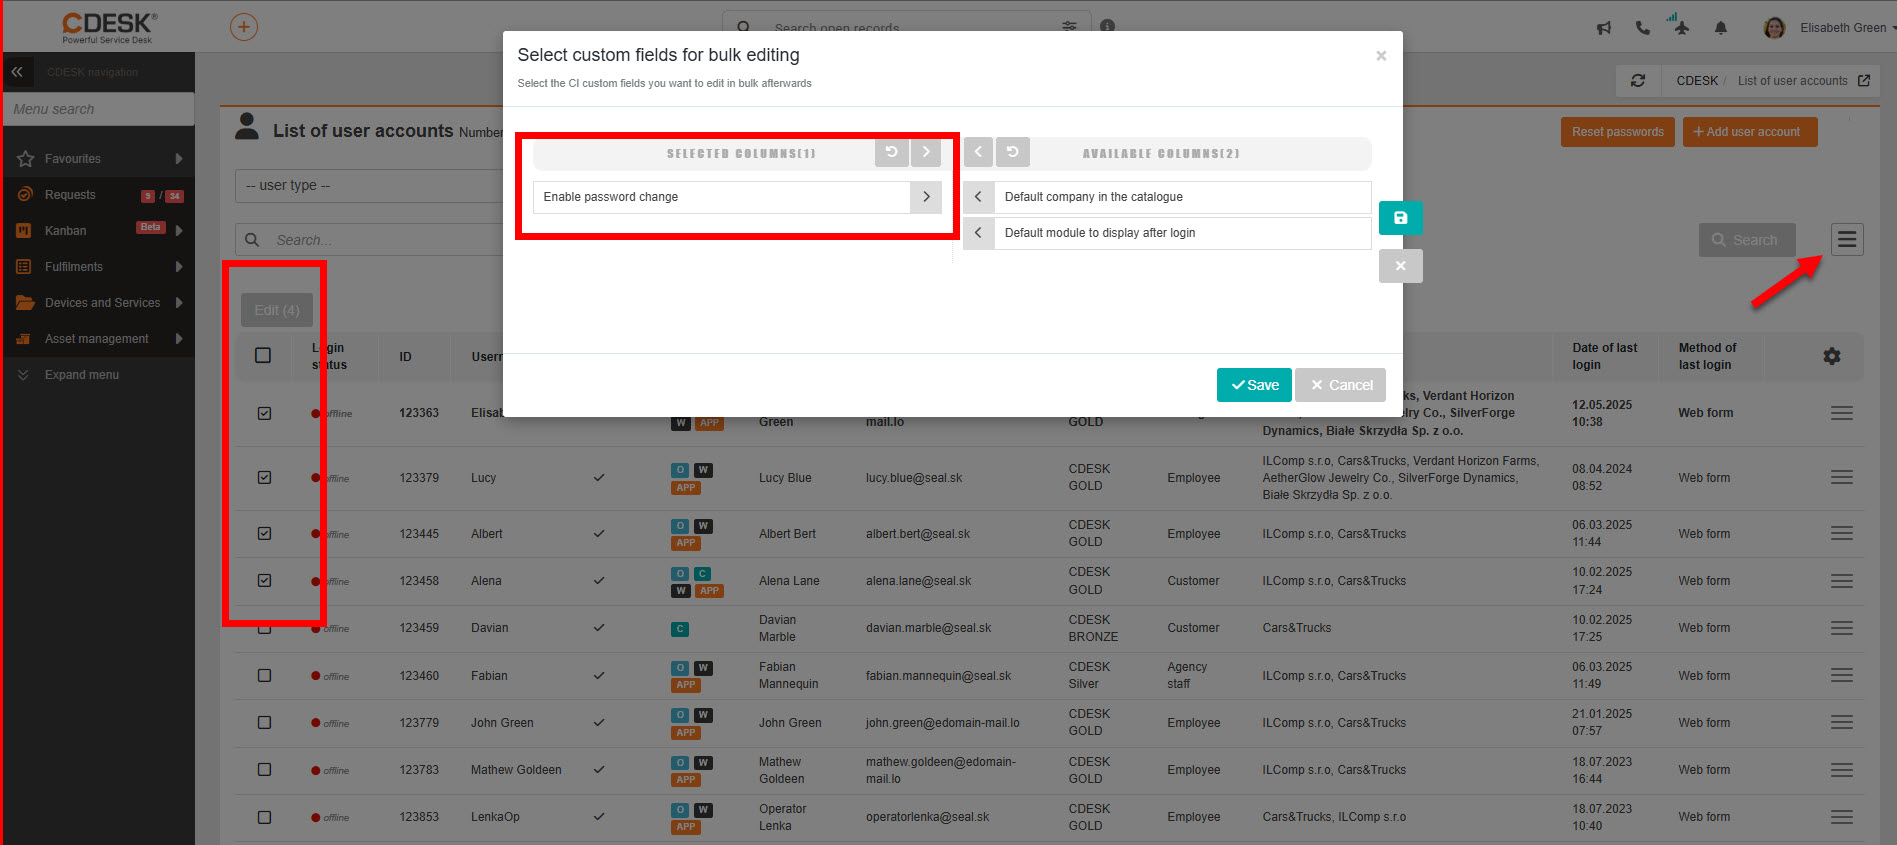
Ability to save custom column lists
When selecting columns in a list, you can save your selection as a template. You can save multiple column templates and switch between them, easily changing the layout of your list. The goal of this feature is to reduce the manual selection of columns, such as for recurring reports.
The option to save column templates is available in all modules that work with columns. However, templates are not transferred between modules, so you need to create custom templates for each module separately.
Replacing the SUM function with the more flexible SUBTOTAL function in XLSX exports
In all XLSX files with summary columns, the SUM function has been replaced with the more suitable SUBTOTAL function, which calculates the sum only from visible rows.

Fulfilments
Easy creation of fulfilments from lists in other modules
In previous versions, it was possible to create fulfilments from the list of requests. In the current version, you can also create fulfilments from object lists in modules:
- Address Book
- Deals
- Tasks
By pressing ![]() in the object row, you can create a fulfilment linked to the respective company, deal, task or request.
in the object row, you can create a fulfilment linked to the respective company, deal, task or request.
Deals and Invoicing
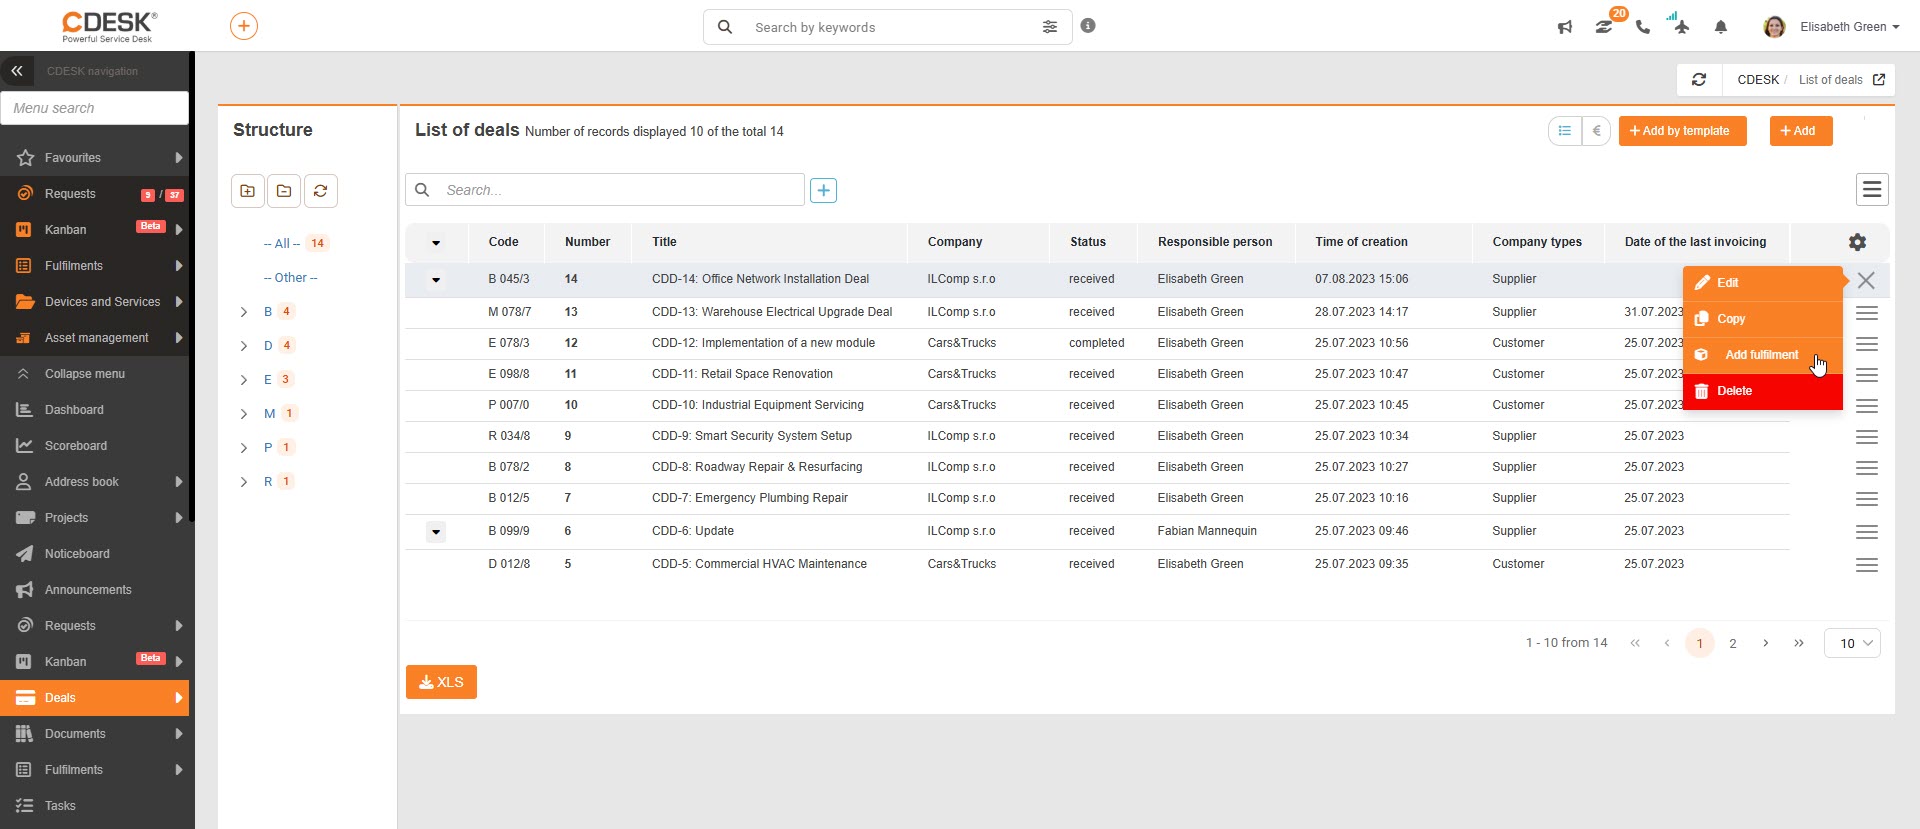
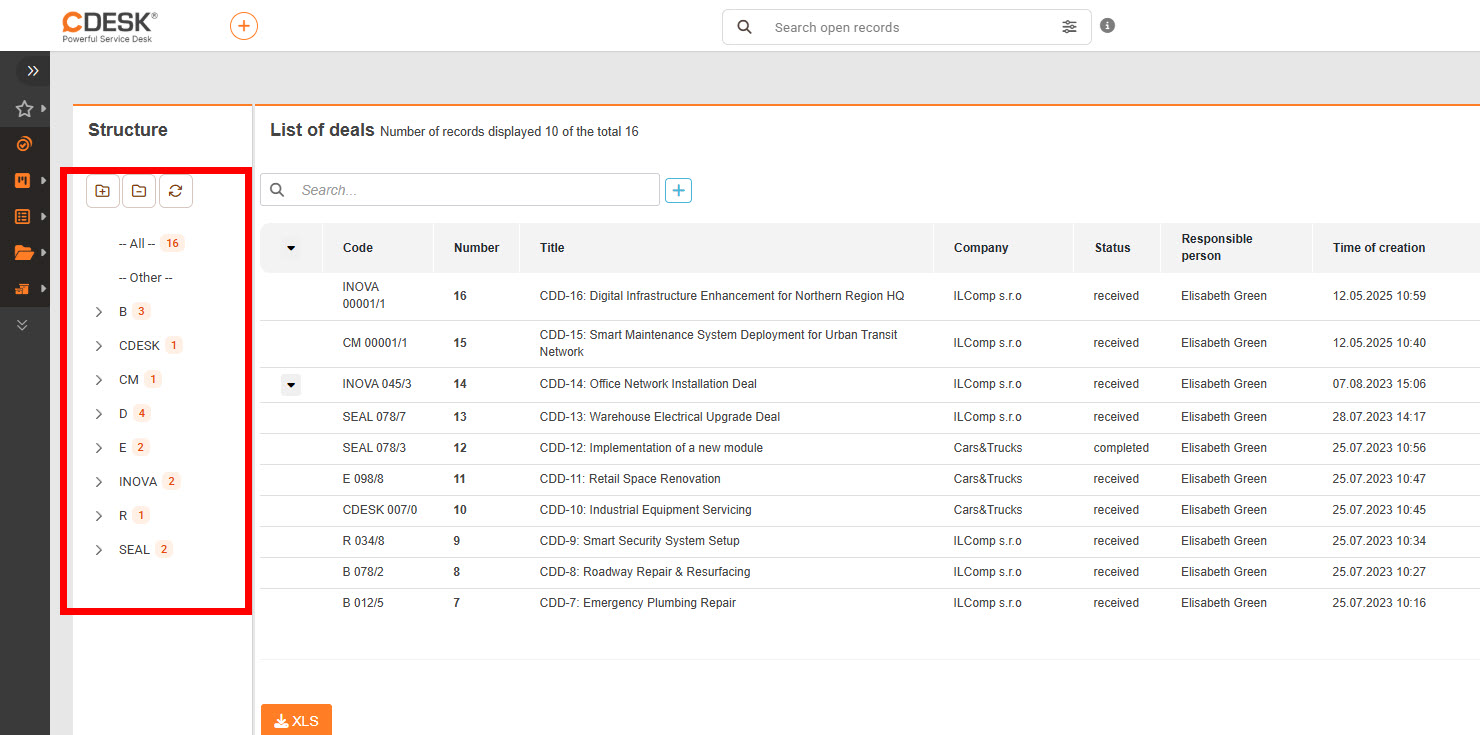
Visualization of the list of deals in a folder structure
The Deals module has been enriched with a new folder structure. By arranging items in a visual scheme, you gain a better overview of your deals. You can assign a code to deals, which will divide them into folders. The placement into folders is determined by the first letter (word), and the placement into subfolders is determined by the number after the slash.
In Global Settings > Deals > Basic Settings, the „Display in Address Book Structure“ field has been added. This field offers two values: Disabled or By Deal Code: Folder (letters A-Z), Number (0-9) / Subfolder (0-9). This field will not be available to the user if the „Automatic Code Generation“ toggle, located above, is activated. Deals with automatically generated codes will be placed in the structure under the label „Other.“ If you use custom code formats, contact us, and we will help you integrate them into CDESK.
You can assign a code to a deal based on the above pattern. For example, creating a deal with the code „A 001/1“ will display a new folder „A“ with a subfolder „1“ in the directory structure. Next to each folder and subfolder, the number of included deals is also displayed. When creating deals, be aware of the following situations:
- If the code is created differently than the specified scheme, no folder will be created. The deal will be counted in the total number of deals but will not be included in the address book structure.
- When creating a new deal with a code, the system checks for duplicates. If a deal with the same code exists, you will be notified.
At the top of the address book structure, there are three new buttons: Expand All, Collapse All, and Reload. After any change in the deal list, you must click Reload to synchronize the structure with the list and create/remove folders and subfolders.
Option to exclude „Fixed price“ billing items in fulfilments
The „Fixed Price Fee“ type of work can be disabled for fulfilments. This is done using the „Available in Fulfilments“ toggle in the billing item details. Toggling it will disable the option to select this billing item when recording a fulfilment.

Central Search
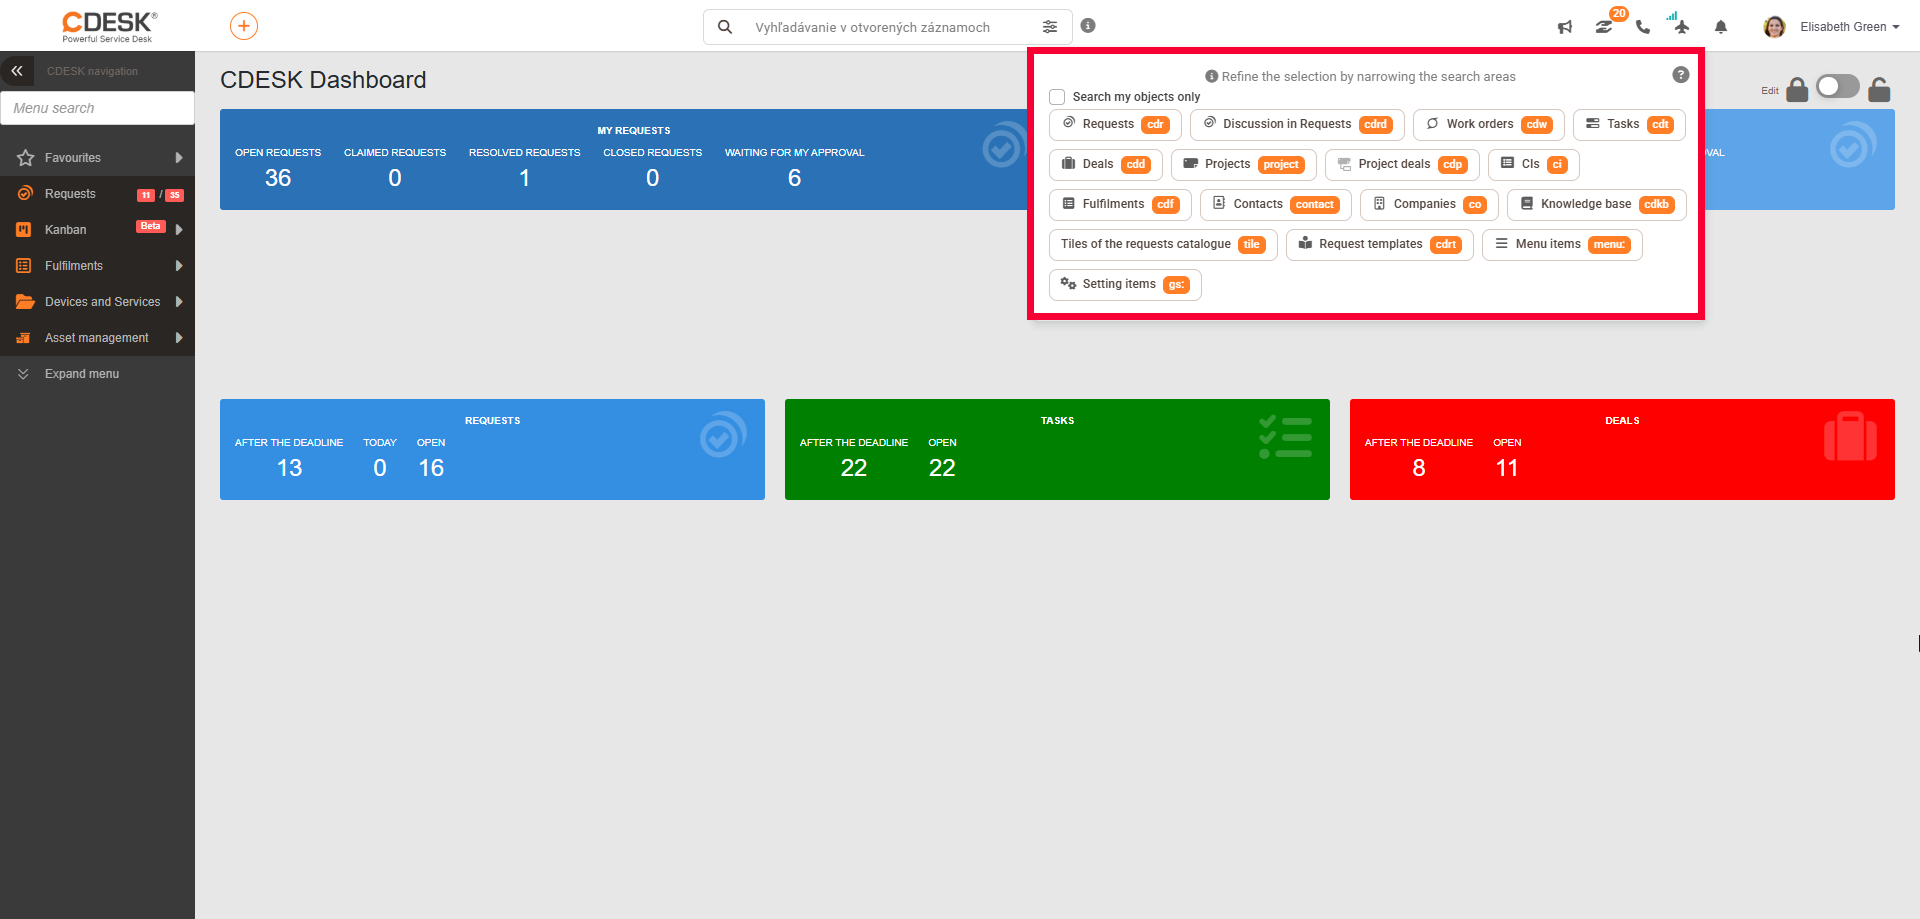
Faster central search in basic field
Searching for objects is now faster as only open objects are searched by default. To include completed objects in the search, users must open the central search modal window (by clicking into the field and pressing Enter) and select this option.

If no keywords are entered, the search will cover modules designated for this type of search. The list of these modules can be found under the „i“ symbol to the right of the search field. In version 3.2.7 these are:
- Requests
- Work Orders
- Tasks
- Deals
- Projects
- Project Deals
- Items (CI)
- Fulfilments
- Contacts
- Companies
- Knowledge Base
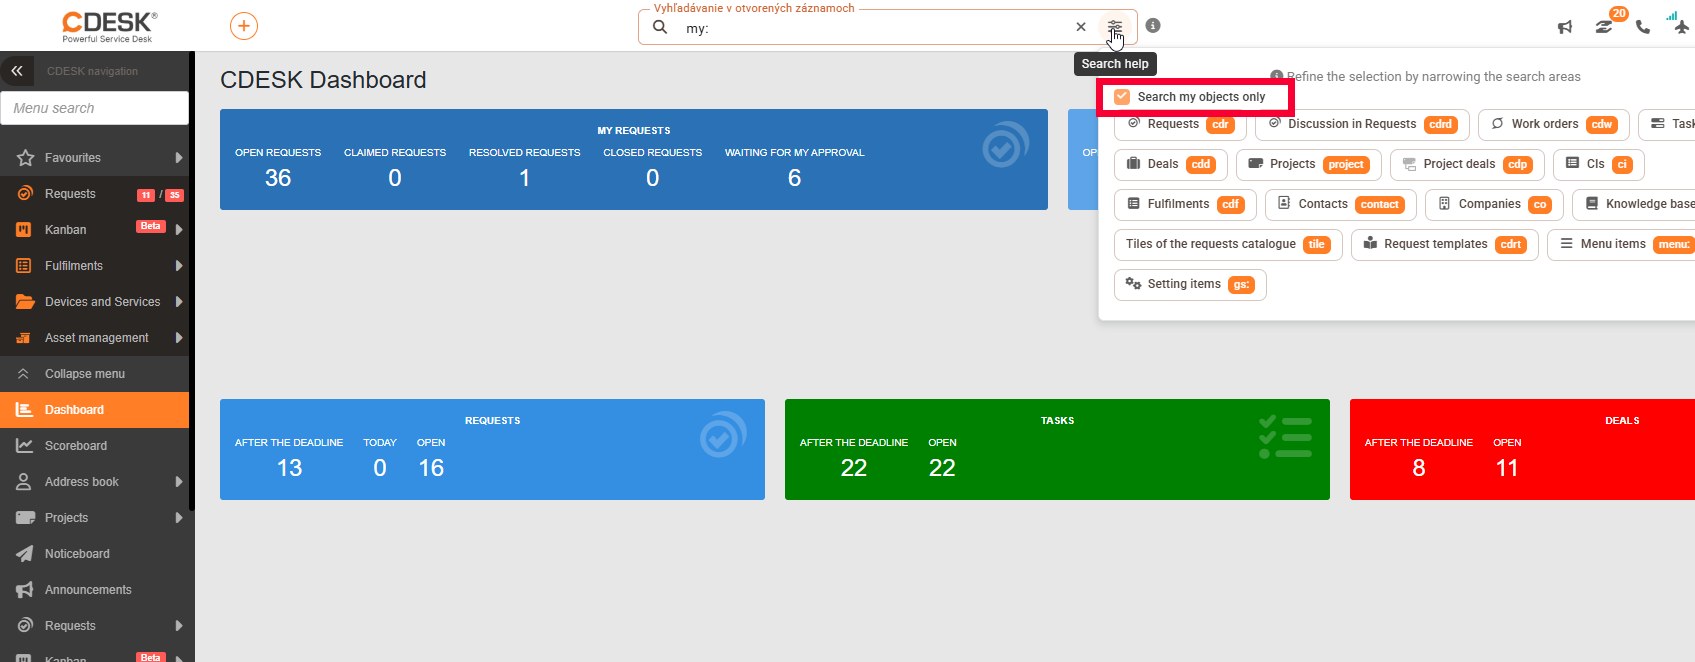
Filtering personal objects in central search using „my:“ prefix
When entering „my:“ at the beginning of the search field or selecting „Search only my objects“ in the helper window, the search will be limited to personal records.
When selecting modules in the helper window, additional abbreviations will be added to the prefix (e.g., cdr for requests, cdt for tasks). This allows direct searching among personal objects of that type or entering a name/expression to specify and narrow the search.
Fulfilments and projects in central search
Search now includes fulfilments and projects. This is indicated by the central search helper component which lists all searchable modules and address books along with their codes.
Address Book
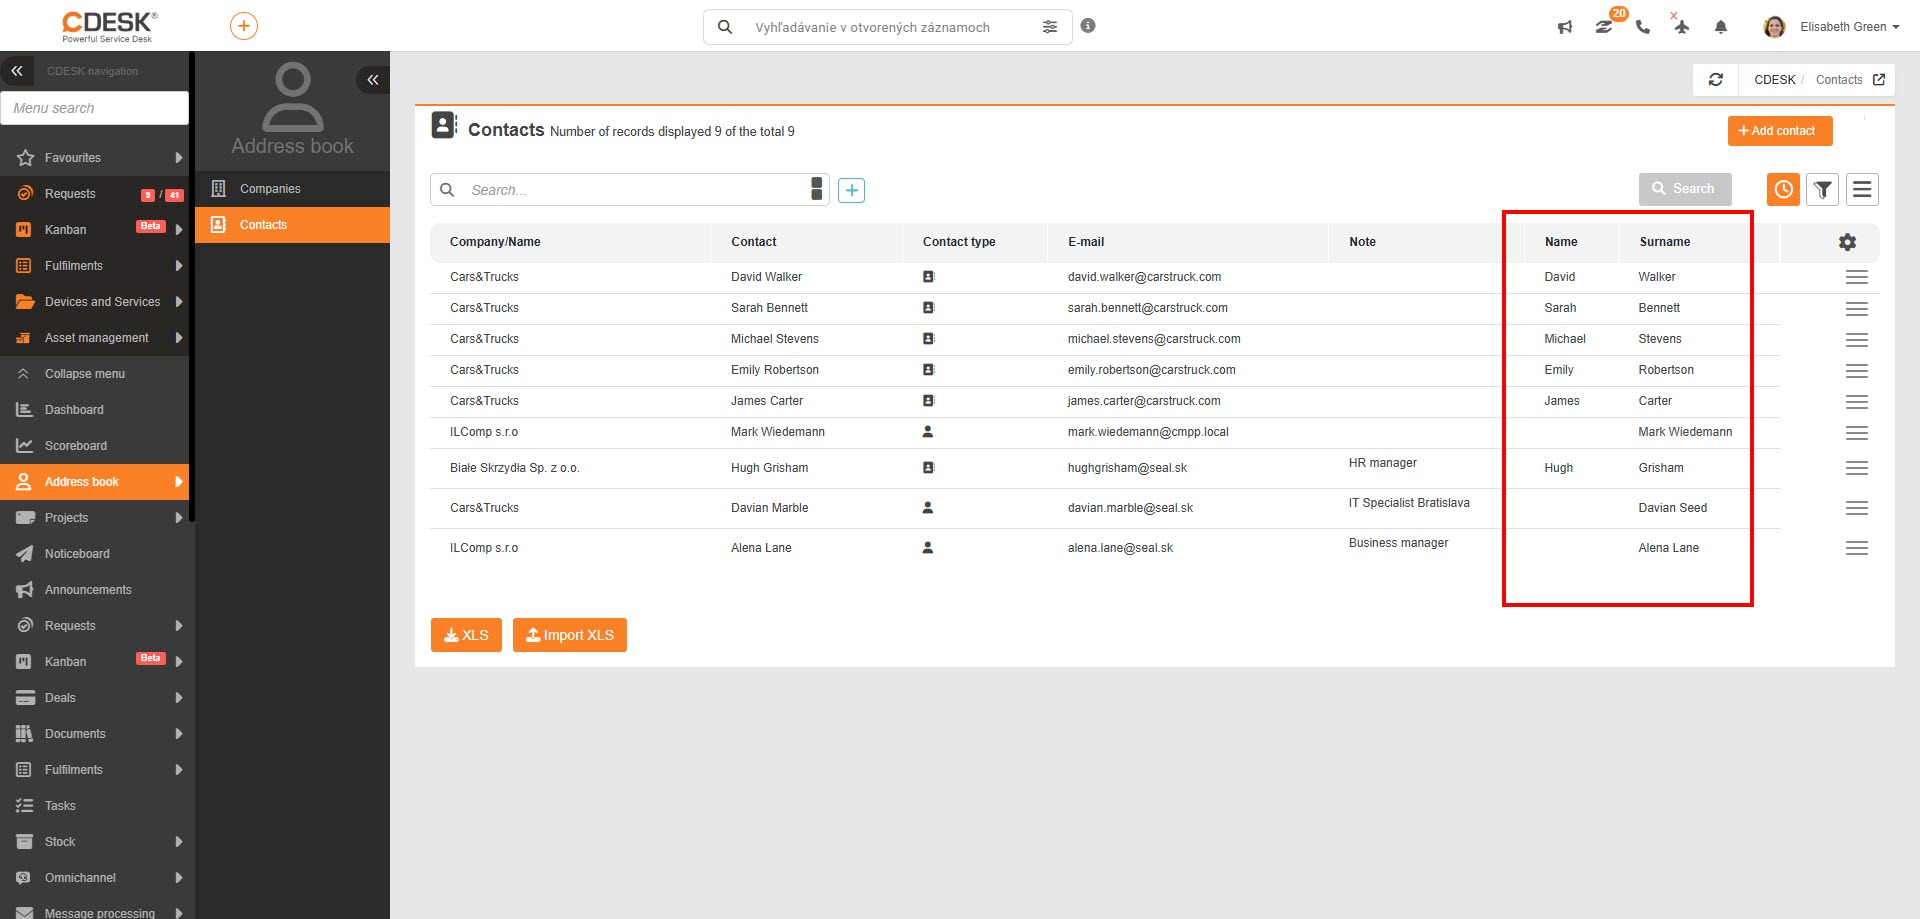
New „First Name“ and „Last Name“ columns in list of contacts
The name field in contacts list has been split into First Name and Last Name columns. This is the first phase of separating names into first/last name components. For customer accounts, names remain in a single field but will be separated in future updates. Contacts without a link to a customer account are recorded by first name and last name. Both columns can be included in contact list exports.
Approval
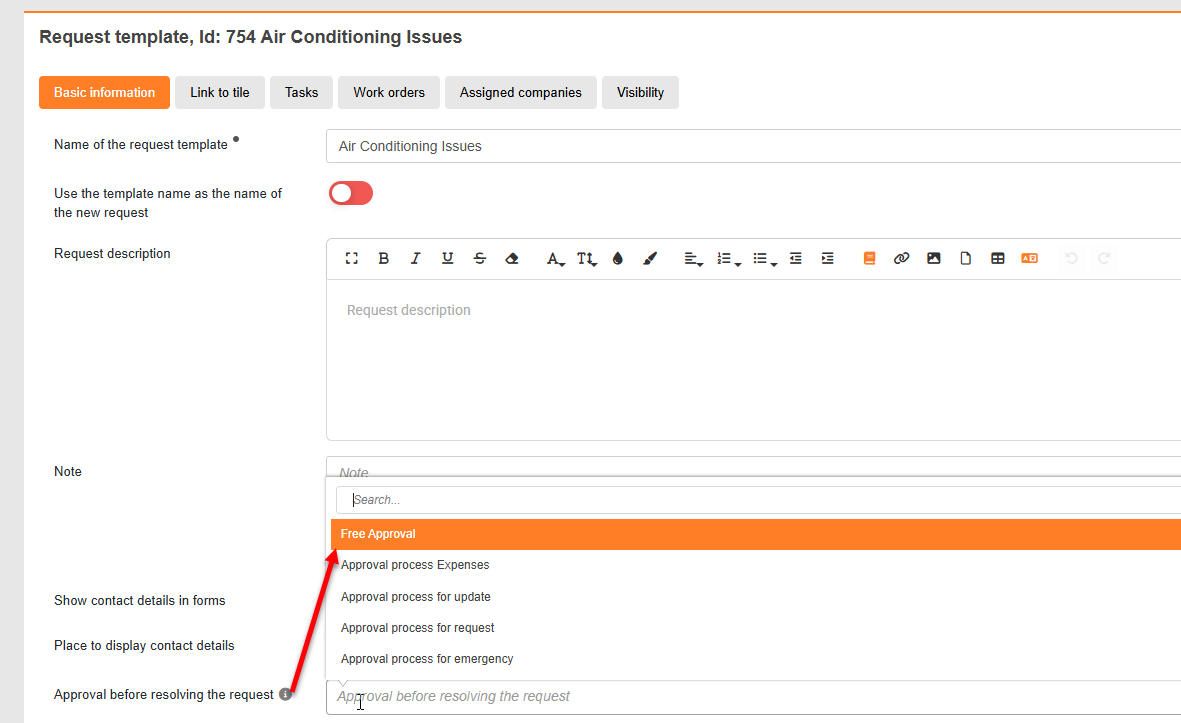
Free approval before request resolution
Version 3.2.7 introduces free approval as an option for pre-resolution request approval. In free approval mode, all approvers assigned to the APP group are available. This allows request submitters to select their preferred approver from all available options.
Configuration is done in individual templates under the „Approval before request resolution“ field.
Message Processing
Company assignment based on contact, set via rule
Objects created by message processing rules now automatically inherit the company associated with the email sender. This requires the sender to be recognized and have an assigned company. If multiple companies are assigned, the first found company will be selected.
This feature must be enabled per rule under Message Processing > Processing Rules > Action tab by selecting „Automatically by sender’s customer account“ in the Company field.

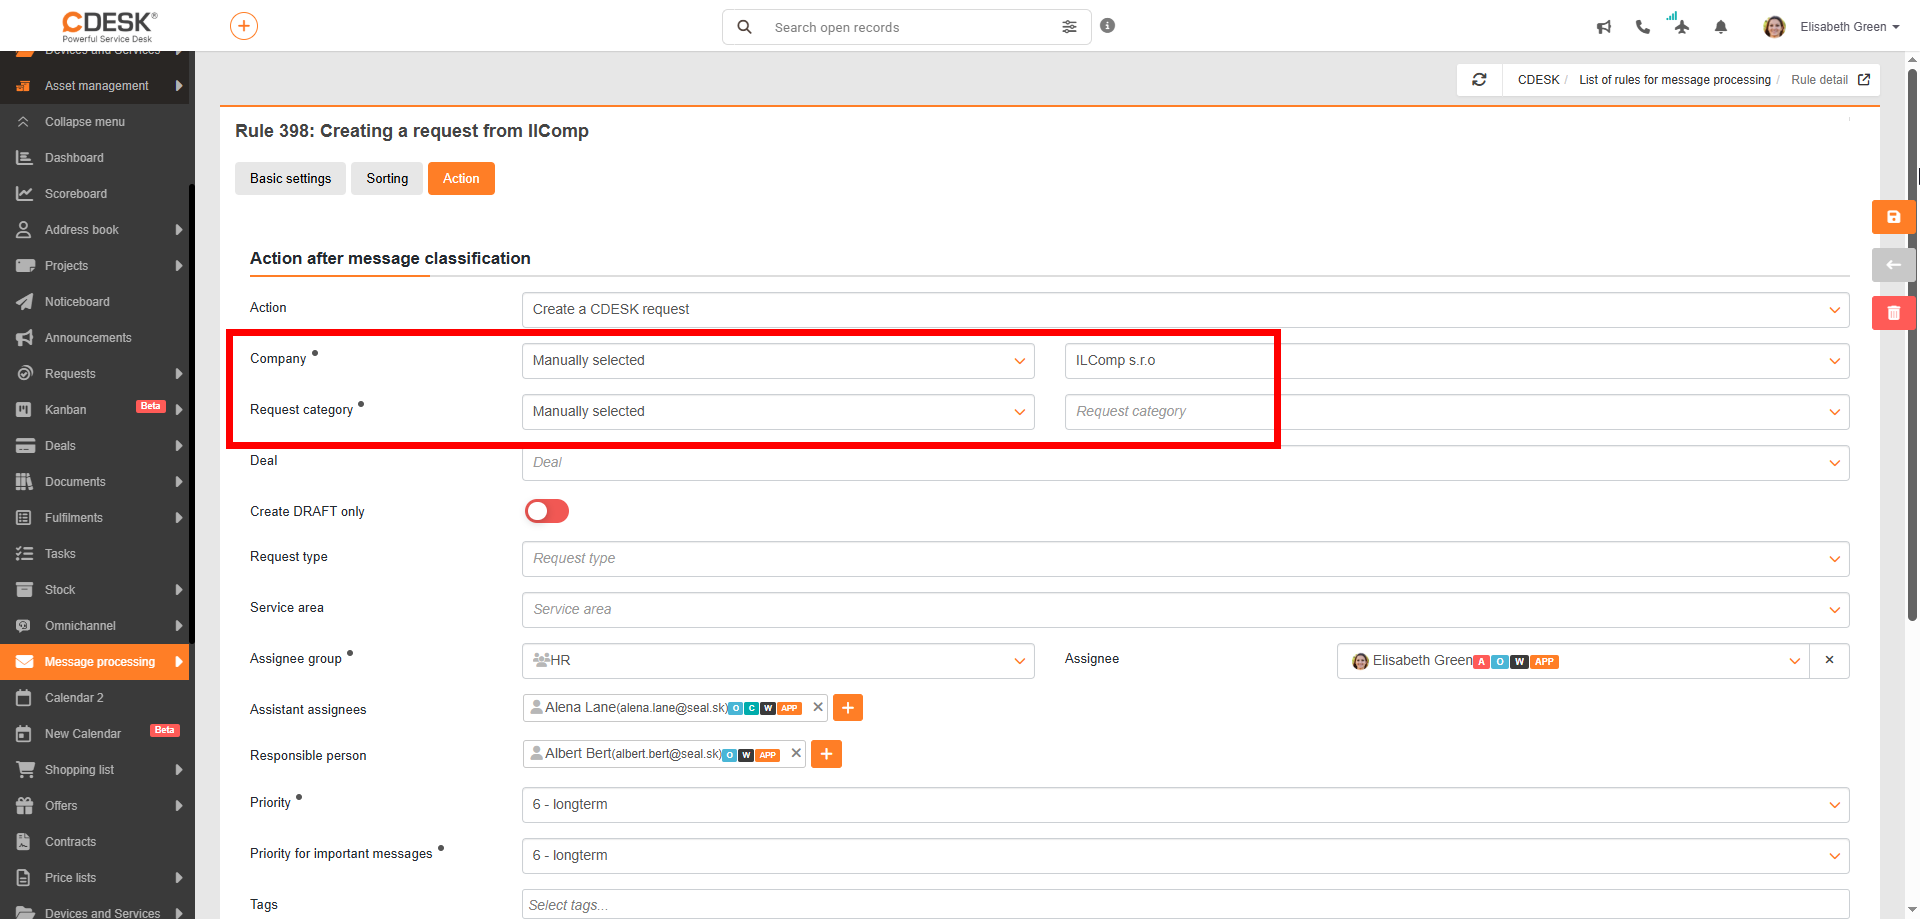
Adding request categories to message processing rules
When message classification creates a CDESK request, the rule can now specify a request category from all available environment categories. Categories can also be automatically assigned based on the sender’s customer account.
CDESK-JIRA Integration
Automatically fulfilment creation from Jira worklog
Worklogs in Jira are transferred via connector to CDESK where corresponding fulfilments are created in linked requests. Fulfilments inherit:
- Assignee – Linked Jira account that created the worklog
- Time – „From“ and „To“ based on creation time and duration
- Description
Other fields require manual completion. This requires CDESK-Jira account pairing with fulfilment creation permissions. When activating, you also specify fulfilment type (internal or billing). Synchronized fulfilments in CDESK are linked to the parent request and visually marked.
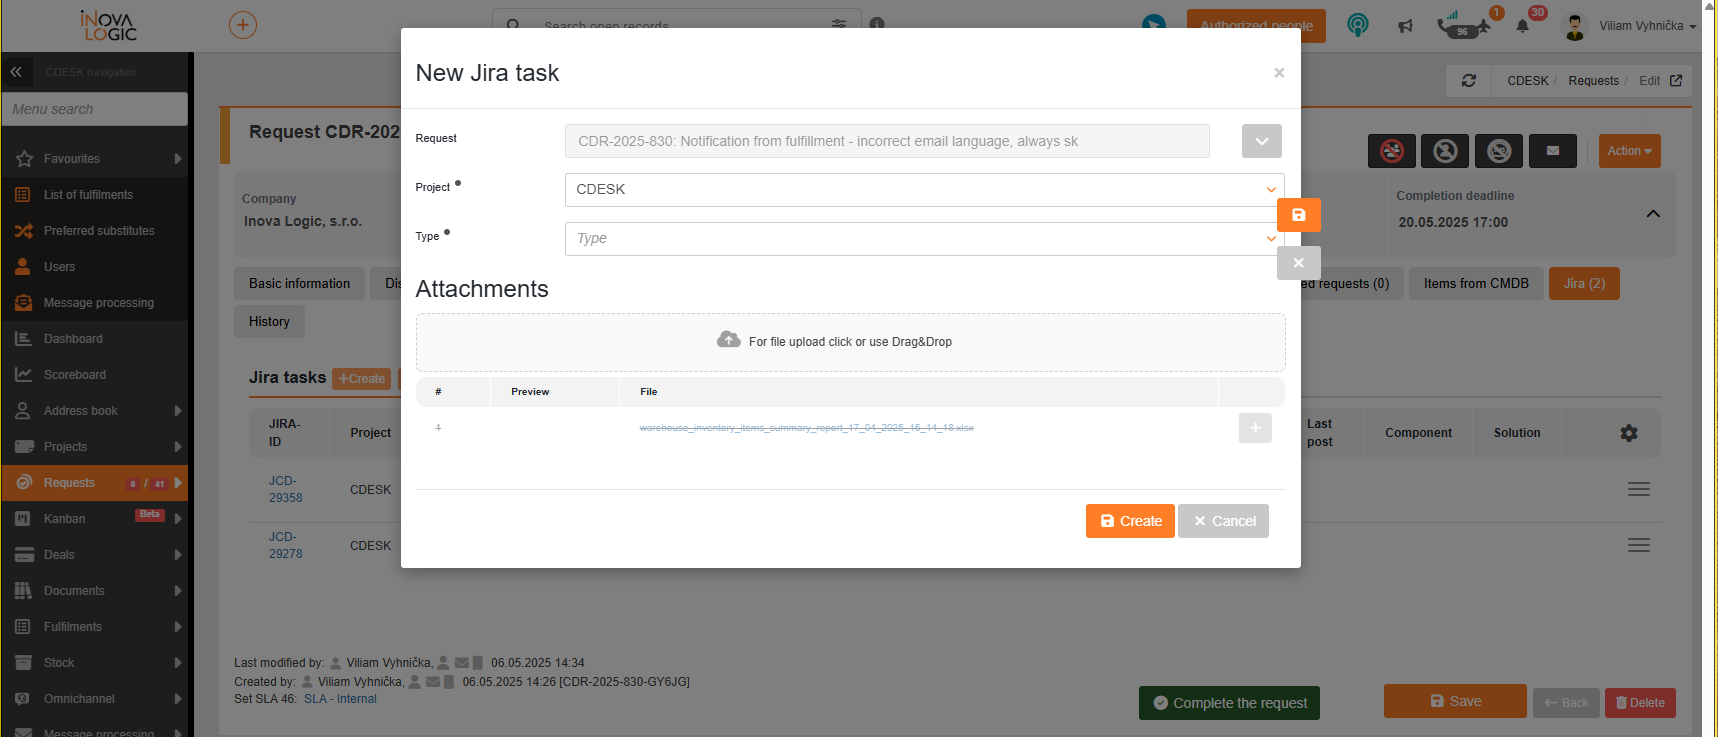
Attachment sending adjustment for Jira connector
In previous versions, attachments from CDESK requests were already automatically transferred to the Jira system. Users still have the option of marking attachments that should not be transferred to Jira. Version 3.2.7 modifies how these attachments are removed in Jira.
Previously, deleted attachments were completely removed from Jira forms. Now, clicking the trash icon keeps the attachment in the form (marked as deleted) allowing later restoration by clicking the button again.
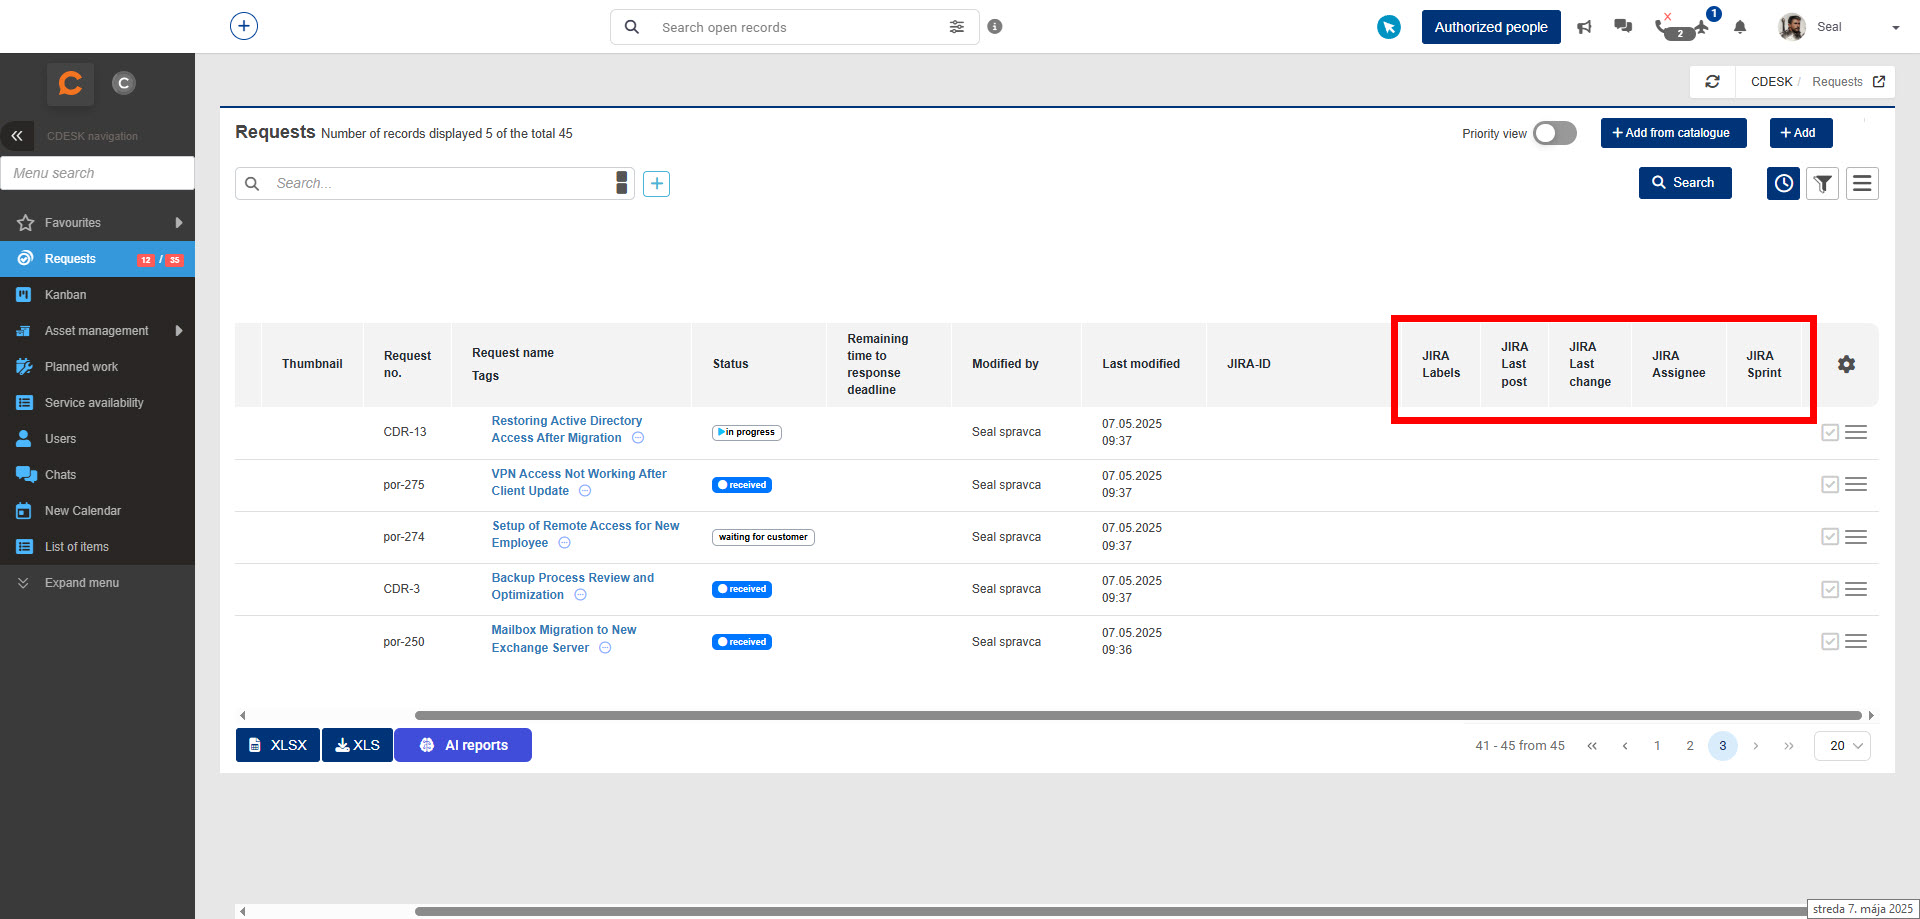
New Jira fields in request list: JIRA Label, JIRA Sprint, Last Post, Assignee, Last Change
Additional fields from the Jira environment have been transferred to CDESK in the form of columns in the requests list. The JIRA Label, JIRA Sprint, Last Post, Assignee and Last Change columns can be included in exports and used for filtering.
Users and Groups
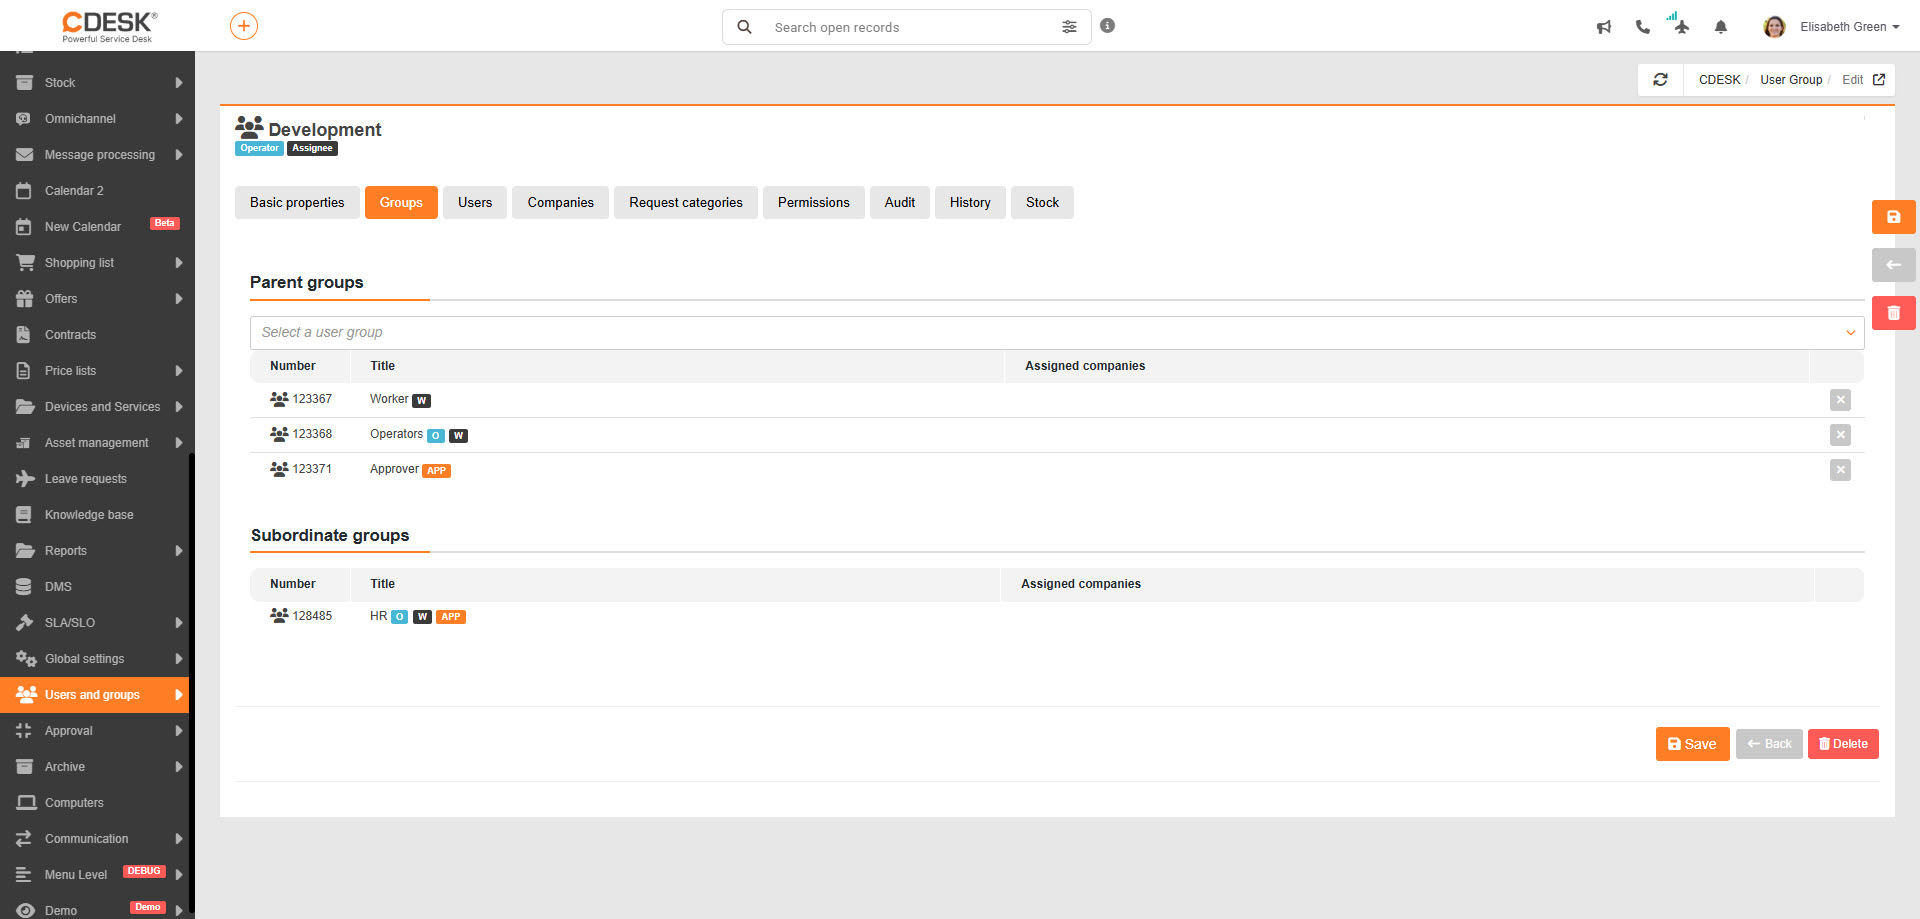
Subgroups added to Groups tab
The group interface now shows both parent and child groups. Navigate to Users and Groups > Groups where the „Parent Groups“ tab has been renamed to „Groups“ displaying both hierarchies. Groups can be added/removed here, with clickable child groups opening their details.
Disabled users logged out from all devices
Building on version 3.2.6’s ability to disable active users (even with assigned objects), version 3.2.7 adds forced logout from all devices when disabling a user, revoking all CDESK access.
Password change/reset blocking for users
Administrators gain more control over password management. In Global Settings > Users, a toggle has been added that allows you to globally block or enable password change/reset for all users on the environment. However, it is still possible to individually enable password changes for individual users.
We recommend blocking password changes when using Office365 login with multi-factor authentication, as users previously could bypass MFA via „Forgot Password“ CDESK resets.
The user list now shows password change status in new „Allow password change“ column with three states:
- Yes
- No
- By Global Settings (Yes/No)
This selection is made in the user details, under the General Settings tab.
Notifications
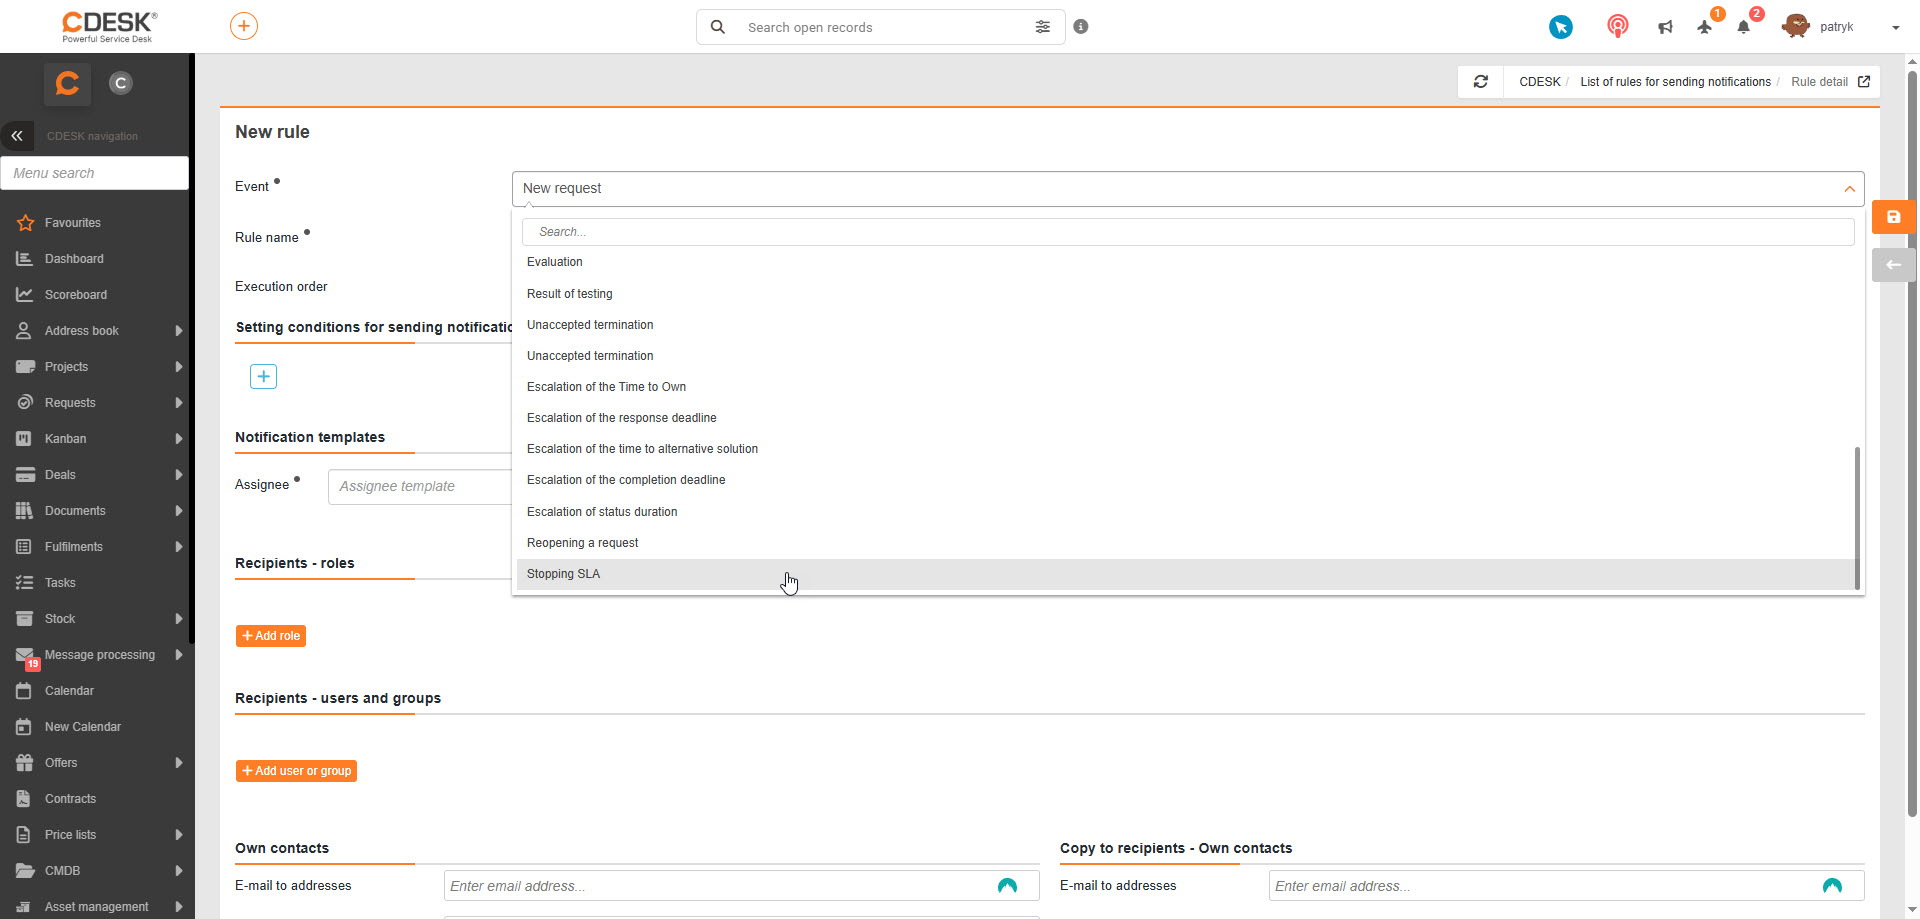
New „SLA Pause“ event in request notification rules
Requires activation of new Request Notifications via Global Settings > Other > „Notification sending rules“ toggle.
Notification rules now include „SLA Pause“ event that stops deadline counting. This applies only to open requests, allowing conditions and templates for assignee/customer notifications. Notifications include the pause reason (listed in changes summary).
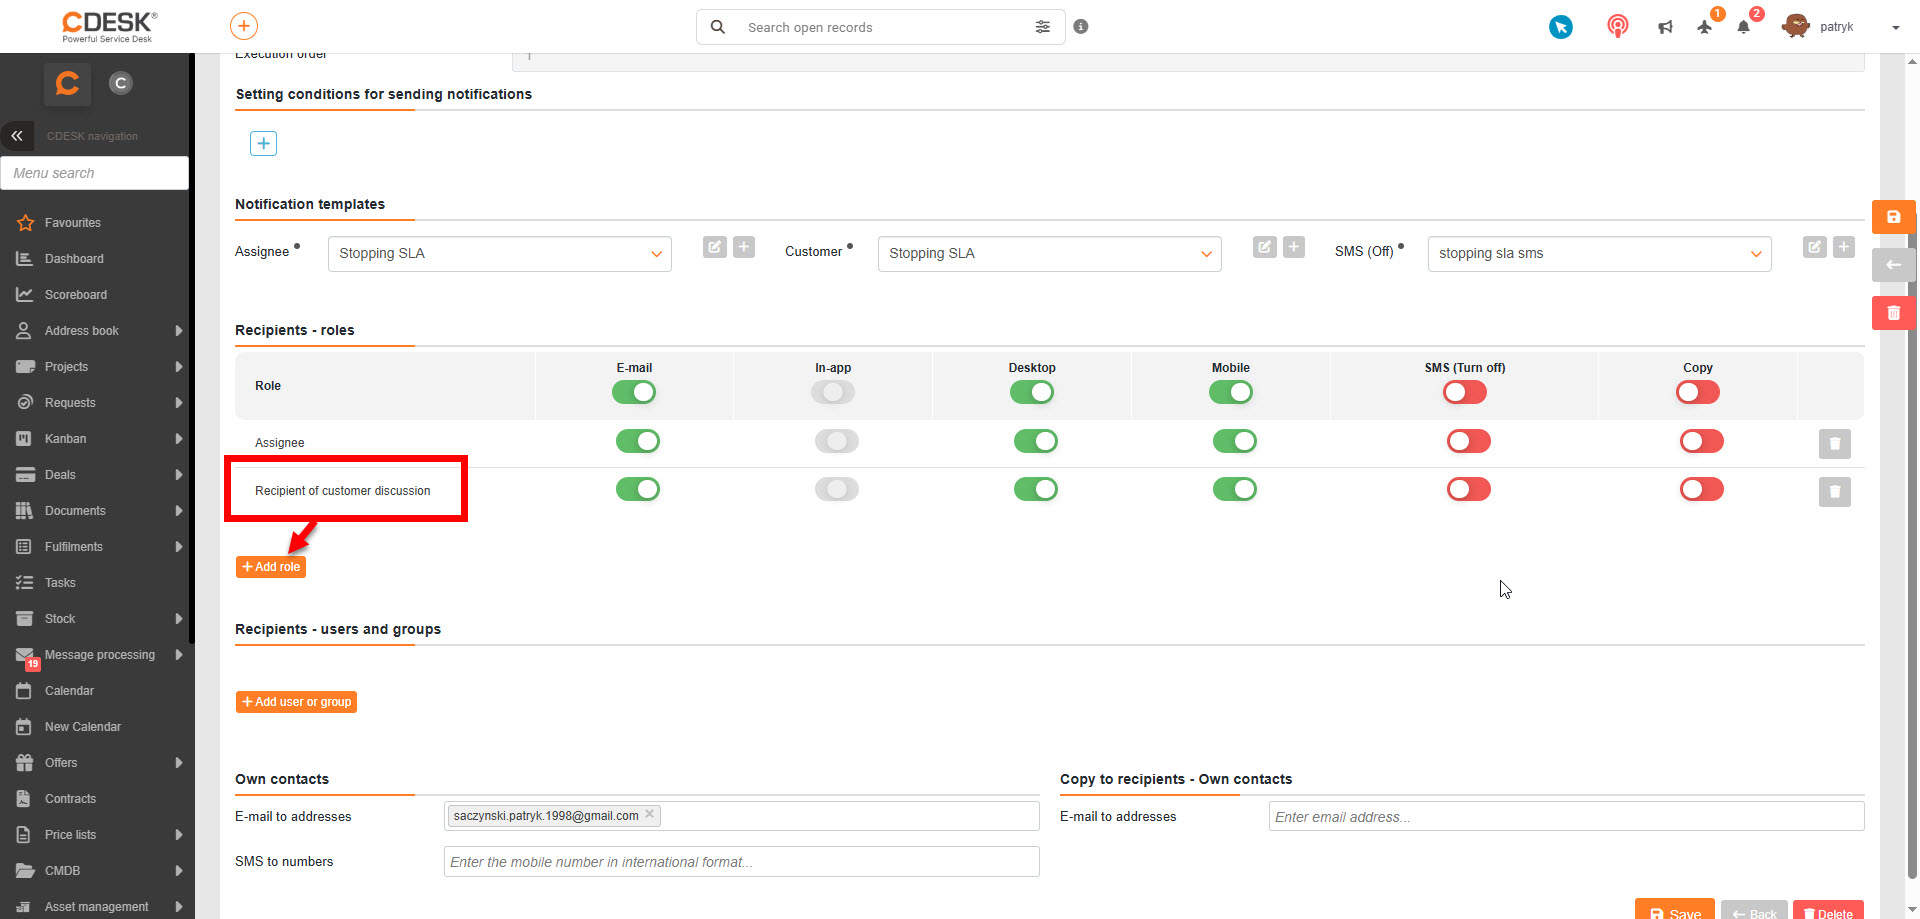
„Customer Discussion Recipient“ role
Only valid if your environment has new Request Notifications enabled. To enable these, toggle the Notification Sending Rules toggle in Global Settings > Other.
In the rule for sending notifications, the user can select „Recipients of customer discussion“ in the „Recipients – roles“ section. All current recipients of the customer discussion will thus become notification recipients.
CDESK Access via MS Entra ID
Domain control separated by portal environment
With connectors for authentication via MS Entra ID or Google, it is possible to allow companies to create user accounts based on their email addresses or domains. Until now, however, the rule was that the same domain could not be used across multiple companies within a single server. Version 3.2.7 limits this control to a single environment defined by a portal domain. This means that a customer can reuse the same address/domain to create user accounts in different environments on the same server.
Automatic data completion when creating customer accounts
When you create a new customer account through your Office 365 account, the details are automatically filled in:
- First Name
- Last name
- Mobile
- Phone
To use this feature, you need to enable account creation within the environment. This setting can be found in Global Settings. This new feature also simplifies access to CDESK for your customers.
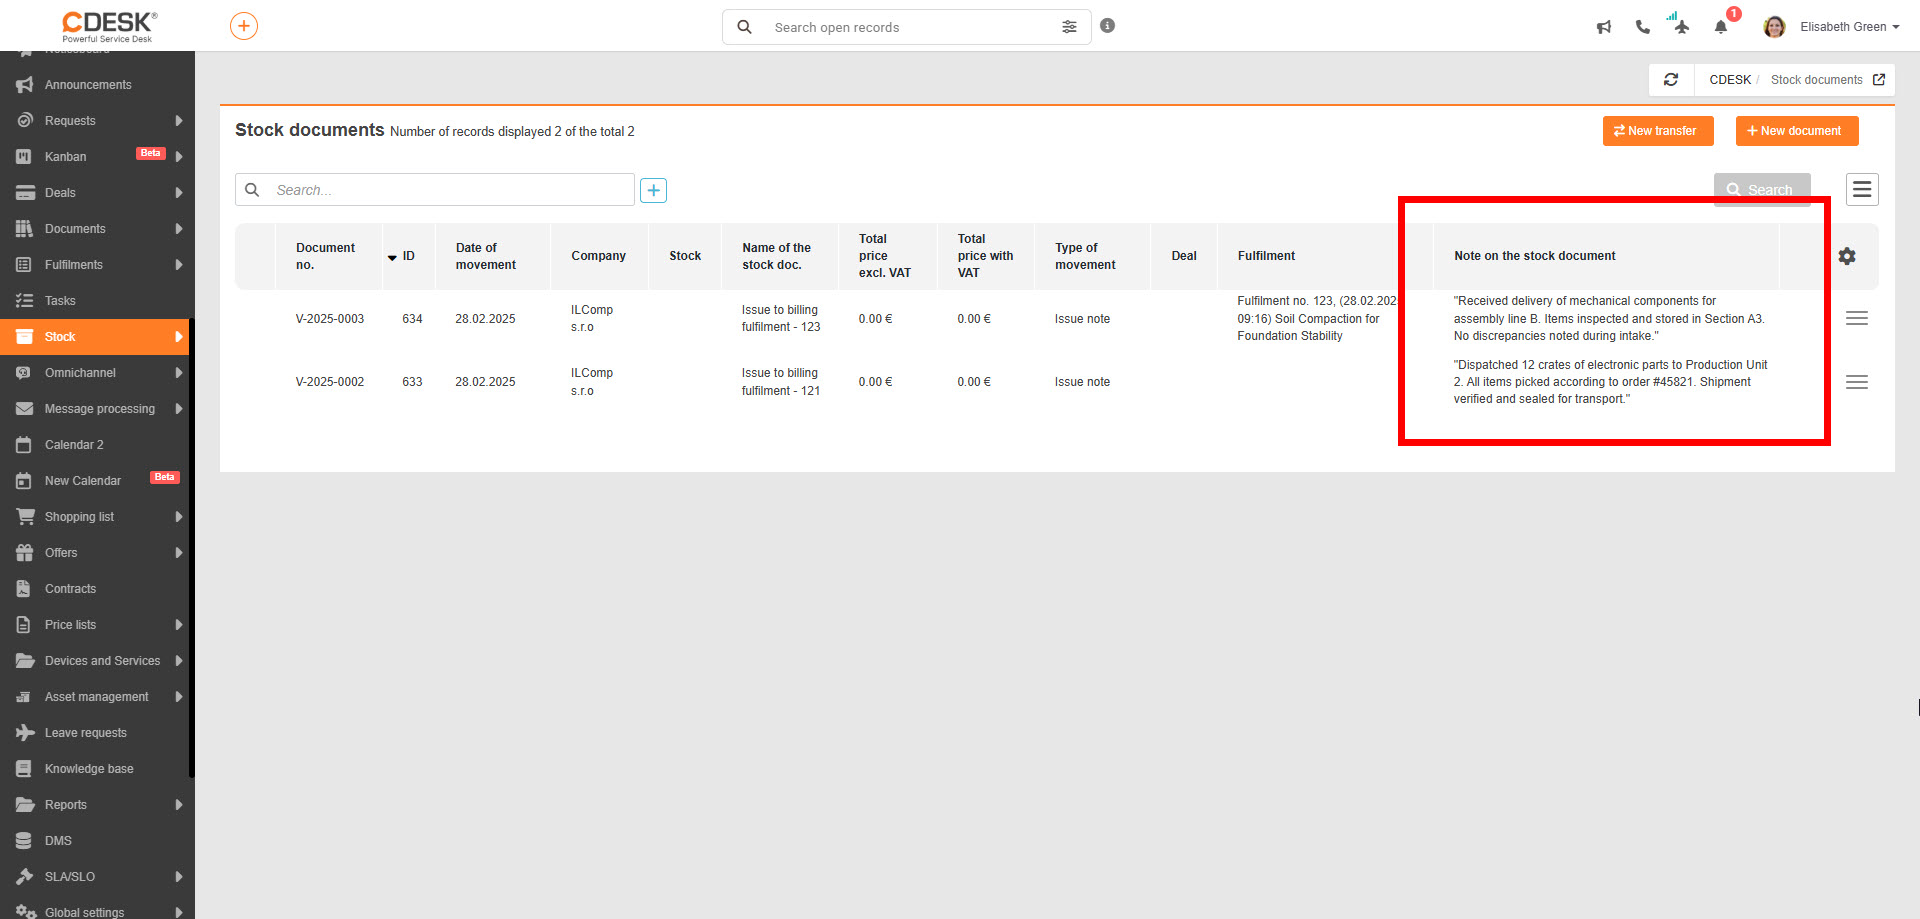
Stock
Added new „Note on the Stock Document“ column for stock documents
The note in the stock document detail has its own column „Note on the stock document“ in the list of stock documents. In it, the note is displayed in its full length.