REQUESTS - SETTINGS
Page content
- General
- Request deadlines
- Request priority
- Prioritization of requests according to Urgency and Impact
- Objects from the CMDB
- Reasons of request completion
- Methods of resolution at the completion of requests
- Causes for the request
- Message for the new asssignee
- Additional properties
- Default filters in the list of requests
Requests
General
Enable Requests module – turn the switch on ![]() to access other module settings. After saving the settings and refreshing the page (using the F5 key, or the combination CTRL + R), the module is accessible in the main menu.
to access other module settings. After saving the settings and refreshing the page (using the F5 key, or the combination CTRL + R), the module is accessible in the main menu.
Allowed request kinds – Helpdesk is always on by default. If you use the Customer Monitor -> Print server functionality, the Order and Claim options become available as well. For now, just use the Helpdesk option.
Enable linking between requests – if the switch is on ![]() , you will be able to register additional requests in the request that are connected to it.
, you will be able to register additional requests in the request that are connected to it.
Default visibility of the request – Regular / Internal. Select how visible the request will be when you enter it. The Regular one is accessible to customer accounts, whereas the Internal is hidden from them. You can change the visibility when entering the request or when later editing.
Insert the list of fulfillments to the email about completed requests – if the switch is on ![]() , the e-mail notification of the request completion will also contain a list of fulfillments.
, the e-mail notification of the request completion will also contain a list of fulfillments.
Reset the Request ID at the beginning of the year – if the switch is on ![]() , the request identification number is automatically reset at the beginning of the year. When this feature is enabled, the request ID is in the format yyyy – the serial number of the request in the year. For example, the first request created in 2021 will have an ID: 2021-1. When this feature is disabled, the request ID is based on the number of requests.
, the request identification number is automatically reset at the beginning of the year. When this feature is enabled, the request ID is in the format yyyy – the serial number of the request in the year. For example, the first request created in 2021 will have an ID: 2021-1. When this feature is disabled, the request ID is based on the number of requests.
Select assignee´s assistant – off / on – this option allows to assign also assignee´s assistants or groups in addition to the assignee. These are also notified of any changes to the request and they can work with the request as assignees. The assignee´s assistant field is subject to permissions and you can enable / disable it for certain users or groups in CDESK (Permissions: Requests-> Access to fields-> Assignee´s assistant).
Enable discussion – if the switch is on ![]() , you can have a discussion in the request, primarily between operators and customers. More information about the discussion in the request is given in this text. The Discussion field is subject to permissions and you can enable / disable it to certain users or groups in CDESK (Permissions: Requests-> Access to fields-> Discussion).
, you can have a discussion in the request, primarily between operators and customers. More information about the discussion in the request is given in this text. The Discussion field is subject to permissions and you can enable / disable it to certain users or groups in CDESK (Permissions: Requests-> Access to fields-> Discussion).
Select the responsible person – disabled / optional / obligatory – this option allows to assign to the request a responsible person who is responsible for the results of the assignees and is notified, for example, in case of non-compliance with deadlines. The Responsible assignee field is subject to permissions and can be enabled / disabled to certain users or groups in CDESK (Permissions: Requests-> Access to fields -> Responsible assignee).
Request from – disabled / optional / obligatory – this option allows you to select from the address book the contact who asked for the request. When selecting the optional or obligatory option, a code list becomes available that contains the options: CDESK users / CDESK users assigned to the company.
- CDESK users – when entering the request, you can select all users registered in the Users module
- CDESK users assigned to the company – when entering the request, you will be able to select all users who are assigned to the company selected in the request.
The Request from field is subject to permissions and can be enabled / disabled to certain users or groups in CDESK (Permissions: Requests-> Access to fields-> Request from).
For whom – this setting is available if you select the optional / obligatory options in the Request from settings. In the settings you can find options: disabled / optional / obligatory. This option allows you to select a contact from the address book of companies and the address book of contacts for the request. When selecting the optional or obligatory options, the code list with the following options is made available: Only CDESK users / CDESK users + free text / Only subordinate users of CDESK.
- Only CDESK users – when entering the request, you can select all users registered in the Users module
- CDESK users + free text – when entering the request, you can select all users registered in the Users module and you can enter any person manually.
- Only subordinate users of CDESK – when entering the request, you can select only users who are subordinate to you.
The For whom field is the subject to permissions and can be enabled / disabled to certain users or groups in CDESK (Permissions: Requests-> Access to fields-> For whom).

Enable the branch selection – when the switch is on ![]() , selection of the customer’s (company’s) branch becomes available in the request, for which, for example, other SLA terms may apply. The option is available if at least one branch assigned to the customer (company) is defined in the CMDB. Learn more about the CMDB and its configuration in the CMDB documentation. The branch field is subject to permissions and can be enabled / disabled to certain users or groups in CDESK. (Permissions: Requests-> Access to fields-> Branch).
, selection of the customer’s (company’s) branch becomes available in the request, for which, for example, other SLA terms may apply. The option is available if at least one branch assigned to the customer (company) is defined in the CMDB. Learn more about the CMDB and its configuration in the CMDB documentation. The branch field is subject to permissions and can be enabled / disabled to certain users or groups in CDESK. (Permissions: Requests-> Access to fields-> Branch).
Enable the place selection – when the switch in on ![]() , this option enables to choose the location of the customer (company) in the request, which helps technicians to more easily find the location of the object related to the request, for example reception, server room, etc. The option is available if at least one location assigned to the company is defined in the CMDB. You can read more about CMDB and its configuration in the CMDB article. The location field is subject to permissions and can be enabled / disabled to certain users or groups in CDESK. (Permissions: Requests-> Access to fields -> Location).
, this option enables to choose the location of the customer (company) in the request, which helps technicians to more easily find the location of the object related to the request, for example reception, server room, etc. The option is available if at least one location assigned to the company is defined in the CMDB. You can read more about CMDB and its configuration in the CMDB article. The location field is subject to permissions and can be enabled / disabled to certain users or groups in CDESK. (Permissions: Requests-> Access to fields -> Location).
Turn on the implementation approval by customer – if the switch is on ![]() , you will not be able to fulfil the request unless approved by the customer. Additional settings are required for the customer to approve requests:
, you will not be able to fulfil the request unless approved by the customer. Additional settings are required for the customer to approve requests:
- On this tab, enable customer approval.
- Define at least one approval rule that belongs to the Approval for the request creation by a customer group.
- Grant the customer account the permission to approve the requests.
- In Global settings-> Requests-> Service types and areas set for which type of request the customer account can approve the implementation.
Limit the selection of assignees by the assignee group – this feature is available when the switch is on ![]() . When activated, the selection of assignees is divided into two fields: the obligatory assignee group and the optional assignee. Only assignees belonging to the selected assignee group are offered in the assignee field. This feature is disabled by default because activating it triggers the migration of assignee group settings from different parts of CDESK. This change is irreversible, so it is very important to think about turning it on! If you want to test this functionality, do so in the test environment. If you have mistakenly turned on the assignee selection according to the assignee group and you need to turn it off, contact our support. There is a charge for disabling this feature and restoring previous settings. The amount of the fee depends on the configuration you use.
. When activated, the selection of assignees is divided into two fields: the obligatory assignee group and the optional assignee. Only assignees belonging to the selected assignee group are offered in the assignee field. This feature is disabled by default because activating it triggers the migration of assignee group settings from different parts of CDESK. This change is irreversible, so it is very important to think about turning it on! If you want to test this functionality, do so in the test environment. If you have mistakenly turned on the assignee selection according to the assignee group and you need to turn it off, contact our support. There is a charge for disabling this feature and restoring previous settings. The amount of the fee depends on the configuration you use.
Use the solution field – if the switch is on ![]() , after saving the request, a text field is made available in the form where you can write a solution. The field is subject to permissions and can be enabled / disabled to certain users or groups in CDESK (Permissions: Requests-> Access to fields-> Solution).
, after saving the request, a text field is made available in the form where you can write a solution. The field is subject to permissions and can be enabled / disabled to certain users or groups in CDESK (Permissions: Requests-> Access to fields-> Solution).

Use the internal note field – if the switch is on ![]() , after saving the request, a text box will appear in the form in which you can enter a note. It will not be accessible to customer accounts unless you grant them permissions (Permissions: Requests-> Access to fields-> Internal Note).
, after saving the request, a text box will appear in the form in which you can enter a note. It will not be accessible to customer accounts unless you grant them permissions (Permissions: Requests-> Access to fields-> Internal Note).

Enable editing the description after saving – if the switch is on ![]() , the text box with the description of the request will be editable even after saving the request.
, the text box with the description of the request will be editable even after saving the request.
Edit requests before assigning – if the switch is on ![]() , you will be able to modify the request made for an assignee group until it is assigned to an assignee.
, you will be able to modify the request made for an assignee group until it is assigned to an assignee.

Request deadlines
Enter the response deadline – RT (Response Time) – this option allows you to register a response date when creating a request. This setting is on by default in CDESK and cannot be deactivated. However, you can set whether the value is required or optional. This value can be set as mandatory. The response deadline field is subject to permissions and can be enabled / disabled to certain users or groups in CDESK (Permissions: Requests-> Access to fields-> Date fields).
Enable to change the assignee after the missed time to response – if the switch is on ![]() , there is a field in the request form in which you can enter another assignee. He will be responsible for resolving the request if the original assignee misses the deadline to respond.
, there is a field in the request form in which you can enter another assignee. He will be responsible for resolving the request if the original assignee misses the deadline to respond.

Enabling this feature makes available in the request templates the field for choosing an assignee after a missed response.

The After missing Time to Response assign to field is subject to permissions and can be enabled / disabled to certain users or groups in CDESK (Permissions: Requests-> Access to fields-> After missing Time to Response assign to). It is inaccessible to customer accounts by default.
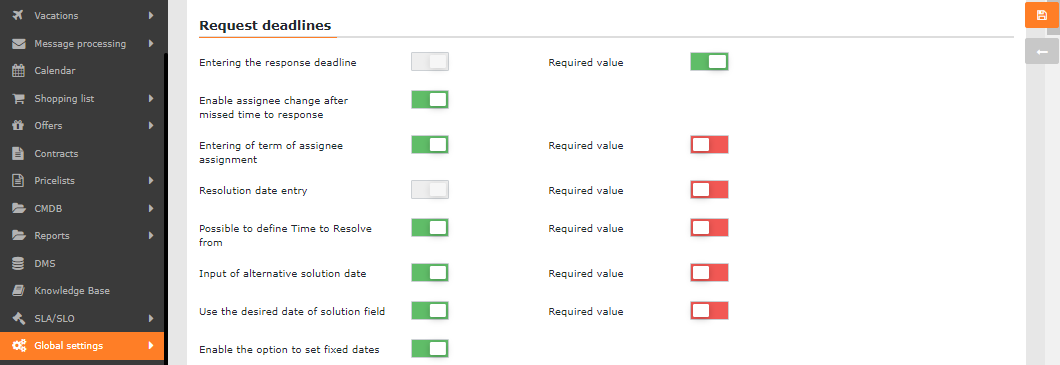
Enter the deadline for adding assignees – TTO (Time to Own) – the switch turned on ![]() adds to the monitored dates of the request a deadline until when the request must be assigned to a specific assignee. This value can be set as required.
adds to the monitored dates of the request a deadline until when the request must be assigned to a specific assignee. This value can be set as required.
Resolution date entry – TTR (Time to Resolve) – allows you to register the resolution date of the request. This setting is on by default in CDESK and cannot be deactivated. However, you can set whether it will be a required or optional value. The Resolution date entry field is subject to permissions and can be enabled / disabled to certain users or groups in CDESK (Permissions: Requests-> Access to fields-> Date fields).
Possible to define Time to Resolve from – allows you to register a date in the request, from when the request should start to be resolved. The time period from Time to resolve from to The resolution date is also displayed in the calendar. You can register this term in the request if the switch is on ![]() . This value can be set as required. The Time to resolve from field is subject to permissions and can be enabled / disabled to specific users or groups in CDESK (Permissions: Requests-> Access to fields-> Date fields).
. This value can be set as required. The Time to resolve from field is subject to permissions and can be enabled / disabled to specific users or groups in CDESK (Permissions: Requests-> Access to fields-> Date fields).

Input of an alternative solution date – TTAS (Time to Alternative Solution) – the switch turned on ![]() adds to the monitored terms of the request also the date until when it is necessary to deliver an alternative solution. This value can be set as required.
adds to the monitored terms of the request also the date until when it is necessary to deliver an alternative solution. This value can be set as required.
Use the desired deadline for solution field – the switch turned on adds the desired deadline to the monitored terms of the request. This is the deadline by which you want the request to be met. If this deadline is earlier than the Resolution date, no change is made in the request and it is at the discretion of the solver whether to shorten the resolution date. If this deadline is later than the Resolution date, the Resolution date will be automatically adjusted according to the desired deadline. This value can be set as required.
Enable the option to set fixed dates – the switch turned on ![]() allows to set fixed deadlines in the request. In such a case, the deadlines in the request will not be shifted even if it results from the set SLA. For example, in the status of Waiting for a customer, it is common for the resolution date to be postponed, but when this option is turned on, it will remain fixed and the request may be delayed even when the responsible person is the customer.
allows to set fixed deadlines in the request. In such a case, the deadlines in the request will not be shifted even if it results from the set SLA. For example, in the status of Waiting for a customer, it is common for the resolution date to be postponed, but when this option is turned on, it will remain fixed and the request may be delayed even when the responsible person is the customer.
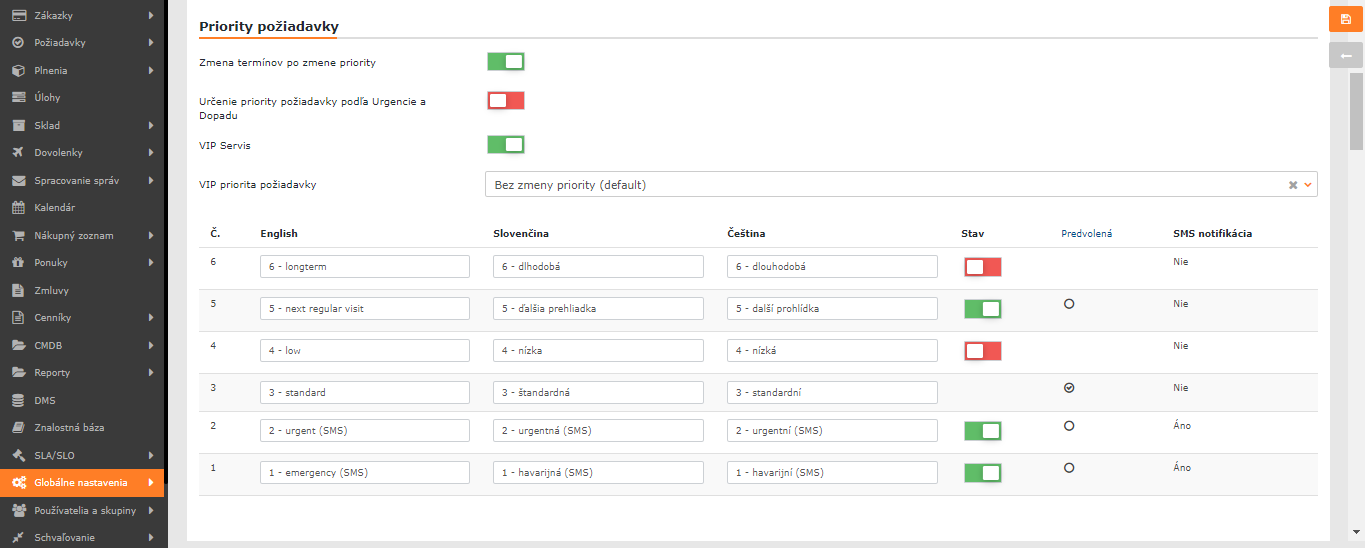
Request priority
Update deadlines after the priority change – if the switch is on ![]() when changing the priority of the request, the dates are recalculated according to the set SLA. The starting date for the calculation of new terms is the date of creating the request.
when changing the priority of the request, the dates are recalculated according to the set SLA. The starting date for the calculation of new terms is the date of creating the request.
Prioritization of requests according to Urgency and Impact – if the switch is on ![]() , the priority of the request is determined according to the urgency and impact completed in the request. You define the rules that determine the priority in the matrix in the Impacts of the request section. Click on the
, the priority of the request is determined according to the urgency and impact completed in the request. You define the rules that determine the priority in the matrix in the Impacts of the request section. Click on the ![]() icon to open a new window with request types. For each type of request, you will be able to set separately whether the urgency and impact input will be Disabled / Optional / Obligatory. To save the settings, use the Save button in the lower right corner.
icon to open a new window with request types. For each type of request, you will be able to set separately whether the urgency and impact input will be Disabled / Optional / Obligatory. To save the settings, use the Save button in the lower right corner.

VIP Service – if the switch is on ![]() , the requester with the VIP Service enabled in the Users and groups module can use the function called VIP Priority of the Request. The priority of the request changes according to the VIP Priority of the Request setting, even if the VIP user is listed in the Request from or For whom field.
, the requester with the VIP Service enabled in the Users and groups module can use the function called VIP Priority of the Request. The priority of the request changes according to the VIP Priority of the Request setting, even if the VIP user is listed in the Request from or For whom field.
VIP priority of the request – this setting becomes available after turning on the VIP service. You can define the priority of requests from the VIP users. The originally set priority of the request can be increased after saving according to the following code list:
- No change of priority (default) – the request priority does not change, the VIP sign is displayed in the request form, next to the Request from or For whom
- Increase priority by 1 level
- Increase priority by 2 levels
- Increase priority by 3 levels
- Highest priority
Configured request priorities and their naming – the choice of priority has a direct influence on the calculation of individual dates (response time – RT, time to resolution – TTR, or TTAS). Before launching CDESK in your environment, think carefully about what priorities and names to use. The default setting is as follows:
- 6 – long-term
- 5 – next regular visit
- 4 – low (off)
- 3 – standard (default)
- 2 – urgent (SMS)
- 1 – emergency (SMS)
Priorities can be freely named. For foreign language users, you can attach a translation to the languages that are turned on in the Global Settings-> Language Settings. CDESK automatically presets the default priority when creating a new request.
Not used priorities can be turned off in the Status column by moving the switch to the off position ![]() .
.
SMS notification – the assignee / assignee group is notified by an SMS message and / or PUSH notification in the mobile application of the new request with the priority 2 – urgent or 1 – emergency.
SMS notifications must be activated via settings in the Global Settings -> Connectors, API.
Sending SMS or PUSH notifications is enabled / disabled within the notification settings: Global Settings -> Notifications and User profile -> Notifications.
If you use a cloud service and the server settings within the SMS gateway settings in API Connectors, SMS services will be charged as part of the CDESK usage fees. If you choose your own settings, you must pay for sending the SMS yourself.
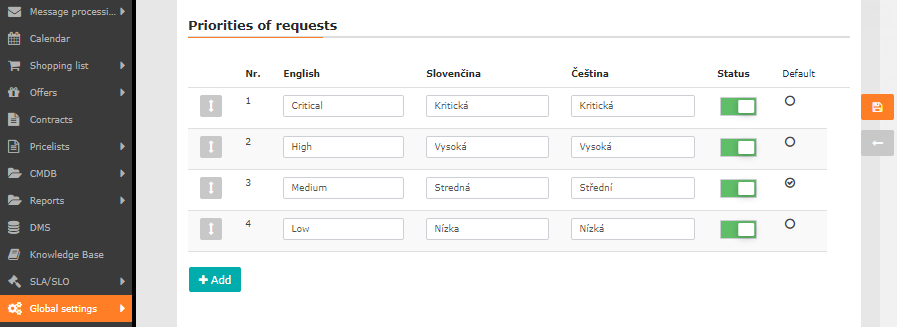
Prioritization of requests according to Urgency and Impact
The urgency of the request is entered by the customer when creating the request. Impacts are determined by the request assignee. Based on the selected urgency and impact, CDESK will automatically determine the priority of the request. You define the rule for the priority determination in the matrix below the list of impacts of the request.

You can only enter Urgency and Impact in the request if the function Prioritization of requests according to Urgency and Impact is turned on. Enabling this feature also makes available the settings for urgency and request impact.
CDESK contains four predefined urgency requests:
- Critical
- High
- Medium
- Low
CDESK contains four predefined impacts of requests:
- Extensive
- Significant
- Moderate
- Minor
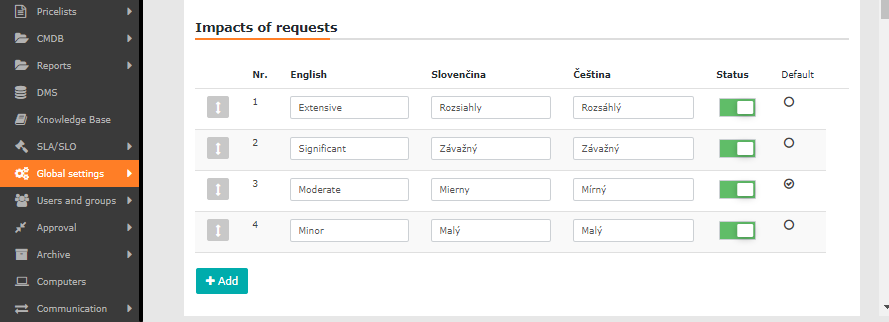
Items can be named as desired. For foreign language users, you can attach a translation to the languages that are turned on in the Global Settings-> Language Settings. CDESK automatically presets the default urgency when creating a new request.
Unused items can be turned off in the Status column by moving the switch to the off position ![]() .
.
Use the Add button to add your own item to the list. A new row is created in the list, where you can enter the name of the urgency. You can also define whether it is a default item. You can only set the custom item as default when you create it. Once saved, it can no longer be set as default.
Objects from the CMDB
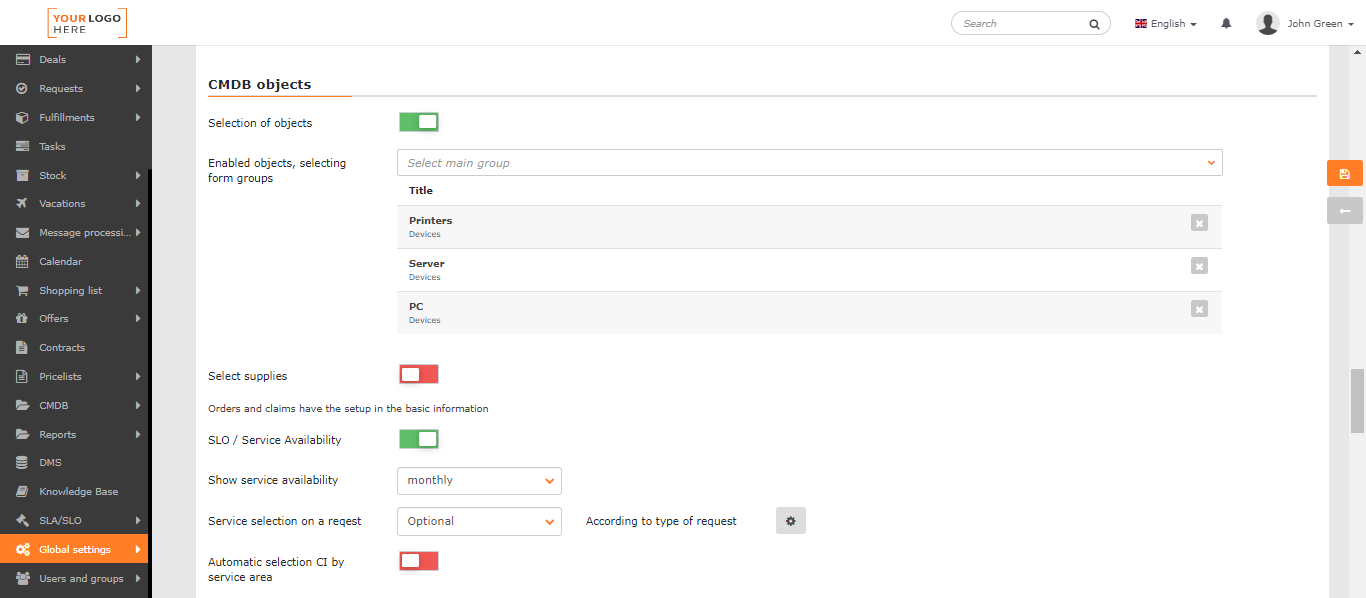
Selection of objects – turn the switch on ![]() and the button for adding objects to the request will appear on the right side of the request form. Only objects linked to the customer who was set up for the request will be offered.
and the button for adding objects to the request will appear on the right side of the request form. Only objects linked to the customer who was set up for the request will be offered.

Enabled objects, selecting from groups – used to select the main groups of objects. These must first be defined in the CMDB. Only main groups (CI Maingroups) created from the categories Devices, Catalog of operated services and General category are available for selection.
Select supplies – if the switch is on ![]() , you will be able to add to the request the CI items that are registered as consumables in the Configuration Database.
, you will be able to add to the request the CI items that are registered as consumables in the Configuration Database.
SLO / Service availability – if the switch is on ![]() , the availability of the service will be counted on the service added to the request.
, the availability of the service will be counted on the service added to the request.

Show service availability – monthly / annually – the availability of the service is given as a percentage. With this setting, you can choose whether to display a value that indicates availability for one month or for a year. These values will be different.
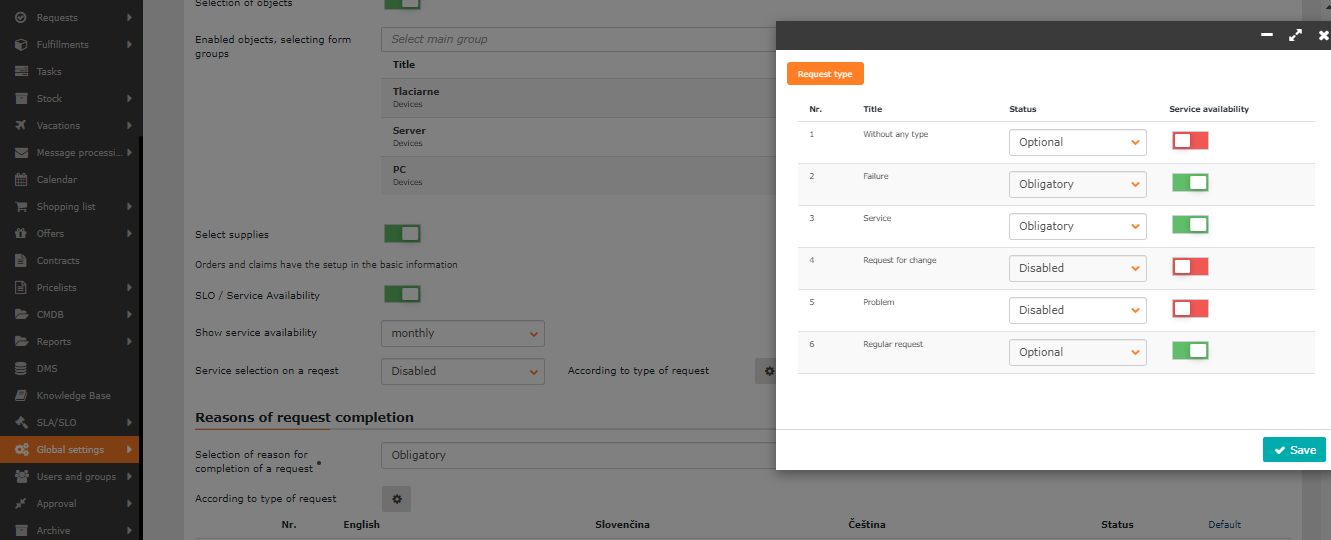
Service selection in the request – Disabled / Optional / Obligatory / Custom – allows you to add items to the request that belong to the Catalog of Operational Services in the CMDB. The function is accessible if the SLO / Service availability is activated. When choosing the option Optional or Obligatory, it will be possible to select services on all types of requests, regardless of the settings in the According to the type of request section. The settings according to the request type will be taken into consideration when selecting the Custom option.
According to the type of request – click on the ![]() icon to open a new window with the request types. For each type of request, you will be able to set separately whether the service selection will be Disabled / Optional / Obligatory. For each request type, you can set the service availability to be displayed as well. To turn the function on, turn the toggle switch on
icon to open a new window with the request types. For each type of request, you will be able to set separately whether the service selection will be Disabled / Optional / Obligatory. For each request type, you can set the service availability to be displayed as well. To turn the function on, turn the toggle switch on ![]() . Use the Save button in the lower right corner to save the settings. This setting applies if you select Custom when setting the scheduled start.
. Use the Save button in the lower right corner to save the settings. This setting applies if you select Custom when setting the scheduled start.
Automatic selection of the CI by the service area – if the switch is on ![]() , the Service Areas tab becomes available on the CI object belonging to the category of Services. You can set this service to be automatically added to the request, if certain service area is set in the request. The service added in this way can only be removed from the request by changing the service area in the request.
, the Service Areas tab becomes available on the CI object belonging to the category of Services. You can set this service to be automatically added to the request, if certain service area is set in the request. The service added in this way can only be removed from the request by changing the service area in the request.
Reasons of request completion
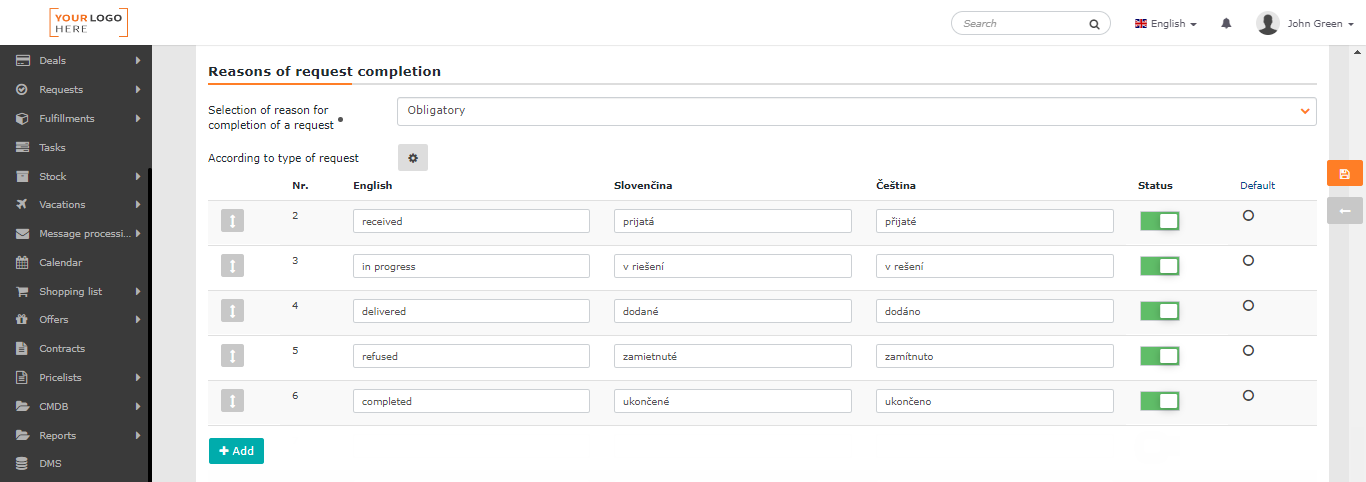
Select a reason for the request completion – Disabled / Optional / Obligatory / Custom – this option allows you to add the reason for completion when the status changes for Completed. When set to Optional or Obligatory, you will be able to enter the reason for termination on all types of requests, regardless of the settings in the According to the type of the request section. The According to the type of the request setting will be taken into consideration when selecting the option Custom.
According to the type of request – click on the ![]() icon to open a new window with the request types. For each request type, you can set separately whether the indication of the reason for termination will be Disabled / Optional / Obligatory. Use the Save button in the lower right corner to save the settings. This setting applies if you select Custom when setting the scheduled start.
icon to open a new window with the request types. For each request type, you can set separately whether the indication of the reason for termination will be Disabled / Optional / Obligatory. Use the Save button in the lower right corner to save the settings. This setting applies if you select Custom when setting the scheduled start.
Reasons of the request completion – here is the list to define reasons for the request completion. Click on +Add to add a row to state the reason for completion. Thus, the assignee can choose one of the reasons defined here for the completed requests. You cannot remove the reason for completion from the code list, but you can deactivate it using the switch in the Status column. The item is deactivated if the switch is off ![]() . If the Default option is checked, the given reason will be pre-filled when the request ends.
. If the Default option is checked, the given reason will be pre-filled when the request ends.
Methods of resolution at the completion of requests
Methods of resolution at the completion of requests – Disabled / Optional / Obligatory / Custom – this module allows you to define a completion solution at the end of the request. When you set the Optional or Obligatory options, you can select a solution method for all types of requests, regardless of the setting in the According to the type of request section. The settings according to the request type is taken into consideration when selecting Custom.
According to the type of request – click on the ![]() icon to open a new window with the request types. For each type of request, you can set separately whether the input of the solution method will be Disabled / Optional / Obligatory. Use the Save button in the lower right corner to save the setting. This setting applies if you select Custom when setting the scheduled start.
icon to open a new window with the request types. For each type of request, you can set separately whether the input of the solution method will be Disabled / Optional / Obligatory. Use the Save button in the lower right corner to save the setting. This setting applies if you select Custom when setting the scheduled start.

Then follows a list where you define the methods of solving the request at the request completion. Click on +Add to add a row with the option to specify the solution method. You can’t remove items from the list, but you can deactivate them using the switch in the Status column. The item is deactivated if the switch is off . If the Default option is checked, the method will be pre-filled at the request completion.

Causes for the request
Select the cause for the request – Disabled / Optional / Obligatory / Custom – the module allows the request assignee to select the reason why the request was entered. When you set the Optional and Obligatory options, you can define the cause on all request types, regardless of the setting in the According to the type of the request section. The According to the type of the request setting is taken into consideration when selecting Custom.
According to the type of request – click on the ![]() icon to open a new window with the request types. For each type of request, you can set separately whether entering the cause of the request will be Disabled / Optional / Obligatory. Use the Save button in the lower right corner to save the settings. This setting applies if you select Custom when setting the scheduled start.
icon to open a new window with the request types. For each type of request, you can set separately whether entering the cause of the request will be Disabled / Optional / Obligatory. Use the Save button in the lower right corner to save the settings. This setting applies if you select Custom when setting the scheduled start.

The following is a list in which you define the causes of the requests. Click on +Add to add a row to specify the solution method. You cannot remove items from the list, but you can deactivate it using the switch in the Status column. The item is deactivated if the switch is turned off ![]() . If Default is checked, the cause will be pre-filled when the request ends.
. If Default is checked, the cause will be pre-filled when the request ends.

Message for the new assignee
Message for the new assignee – if the switch is on ![]() and you change the request assignee, the Message for the new assignee field appears in the request form. The item selected from the code list is inserted at the beginning of the message subject with a request notification.
and you change the request assignee, the Message for the new assignee field appears in the request form. The item selected from the code list is inserted at the beginning of the message subject with a request notification.

The following is a list of messages for the new assignee. The list contains three predefined items:
- To close
- To control
- To buy
You can rename these items as you wish, as well as attach a translation into the languages that are activated in the Global Settings-> Language Settings.
To add a new item to the list, use the +Add button below the list. Once created items cannot be removed from the list, but you can deactivate them using the switch in the Status column. The item is deactivated if the switch is off ![]() . If the Default option is checked, the message will be pre-filled when the request assignee changes.
. If the Default option is checked, the message will be pre-filled when the request assignee changes.


Additional properties
In this section, you can assign additional properties to all requests by clicking +Assign a property. Click to open a new window with the list of additional properties that you can define in the CMDB module. For each property, there is a check box to select the desired property. Use the Assign selected button to add the selected properties. These items will then be included in the request form.
If the list does not contain the property you require, you can also define it directly in the property selection window using the +Quickly add a property and +Composite property buttons. Select +Quickly add a property to create a base property. Use the +Composite property button to add a composite property that contains more basic properties. You can find more about working with additional properties in the text Configuration database, CMDB->Additional properties.

The selected additional properties are included in the list of Additional properties. The properties are in the request form in the order in which they are listed in this list. You can change the order of the items by dragging ![]() . There is a search bar above the list. To delete additional features that you have already added and do not want to use, press
. There is a search bar above the list. To delete additional features that you have already added and do not want to use, press ![]() .
.
You can also set how the properties are displayed and filled.

Show collapsed – when the Show collapsed option is selected, only the check box appears in the request form, not the entire property. The property expands when this check box is selected.
Required field – when the Required field is checked, the given property will be marked as required in the request form. You will not be able to save the request unless you fill in the property.
More values – if you select More values, you will be able to fill in the property more than once. You can limit this number in the limit field.
Subject to approval – allows you to set approval for the use of an additional property. See the Approval for Additional Properties section for more information on this feature.

Default filters in the list of requests
Filter for the customer account – this option allows you to set a default filter for the customer account to display items of the list of requests. Use the ![]() icon to set the filter.
icon to set the filter.

Click to open a new window with a list of items. At the top of the window, there is a Set a request filter panel. After setting the filter, click the Apply button in the upper right corner.

Filter for the assignee account – allows you to set a default filter for the assignee’s account to display items of the list of requests. To set the filter, use the ![]() icon. Click to open a new window with a list of items. At the top of the window, there is the Set the request filter panel. After having set the filter, click the Apply button in the upper right corner.
icon. Click to open a new window with a list of items. At the top of the window, there is the Set the request filter panel. After having set the filter, click the Apply button in the upper right corner.

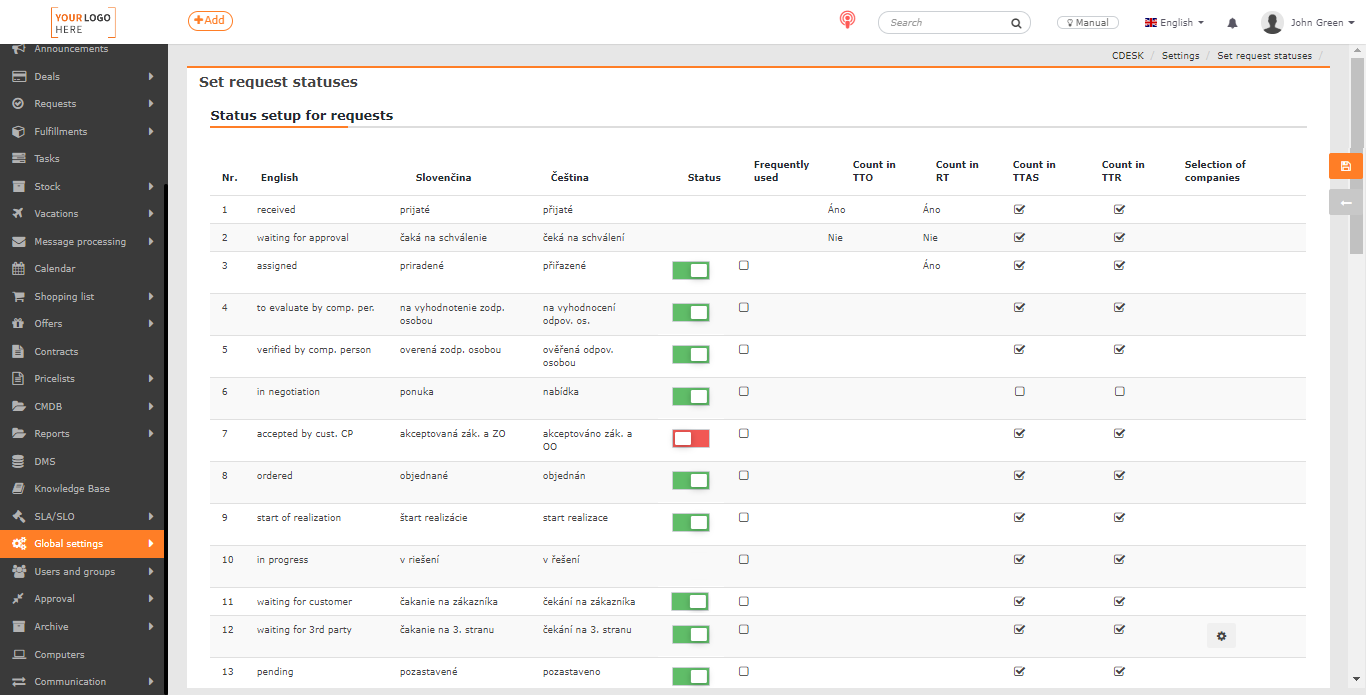
Status setup for requests
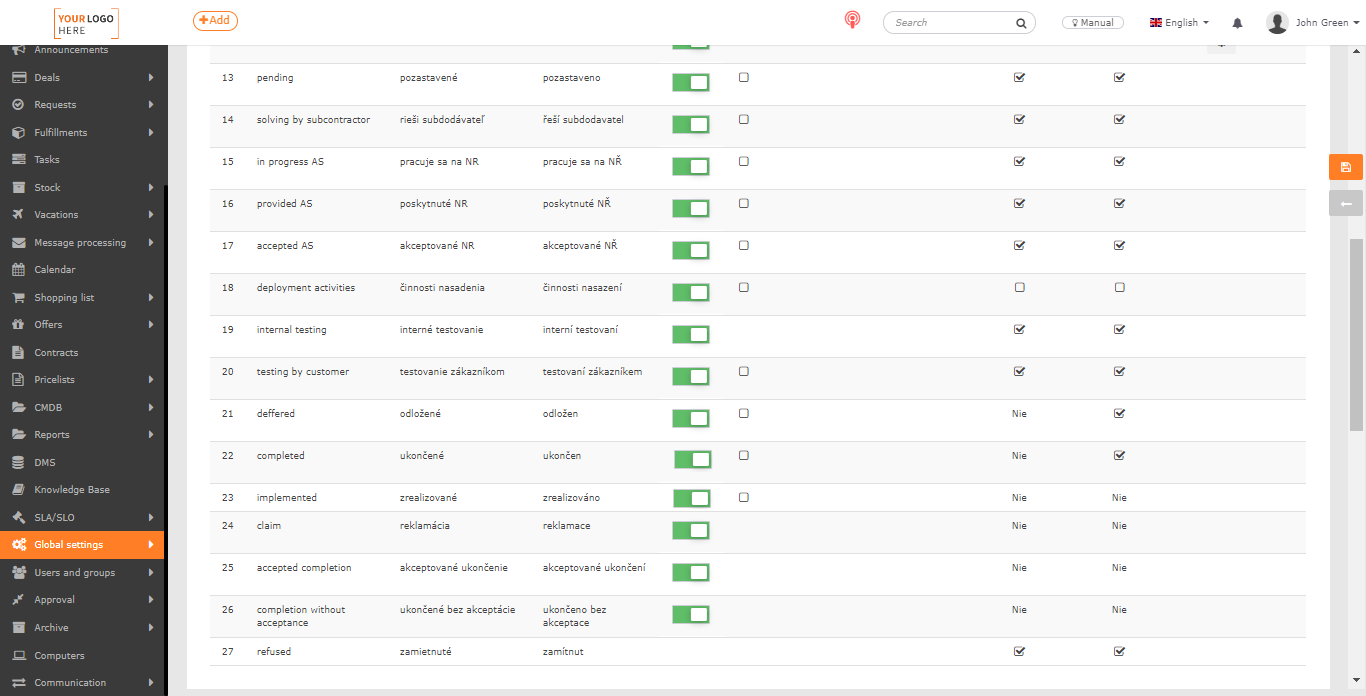
The following table shows the 27 possible statuses that a request can acquire. Statuses that should not be offered can be easily turned off with the switch in the status column ![]() . Statuses received, waiting for approval, in progress, completed and refused are the baseline statuses that cannot be turned off. We recommend that you carefully consider the selection of states for your environment to cover your necessary workflow. We recommend starting with a smaller number of statuses and then replenishing as needed.
. Statuses received, waiting for approval, in progress, completed and refused are the baseline statuses that cannot be turned off. We recommend that you carefully consider the selection of states for your environment to cover your necessary workflow. We recommend starting with a smaller number of statuses and then replenishing as needed.
Abbreviated list of request statuses:
- received
- waiting for approval
- assigned
- to evaluate by comp. person
- verified by comp. person
- in negotiation
- accepted by cust. and CP
- ordered
- start of realization
- in progress
- waiting for customer
- waiting for the 3rd party
- pending
- solving by subcontractor
- in progress AS
- provided AS
- accepted AS
- deployment activities
- internal testing
- testing by customer
- deffered
- completed
- implemented
- claim
- accepted completion
- completion without acceptance
- refused

Abbreviations used:
- Comp. person – competent person
- CP – competent person
- Cus. – customer
- AS – alternative solution
Short description of individual conditions
| Number | Request status | Short description |
| 1. | Received | This status is for a newly created request. |
| 2. | Waiting for approval | The status is for request templates with an approval process. A request created from such a template will automatically switch to Waiting for Approval after the record is saved. |
| 3. | Assigned | Status to indicate that an assignee has been assigned a request but is not yet working on it. When the Limit the selection of assignee by assignee group function is enabled, the request is put into the Assigned status automatically after selecting the assignee from the assignee group. |
| 3. | Assigned | Status to indicate that an assignee has been assigned a request but is not yet working on it. When the Limit the selection of assignee by assignee group function is enabled, the request is put into the Assigned status automatically after selecting the assignee from the assignee group. |
| 4. | To evaluate by a comp. person | You switch the request to the status To evaluate by a comp. person when you ask for an internal evaluation of the request, whether to assign and price the request at all, and so on. |
| 5. | Verified by a comp. person | Related to the previous state To evaluate by a competent person. This is a confirmation of the inspection / verification and the move to the next expected state. |
| 6. | In negotiation | The request can be switched to the In negotiation status at any time. Used if offers have been added in the request. |
| 7. | Accepted by cust. CP | You can switch the request to the Accepted by the customer and the competent person status if the conditions of the request have been accepted by both the customer and the user who is set as the Competent Person |
| 8. | Ordered | The request can be switched to the Ordered state at any time. Used if the request contains items that needed to be ordered. |
| 9. | Start of realization | You switch the request to the Start of realization status if preparations for the actions that are required to meet the request have begun. |
| 10. | In progress | The request can be switched to the In progress status at any time. Used when active work on the request has started. The request also switches to this status upon acceptance of the claim. |
| 11. | Waiting for customer | Use the Waiting for Customer status if you are waiting for a customer to respond. For this status, we recommend disabling the counting of TTAS (Time to Alternative Solution) and TTR (Time to Resolve), which will postpone the request deadlines. |
| 12. | Waiting for the 3rd party | The request can be switched to Waiting for the 3rd party at any time. Used if the fulfillment of the request has been transferred to a third party. For this state, it is possible to set the supplier to be selected in the request. We also recommend disabling Time to Alternative Solution (TTAS) and Time to Resolve (TTR) counting, which will postpone deadlines of the request. |
| 13. | Pending | The request can be switched to this state at any time. It is used if the resolution of the request has been suspended for various reasons, e.g. due to a more important request. For this status, we recommend disabling TTAS (Time to Alternative Solution) and TTR (Time to Resolve) counting, which will postpone the request deadlines. |
| 14. | Being solved by the subcontractor | Used if the fulfillment of the request has been transferred to a subcontractor. We also recommend disabling Time to Alternative Solution (TTAS) and Time to Resolve (TTR) counting, which will postpone deadlines of the request. |
| 15. | In progress AS | It is possible to switch the request to the In progress alternative solution status at any time. Used when the implementation of an alternative solution has started. You can toggle the request to the Start of realization status, if the preparations for the actions required to fulfil the request have begun. |
| 16. | Provided AS | It is possible to switch the request to the status Provided Alternative Solution at any time. Used if an alternative solution has been provided in the request. |
| 17. | Accepted AS | The customer should switch the request to the status of Accepted Alternative Solution upon receipt of the provided alternative solution. The final solution is expected to be further worked on. |
| 18. | Accepted AS | The request can be switched to the Deployment Activities status at any time. Used if the actions in the request have been completed but still need to be applied, such as a software update. |
| 19. | Internal testing | You switch the request to the Internal Testing status if the actions in the request have been met, but they require internal testing before being provided to the customer. |
| 20. | Testing by customer | The Testing by customer status is used if the customer selected in the request is testing the fulfillment of the request. For this status, we recommend disabling TTAS (Time to Alternative Solution) and TTR (Time to Resolve) counting, which will postpone deadlines of the request.
Whether the test was successful or unsuccessful is then evaluated via buttons. After successful as well as unsuccessful testing, the request switches to the In progress status. |
| 21. | Deffered | The request can be switched to Deferred at any time. Used if the resolution of the request has been postponed. For this status, we recommend disabling TTAS (Time to Alternative Solution) and TTR (Time to Resolve) counting, which will postpone deadlines of the request. |
| 22. | Completed | The status of the request can be changed to Completed after completing all actions in the request. The request with this status contains buttons to accept / refuse the completion, if enabled in the global settings. |
| 23. | Implemented | The Implemented status resembles the Completed status and is usually launched by the supervisor who checked the request. This status is intended as an internal alternative to the Accepted Completion status. |
| 24. | Claim | The request will be put into the Claim status automatically when the request completion is refused. The Claim status can only be turned on if the Accepted Completion and Completion without Acceptance statuses are enabled. |
| 25. | Accepted completion | The request switches to this state automatically when you press the Accept completion button in the request in the Completed state. The Accepted Completion status is automatically turned on in the global settings when the Claim status is turned on. Turning off the Accepted Completion status will automatically turn off the Completed Without Acceptance and Claim statuses in the global settings. |
| 26. | Completion without acceptance | The request automatically switches to this state from the Claim state when selecting Unauthorized Claim. When the Claim status is switched on, the status Completed without acceptance is automatically switched on in the global settings. |
| 27. | Refused | This status is used only for the request templates with the approval process. A request from such a template will be Refused after it has been disapproved. |
Change the order of request statuses
All statuses, except the basic ones, have a check box in the Frequently Used column. Marked items will be displayed at the beginning of the code list when determining the status of the request.

Choose a supplier in waiting for the 3rd party
In the row of the Waiting for the 3rd party status, there is the ![]() icon in the column titled Company selection. Click to open a new window in which you can set whether the supplier selection when switching the request to this state will be Disabled / Optional / Obligatory. If you select Optional or Obligatory, the field for supplier selection appears in the form after switching the request to the Waiting for the 3rd party status. These are only those companies that are included in the type of Supplier in the address book of companies.
icon in the column titled Company selection. Click to open a new window in which you can set whether the supplier selection when switching the request to this state will be Disabled / Optional / Obligatory. If you select Optional or Obligatory, the field for supplier selection appears in the form after switching the request to the Waiting for the 3rd party status. These are only those companies that are included in the type of Supplier in the address book of companies.

Click the Save button in the lower right corner to save your settings.

Stop counting times in statuses – postpone deadlines
The request status table contains the columns Count in:
- Count in TTO – Time to Own
- Count in RT – Time to Response
- Count in TTAS – Time to Alternative Solution
- Count in TTR – Time to Resolve
While the Count in TTO and Count in RT columns have a fixed time counting logic, for most statuses in the Count in TTAS and Count in TTR columns it is possible to set your own time counting:
 / Yes – counts the remaining time to meet the deadline (TTO / RT / TTAS / TTR).
 / No – stops the counter of the remaining time to meet the deadline:
- Provided AS status – stops the TTAS counter and evaluates whether the deadline was met on time
- Completed status – stops the TTR counter and evaluates whether the deadline was met on time
- other states – the counting of the remaining time is stopped and the due date is delayed until the status counting time or the state evaluating the timely fulfillment of the deadline is reset.

Example of counting times:
Consider the settings according to the illustration:
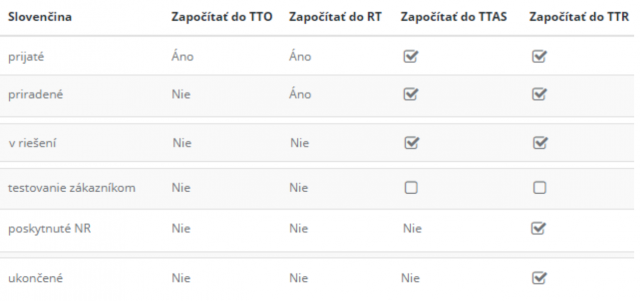
- A completely new request is assigned the Received status – the counter starts counting time for all dates from the moment of its creation.
- By adding an assignee, the request switches to the Assigned state, Time to own (TTO) is stopped and evaluated, and the RT, TTAS, TTR times continue to count down.
- A change in the request, such as switching to the In progress state, or adding a discussion post or fulfillment, stops and evaluates the Response Time (RT). The TTAS, TTR term counters further count down the remaining time.
- By changing the status for the Testing by customer, the countdown of the Time to Alternative Solution (TTAS) and the Time to resolve (TTR) is suspended. Instead, the system will postpone both deadlines by the remaining time to completion.
- By switching the request status back to the In progress status, the counter is reactivated and will continue to count down the remaining time for both TTAS and TTR.
- The status Provided AS stops the countdown of the time at the Time to Alternative Solution (TTAS) and at the same time evaluates the timely fulfillment of the deadline. The TTR countdown continues.
- Completing the request by switching to the Completed status stops and evaluates the time also at the Time to Resolve (TTR).
Automatic status change
Automatic status change from accepted to in progress – Disabled / Add fulfillment or discussion post – this module allows you to automatically change the status of a request from received to in progress, after adding a fulfillment or discussion to the request.
Automatic status change from waiting for customer to in progress – Disabled / Add fulfillment or discussion post – this module allows you to automatically change the status of a request from waiting for a customer to in progress, after adding a discussion from the customer.

Options for accepted request completion
To accept request completion please log in – if the switch is on ![]() , the request cannot be accepted anonymously via the web form. The user will be redirected and prompted to log in. At the same time, you can use this setting to control who can accept the request completion.
, the request cannot be accepted anonymously via the web form. The user will be redirected and prompted to log in. At the same time, you can use this setting to control who can accept the request completion.
Roles that can accept completion – this setting becomes available when the Accepted Completion feature is turned on and you need to sign in. It allows you to specify who can accept the request completion. The code list contains options:
| Assignee | For whom |
| Assignee assistant | Responsible person |
| Reporter | Reporter´s superior |
| Customer account | Assignee´s superior |
| Request from | Logged in user |

Rating of assignee – Disabled / Optional / Obligatory – when accepting the request completion, this function allows you to rate the assignee. When selecting Obligatory, it will not be possible to accept the request completion without rating the assignee.

View the rating in the request – if the switch is turned on ![]() , the rating and the note on accepting the request completion is found in the request form.
, the rating and the note on accepting the request completion is found in the request form.

Enable automatic acceptation of request upon completion – in the case of enabled request status Accepted Completion, the customer is notified of the request completion by e-mail and invited to accept the completion. By turning the switch of this option on ![]() , the request completion is accepted automatically, unless the customer responds to the request for acceptance within the specified number of days.
, the request completion is accepted automatically, unless the customer responds to the request for acceptance within the specified number of days.
Automatic rating (Grade 1) – this function is accessible when automatic acceptance of request completion is enabled. If the switch is turned on ![]() , the assignee will receive the best rating when automatically accepted.
, the assignee will receive the best rating when automatically accepted.
Number of days for automatic acceptation of a request after completion – enter the number of days after which the request completion is automatically accepted if the customer does not respond to the call. Below you can specify the text that the customer will receive in the notification calling for acceptance of the request completion. You can include translations into the notifications.

Options to reopen a request
Automatically change the status of the completed request after receiving a discussion entry to the status – Disabled / In progress – when selecting In progress after receiving the discussion post, the status of the completed request changes to In progress.
Disable changing of status in accepted completion and completion without acceptance – if the switch is on ![]() , it is not possible to change the status of the request that has been placed in the Accepted Completion and Completion Without Acceptance statuses.
, it is not possible to change the status of the request that has been placed in the Accepted Completion and Completion Without Acceptance statuses.

Other settings
Objected assignees – if the switch is on ![]() , the Objected assignees option is displayed in the request that was claimed. It contains a list of all assignees who have been engaged in the solution of the request or work orders listed under the request. You can select from objected assignees only if the Claim status is turned on in the global settings. If the status is off, the Objected assignees field will appear in your request, but you will not be able to select assignees.
, the Objected assignees option is displayed in the request that was claimed. It contains a list of all assignees who have been engaged in the solution of the request or work orders listed under the request. You can select from objected assignees only if the Claim status is turned on in the global settings. If the status is off, the Objected assignees field will appear in your request, but you will not be able to select assignees.

Request types and service areas
Request types represent the main division of requests. Service areas are a finer division of requests. There are more functions attached to them than to the request types. For individual areas, it is possible to set the assignee, notifications, objects from the CMDB and make them available according to the selected type.
Request types
Request type selection – disabled – it is not possible to select the type in the request, optional / obligatory options – make available the type selection when creating a new request as well as the possibility to add / modify the permissible request types.
Request types can be added by clicking on +Add – enter the name of the type in the new line together with its translation if you like. To delete a row created by mistake, click on the ![]() icon in the Status column, but only before saving the settings. After saving the settings, it is only possible to switch off unwanted types by setting the switch to the off position
icon in the Status column, but only before saving the settings. After saving the settings, it is only possible to switch off unwanted types by setting the switch to the off position ![]() .
.
There is also an option to choose a default type that will be pre-filled automatically when creating new requests. You can reset the default type selection by clicking Default in the column header.
In the following columns, you can set the availability of a specific type for entering requests:
- Operator – only the user type called operator can see and select the type of request
- Customer account – the selection of the type of new requests will be accessible to users of the customer account and the Easyclick account
- Regular request – the type will be available in the regular requests.
Assignee user accounts see all enabled request types, regardless of the options set.
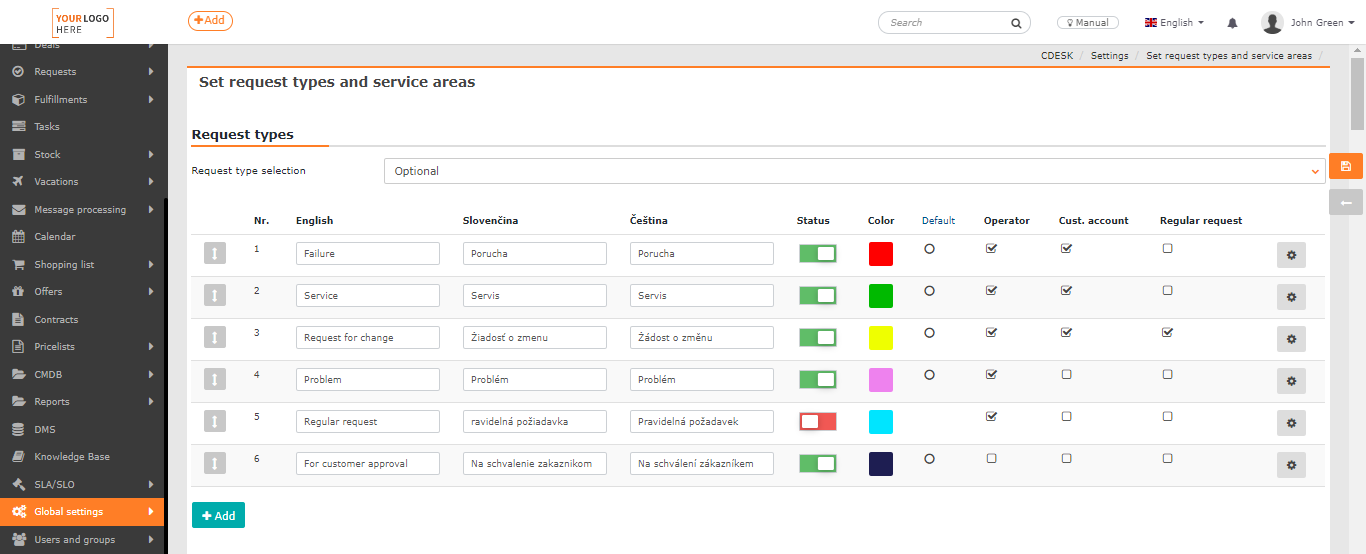
The order of the types can be adjusted by dragging the ![]() icon at the beginning of each line.
icon at the beginning of each line.
In the Color column, you can set a color for each type of request. Requests that will be assigned to a given type will have a colored bar in the list of requests. You can set its color in this list but selecting a color for the request type is optional. Clicking on an empty icon in the Color column will open a new window where you can choose from the colors offered. To save the settings, click the Save icon in the lower left corner. Select Cancel to close the window without setting the color.


There is the ![]() icon at the end of each line. It allows you to set an approval rule for a given request type. Click on the icon to open a new window in which you can select an approval rule. These are the rules from the Approval Rules module which are included in the group Approval for request creation by a customer. The settings are saved by clicking the Save button in the lower right corner. The customer account can approve the implementation of the request if:
icon at the end of each line. It allows you to set an approval rule for a given request type. Click on the icon to open a new window in which you can select an approval rule. These are the rules from the Approval Rules module which are included in the group Approval for request creation by a customer. The settings are saved by clicking the Save button in the lower right corner. The customer account can approve the implementation of the request if:
- In the Global Settings-> Requests-> Basic settings the Turn on implementation approval by customer function is enabled.
- You have defined at least one approval rule that belongs to the group Approval for request creation by a customer.
- You grant the customer account the authority to approve the requests.
- You set in the Global Settings->Requests->Types and areas of service for which request type the customer account can approve the implementation.

Service areas of requests
Service area selection – disabled – the request cannot be assigned to a service area; optional / obligatory – the request can be / has to be assigned to an service area. This option also makes available other setting options described below.
2nd level – disabled – does not allow the selection and creation of a second level of service area; optional / obligatory – it is possible to create second levels for service areas, from which the requester can / must choose when creating new requests.

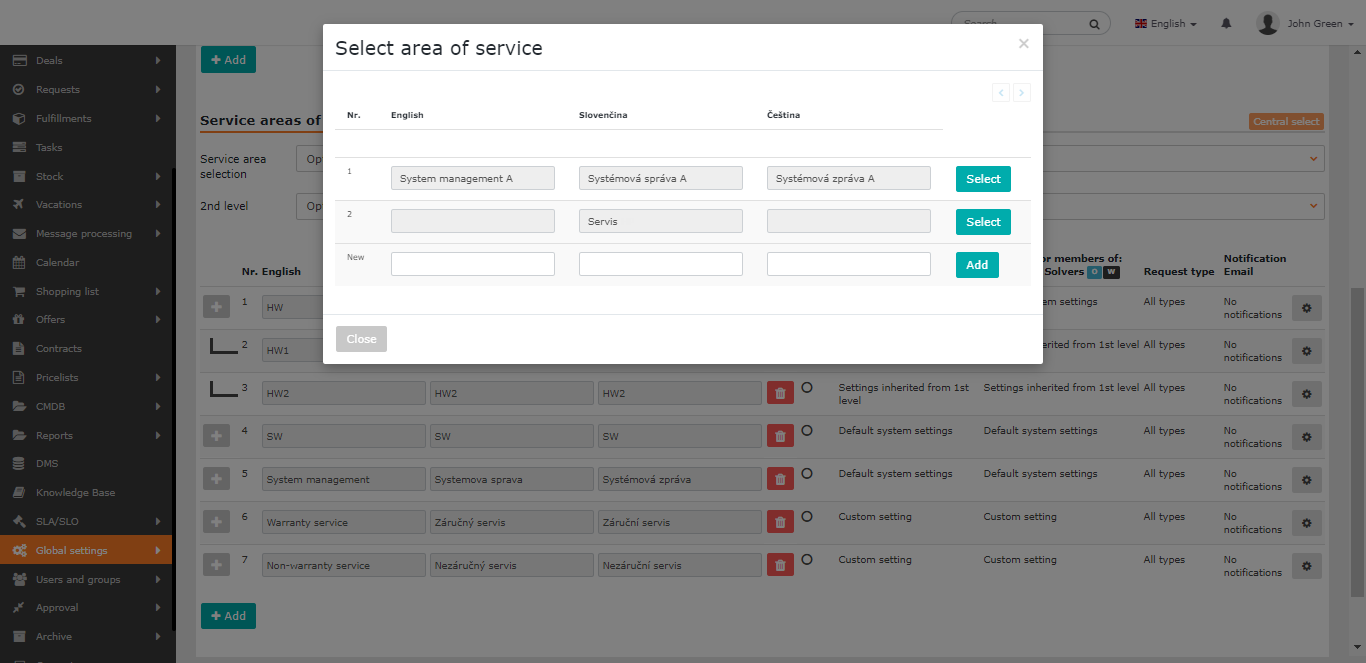
You can add an area of service by clicking the +Add button below the list. A window will open with a central code list of service areas, from which it is possible to Select some defined request area. Service areas that have already been selected are hidden in the list.
Use the blank line at the end of the list to create a new area of service. Fill in the name of the service area (it is not obligatory to fill in all language versions) and click the Add button.
With the 2nd level enabled, individual second levels are added by clicking the + icon at the beginning of the line of each first level service area. You can add the 2nd level, if this level is set as Optional or Obligatory. The method of adding and creating records for the second level service areas is the same as the first level described above. To remove service areas that should not be offered when creating / editing a request, simply remove them from the list of service areas by clicking ![]() .
.
The name of the service area can be edited by clicking on the Central list button. A window will open in which it is possible to create new service areas of the first and second level at the same time, or to turn off their display in the menus for selecting the service area – by turning the switch off ![]() .
.

The Default column is used to indicate those service areas that should be automatically pre-filled when creating a request. It is possible to select at most one first level service area and at most one second level area for each first level area. Click the Default column name to reset the default service area settings.
Add the assignee to the service area
It is possible to set different assignees or assignee groups for each area of the service. The assignee familiar with the issue of cars and fleet, for example, does not have to deal with IT requests and vice versa.
These settings are accessible by clicking on the ![]() icon at the end of the line of every service area. A window divided into two parts will open:
icon at the end of the line of every service area. A window divided into two parts will open:
- Assignee for the customer account, Easyclick – this option allows you to select the default assignee, operators, assignee groups and assignees from the assignee group who can be assigned to the requests entered by customers registered in CDESK, or via Easyclick. Click on × to remove the selected assignees.
- Assignee for the members of Operators, Assignees – allows you to select the default assignee, operators, assignee groups and assignees from the assignee group who can be assigned to the requests specified by the CDESK operators, or via Easyclick. Click on × to remove the selected assignees.

Checking the Use the same settings for every type of users option simplifies the form to select the default assignee, operator, assignee group, and an assignee from the group. These settings will be used at once for the assignees for customer accounts, Easyclick, also for assignees from the groups Operators, Assignees.

If no assignee is set for the 1st level service area, the requester can select any assignee in the new request. If no assignee is set for the 2nd Level service area, the settings from the first level are applied.
To save the settings, click the Save button in the lower right corner of the window.
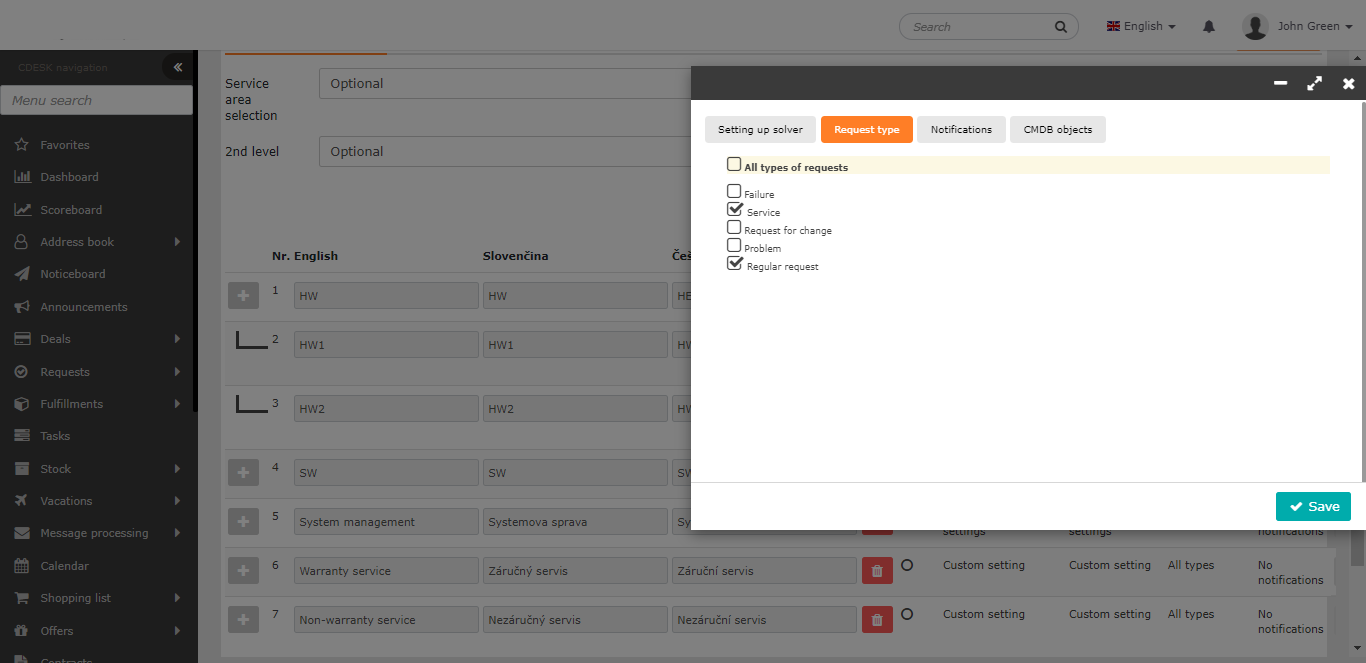
Set a request type to the service area
This feature allows you to set which service areas will be available for the selected request types. By default, All request types are selected. In this case, the selection of the request area does not depend in any way on the set type.
Turn off the All Request Types setting to display names of the request types. There is a check box next to each name. The given request service area will not be accessible for the selected request types.
To save the settings, click on the Save button in the lower right corner of the window.
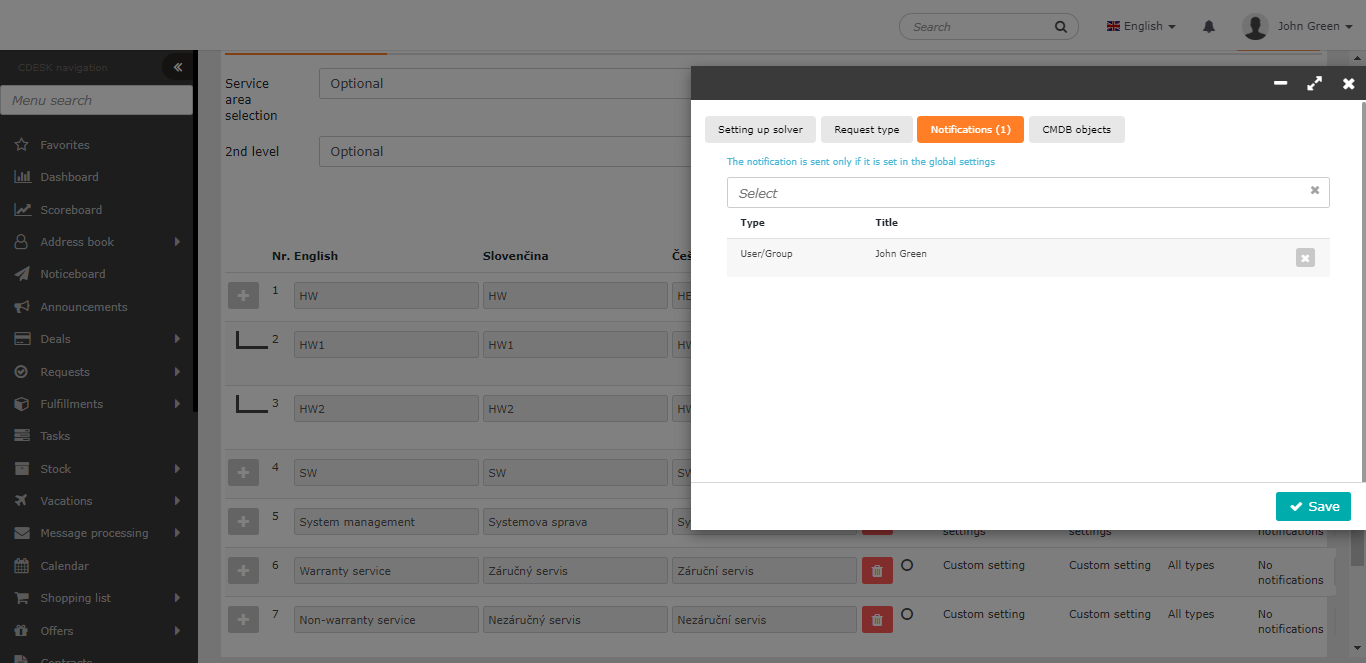
Set notifications for the service area
In the case of notifications, you have the option to select users for specific service areas to be notified of requests belonging to their service area, even if they are not assignees. The notification is sent only if the Service area user is set as well in the global settings of notifications, for the selected actions of requests.
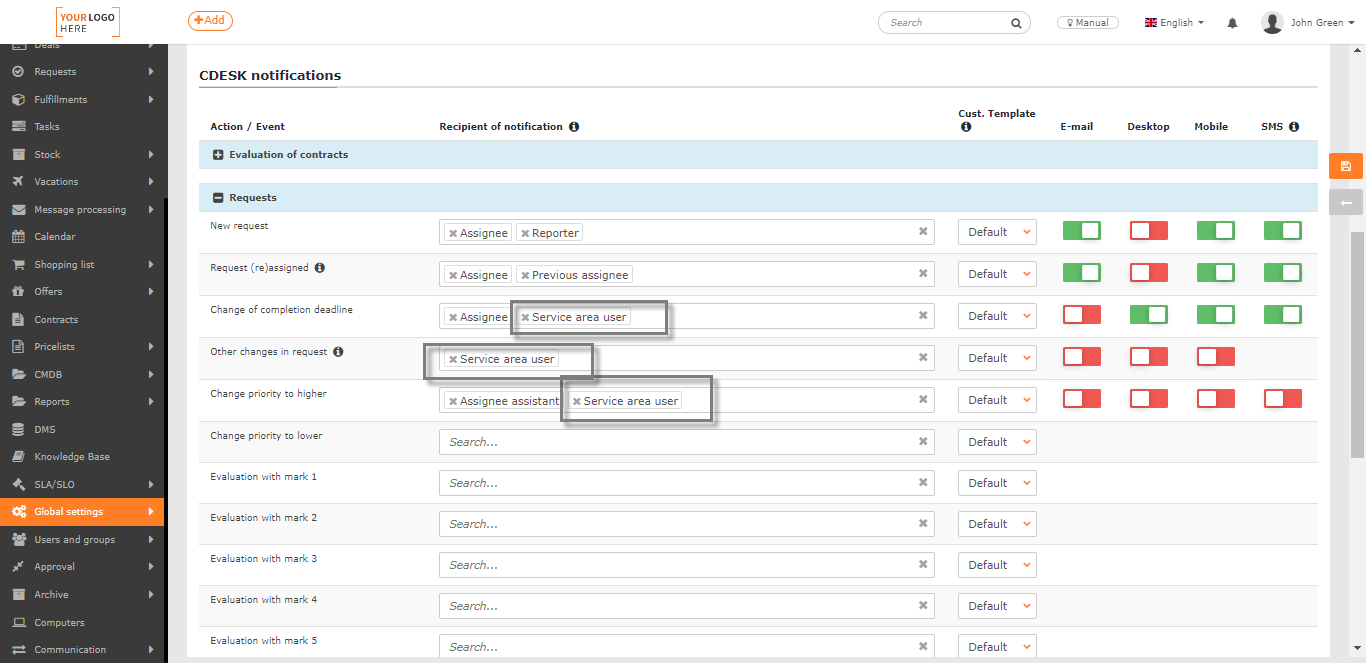
To save the settings, click the Save button in the lower right corner of the window.
Set selection of the CMDB objects for service areas
Selection of CI by service area – Disabled / Optional / Obligatory – when you select the Optional or Obligatory option, you can set that only CI Objects from the selected main groups will be accessible in the request for the given service area. If you select Mandatory, you cannot save the request if you do not select any CI Object.
Allowed objects from the main groups – this setting is available if you set CI selection by service area to Optional or Obligatory. In this section, you select which main groups from all the main groups will be available for the given area. If you selected some group by mistake, click the × icon to cancel the selection. Add the group again using the + button.
To save the settings, click the Save button in the lower right corner of the window.

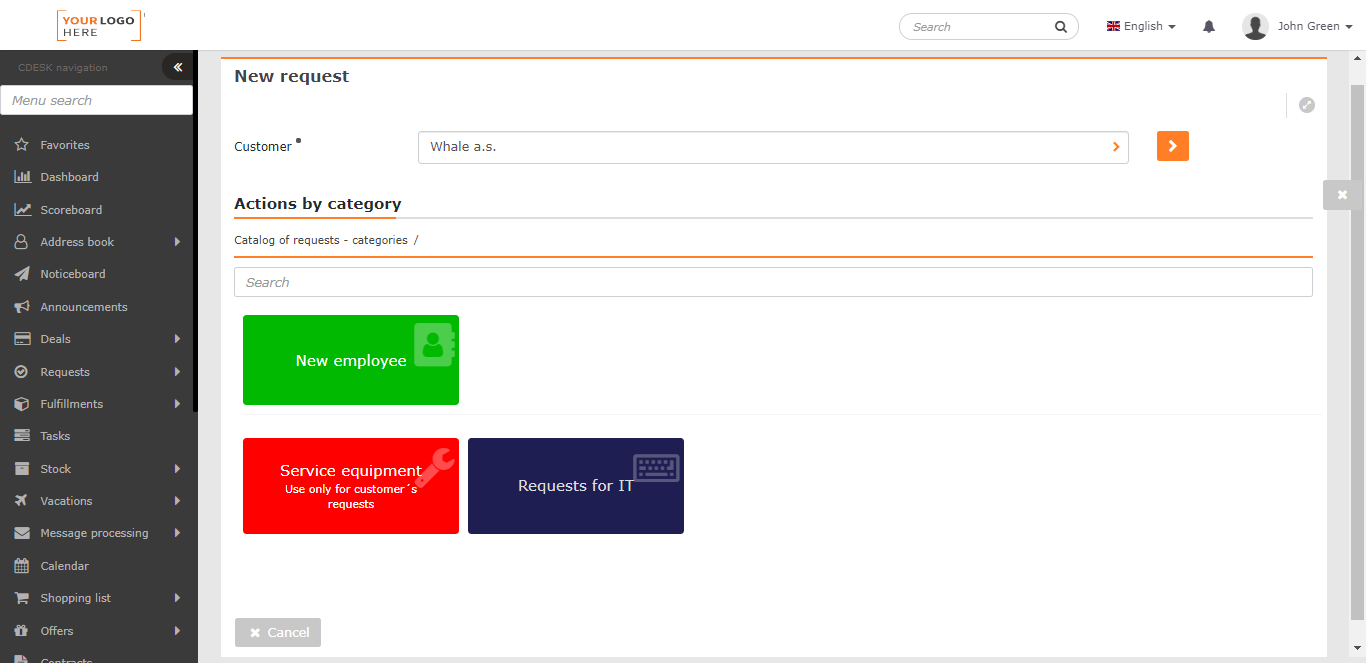
The Catalog of requests – category tiles
The catalog of requests simplifies request entering. When creating requests from templates, there is no need to enter all parameters manually as when creating a regular request. Most fields can be preset and entered when creating a new request template.
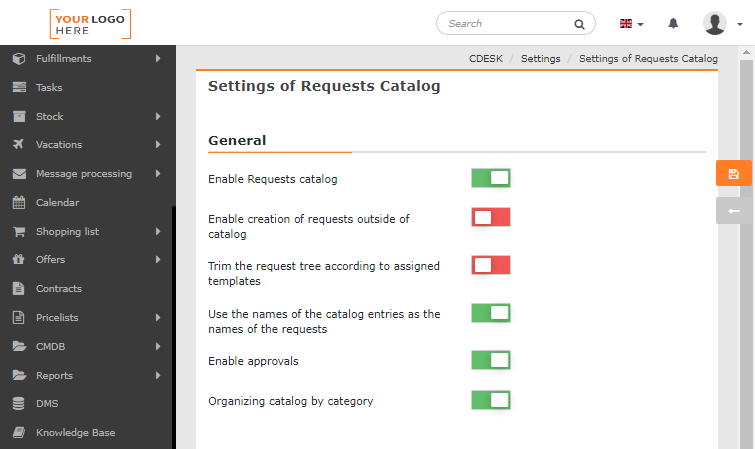
General Settings
Enable the catalog of requests – turn the switch on ![]() to make appear in the Requests->Catalog of requests the button for creating requests from the catalog, which will also replace the button for normal request entry. To re-enable the normal request button, turn on the Enable creation of requests outside the catalog feature.
to make appear in the Requests->Catalog of requests the button for creating requests from the catalog, which will also replace the button for normal request entry. To re-enable the normal request button, turn on the Enable creation of requests outside the catalog feature.
Enable creation of requests outside the catalog – set the switch to the on position ![]() so the Add button becomes available for entering a general request outside the catalog in the Requests->Catalog of requests, in addition to the Add from catalog button.
so the Add button becomes available for entering a general request outside the catalog in the Requests->Catalog of requests, in addition to the Add from catalog button.
Trim the request tree according to the assigned templates – the option allows you to hide tiles with request categories that are not assigned to a selected company (customer). Individual categories are assigned to the company when creating a new request template. The Trim the request tree according to the assigned templates function is triggered when the switch is in the on position ![]() . If the creation of requests outside the catalog is enabled, this feature cannot be turned on.
. If the creation of requests outside the catalog is enabled, this feature cannot be turned on.

Use the names of catalog entries as the names of requests – set the switch to the on position ![]() to pre-fill the request name according to the template name.
to pre-fill the request name according to the template name.
Enable approvals – turn the switch on ![]() to make the approval option available for requests entered through the catalog of requests. For more information on approving processes, see the Approval section.
to make the approval option available for requests entered through the catalog of requests. For more information on approving processes, see the Approval section.
Organize the catalog by category – if the switch is on ![]() , the tiles are available when creating requests from the catalog. The settings for these tiles are made available in the global settings. We recommend keeping the organization of the catalog by category on. Other ways of entering requests from the catalog of requests will be gradually removed. You can read more about entering requests from the catalog HERE.
, the tiles are available when creating requests from the catalog. The settings for these tiles are made available in the global settings. We recommend keeping the organization of the catalog by category on. Other ways of entering requests from the catalog of requests will be gradually removed. You can read more about entering requests from the catalog HERE.
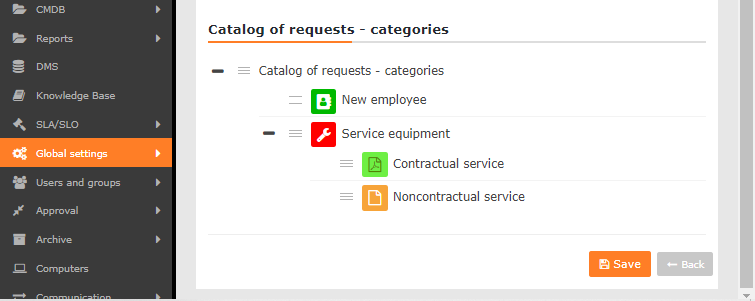
Catalog of requests – categories
The list of categories of the catalog of requests is made available when the Organize catalog by category feature is enabled. You can set a different template for each tile. By default, the Catalog of requests – categories item is listed in the list. This item cannot be edited or deleted.
Add a new category to the catalog of requests
To add a new item to the list, click on the context menu ![]() -> Add child tag. Click to create a new row in the list.
-> Add child tag. Click to create a new row in the list.
Title – the name under which the category is displayed when creating a request from the catalog.
Short description – this description is displayed directly in the category tile.
Long description – this description appears as a pop-up window when you move the cursor over the category tile.

Slug – represents an alias for an item in an understandable form that is used for API calls instead of ID. The term used must not contain accents or spaces and is case sensitive (distinguishes between uppercase and lowercase letters).
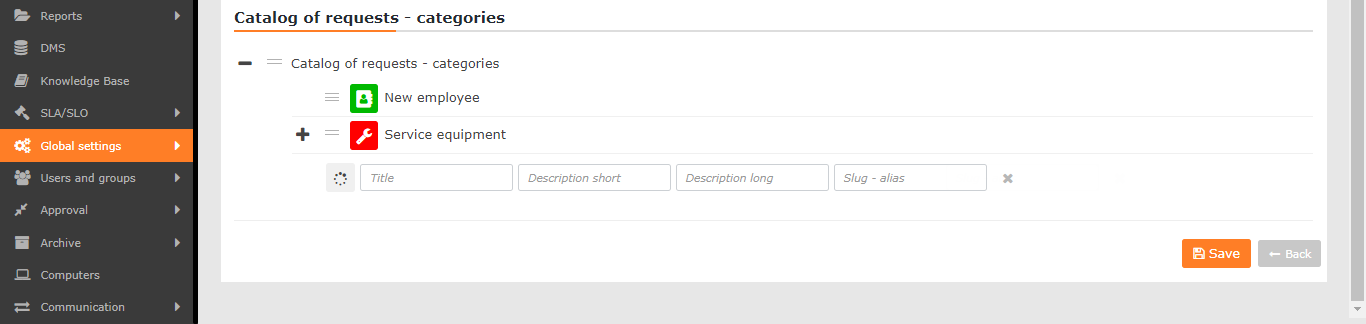
There is an X at the end of the line, which closes the new line and the category is not saved. Use the ![]() button to save the type.
button to save the type.
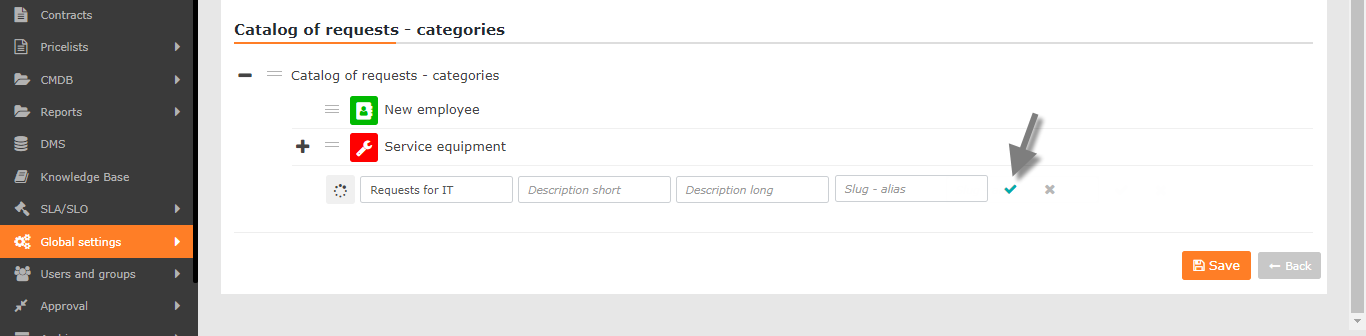
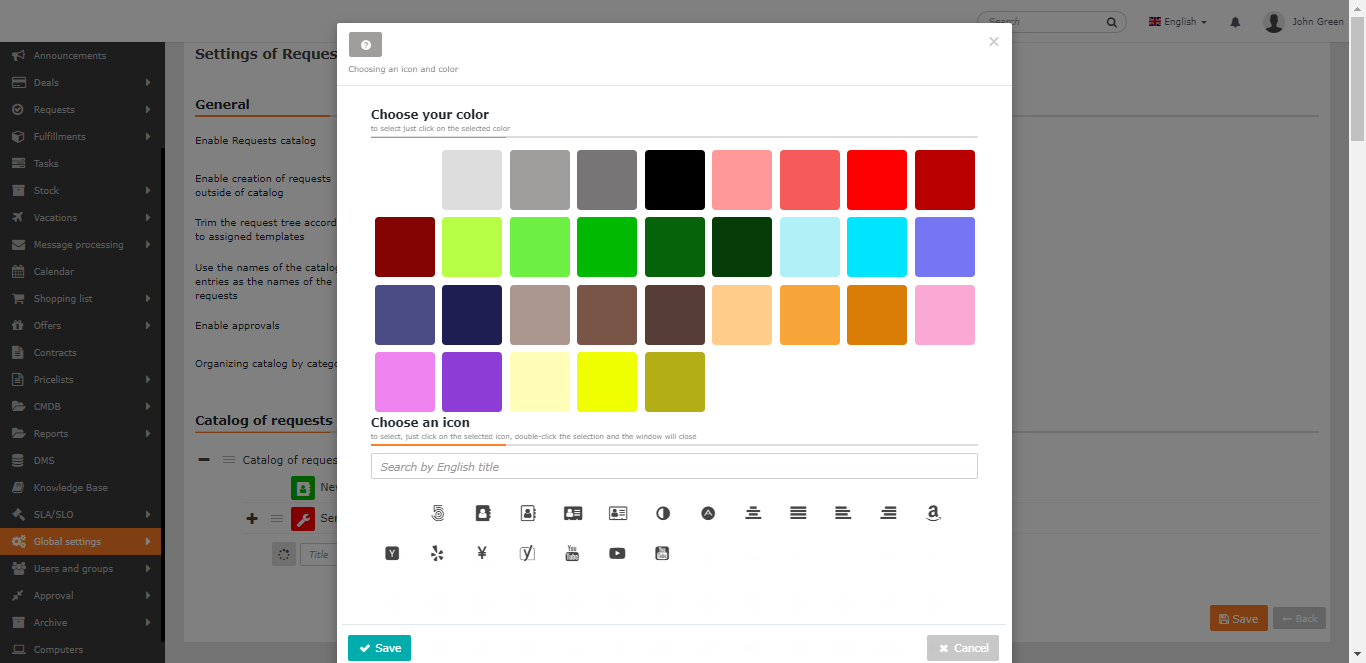
There is an icon at the beginning of the line that allows you to assign an icon and color to the category tile. Click to open a new window where you can choose from different icons and colors. To save the settings, click the Save button in the lower left corner of the window. Select to close the window without saving the settings.
Subcategories can be added to an existing category in the same way as the categories themselves. If a category contains subcategories, a + symbol appears next to the category name allowing you to see a list of all the subcategories belonging to that category. Use the – button to close the list again.
Modification of category tiles in the catalog of requests
You can edit the saved category tile by clicking on the context menu ![]() -> Edit. The row opens as when entering a new category. You can edit all items as well as the color and the icon of the category tile. Click
-> Edit. The row opens as when entering a new category. You can edit all items as well as the color and the icon of the category tile. Click ![]() to save changes. Use the X icon to discard your changes.
to save changes. Use the X icon to discard your changes.
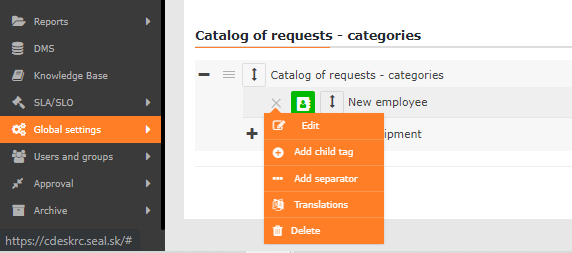
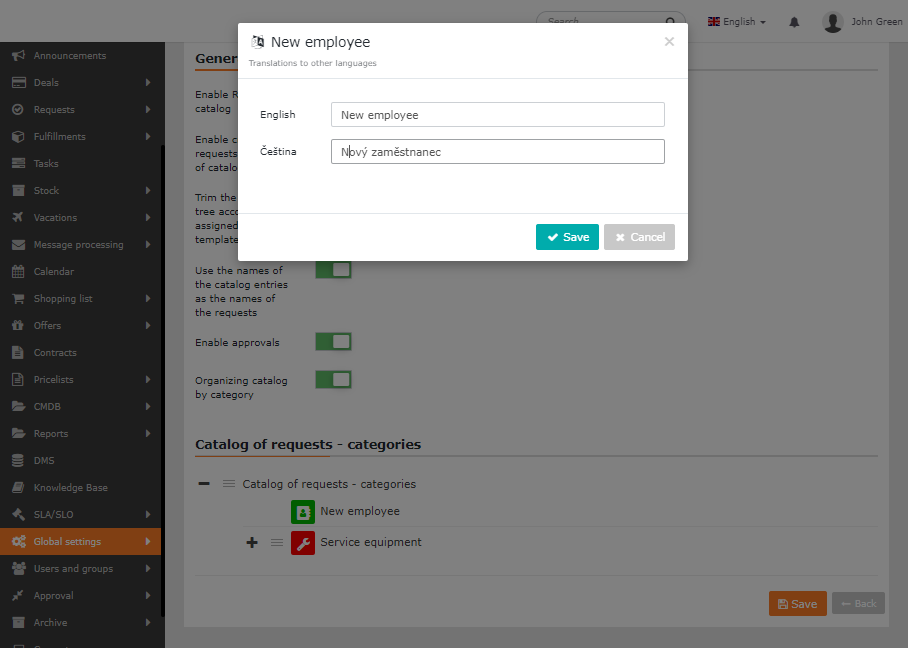
For foreign language CDESK users, you can attach translations into active languages by using the Add translations button in the context menu. Click to open a window where you can enter translations into the languages you have activated in the global settings. Click the Save button to save the translations. Select Cancel to close the window without saving translations.
You can delete a category using the Delete button in the context menu. Click on the Are you sure you want to delete this? to delete the item.
The Add Separator button located in the context menu is used to prevent a tile of a given category from appearing in the same row as the others. It will be added to a new line. Thanks to this function, you can clearly arrange the tiles.
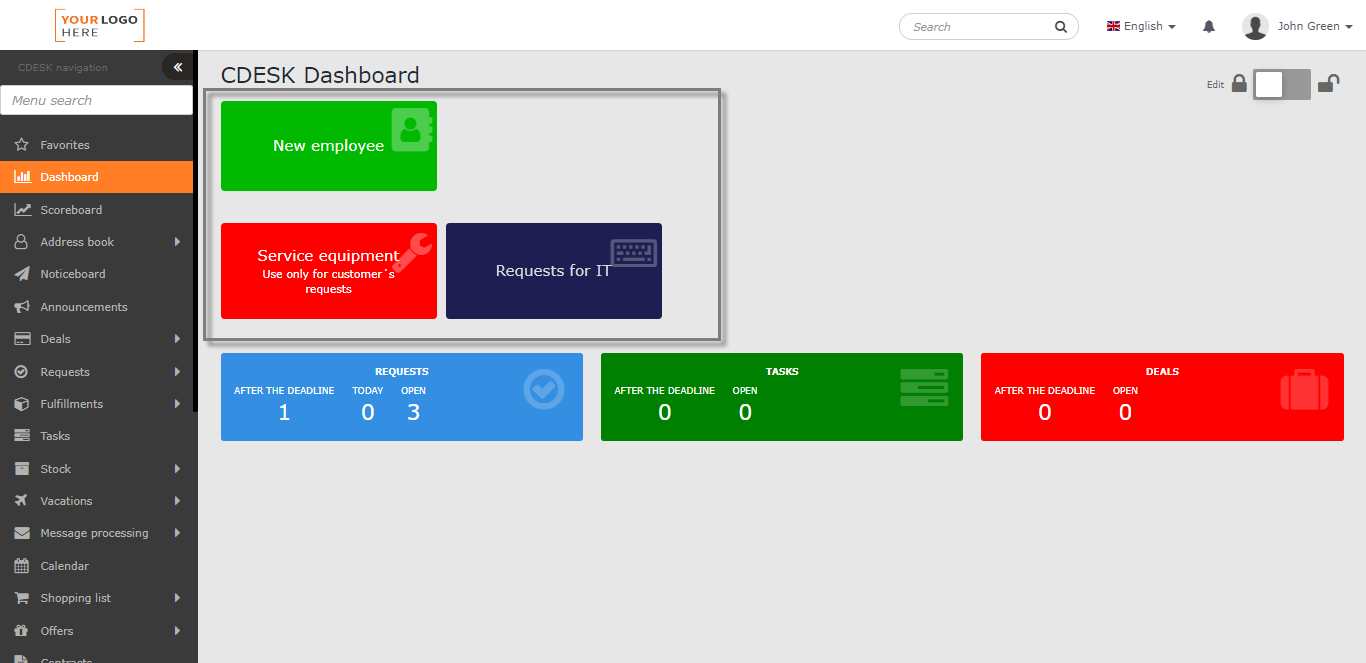
Tiles for creating requests are also available on the Dashboard in the form of widgets.