WORK WITH REQUESTS FOR CUSTOMERS
Obsah stránky
- Discussion with the Operator
- Comment on Offers on the Request
- Invoice Fulfillments on the Request
- Completion of the Request When Logged into CDESK
- Rejecting – Claiming a Request When Logged into CDESK
- Completion of the Request via Email Notification
- Acceptance of Request Completion via Email Notification
- Denying of Request Completion via Email Notification
Overview of Ways to Enter Requests:
- Logged into CDESK – accessible to CDESK users and customer accounts after logging into the CDESK system via a web browser.
- Email (message processing) – requests are created based on an email sent to the address to receive messages for processing – available to all users who know the email address.
- Easyclick (CUSTOMER MONITOR) – – quick and easy submission of requests without the need to log into the system. It is possible to insert a screenshot when entering a request. Easyclick account is available for users with C-Monitor client installed.
- CDESK client – desktop application aimed at operational work of the assignee.
- Mobile app – mobile app allows you to perform common tasks with CDESK anytime, anywhere.
There are several ways to create a new request. Each of them allows you to enter the request either directly or via the catalog of requests.
- Enter a general request – the standard way of creating a request, where the user fills in all the details of the request himself
- Enter a request from the catalog of requests – the user chooses from prepared templates, in which most of the fields of the request are already pre-filled according to the selected scenario
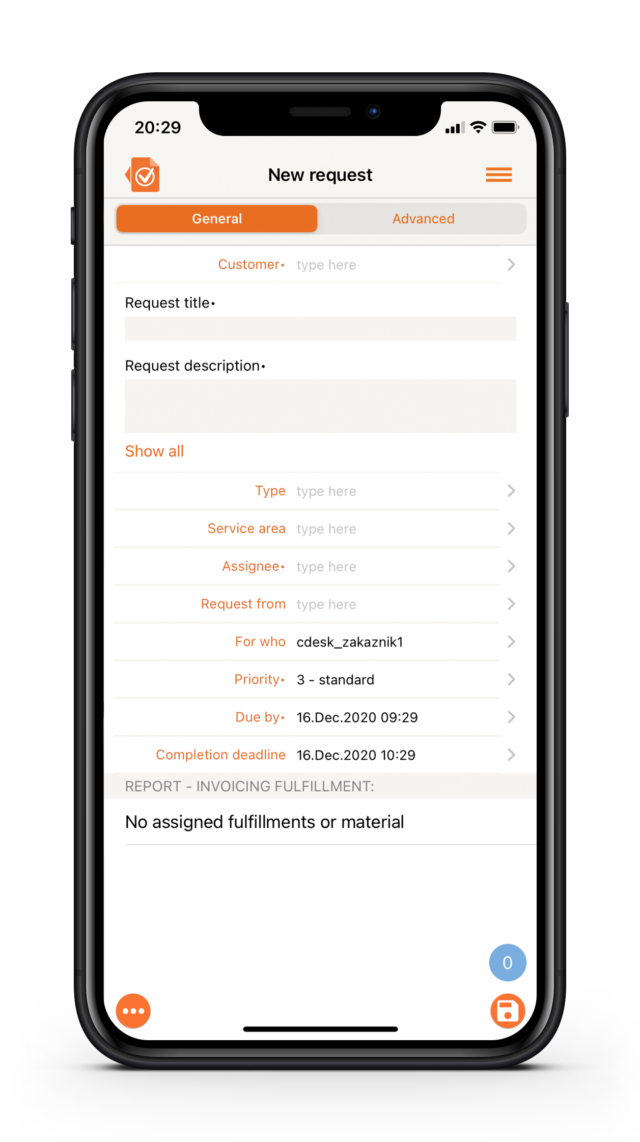
Meaning of Fields for Entering Requests
Basic Information
Customer• – The field is pre-filled with the customer assigned to you. If there are more than one, click on > , to display a window with a selection of companies and the option to filter the entries.
Request Name• – A title that can be compared to the mail subject, it briefly describes the point of the request. The request will appear under this name in the list of requests and other CDESK modules related to requests.
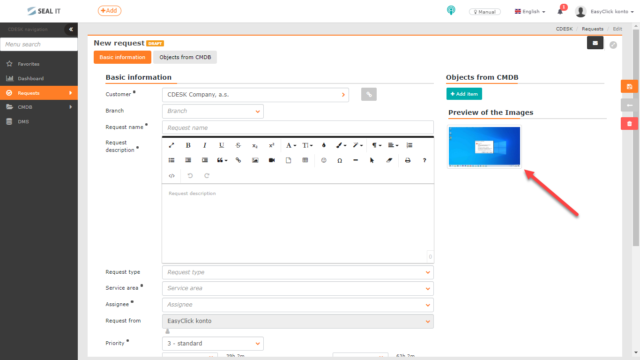
Request Description• – Field for specifying the request details, with the possibility of formatting the text. It is also possible to insert images into the field.
Request Type, Service Area – These are parameters that are optionally set by your supplier to categorize requests appropriately. If you see these items, you select them according to your supplier’s recommendations. There is also an option in CDESK to have these parameters already selected if your supplier will be using the Catalog of Requests.
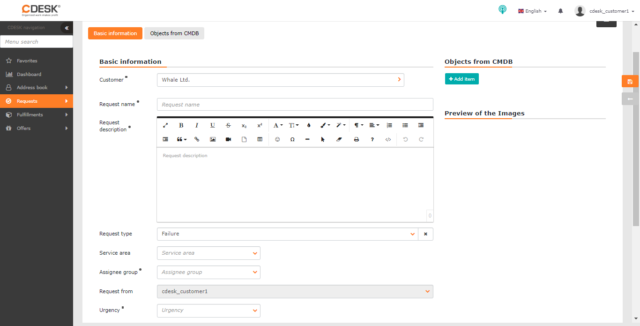
Assignee Group/Assignee • – The Assignee Group, Assignee field is visible if your supplier makes it available to you. The Assignee Group or Assignee may already be pre-set or even hidden.
Requested by– the field is automatically pre-filled with the user logged in (customer). Your supplier can give you access to your colleagues for whom you can make requests.
Urgency – The Urgency field is accessible if the administrator of your environment has enabled the Prioritization of requests according to Urgency and Impact feature. According to the urgency, the assignee evaluates the priority with which to address the request. The assignee determines the Impact of the request and based on the combination of Urgency and Impact, CDESK automatically determines the priority of the request. If the Prioritization of requests according to Urgency and Impact feature is disabled, the customer determines the priority directly.
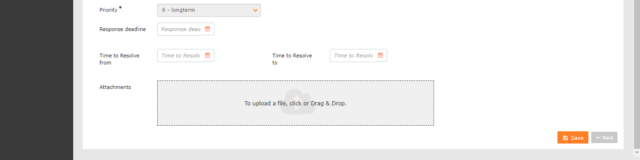
Priority• – This is an information for the request assignee. If the administrator of the environment has a defined SLA, changing the priority of the request may also change the RT and TTR deadlines of the request. If the environment administrator has enabled the Prioritization of requests according to Urgency and Impact feature, the Priority field will be pre-filled automatically based on the rule defined by the administrator in CDESK.
Response Time• (RT) – The deadline by which the assignee has to respond to your request, e.g. changing the status of a request, adding a fulfillment, or a discussion post.
Time to Resolve• (TTR) – The deadline by which the assignee has to complete your request.
Attachments – Possibility to add an attachment (e.g. a screenshot). To attach a file, either drag it with the mouse to this field or click to select the file from the disk. It is also possible to add multiple attachments, a list of attached files will then be displayed below this field.
Preview of the Images – If you have placed an image in the attachment, a preview of the image will be displayed in this section after the request has been saved.
Management of Notifications
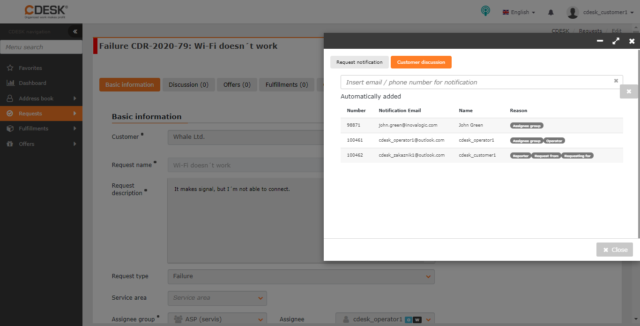
In the upper right part of the window there are icons for setting notifications for the request. Here you can block/enable sending notifications to the request. You can also add additional notification recipients.
![]() Edit Notification Recipients – when clicked, a window appears listing recipients of the request notifications, discussion, and notes for assignees. For automatically added recipients, a reason informing why the contact was added is also displayed. Recipients can also be added manually – by entering their username, email address, or phone number in international format (+421 for Slovakia). You can also remove notification recipients by clicking x. Recipients marked as assignee, reporter and requested by cannot be removed. Contacts that have already been removed can be re-added by clicking +.
Edit Notification Recipients – when clicked, a window appears listing recipients of the request notifications, discussion, and notes for assignees. For automatically added recipients, a reason informing why the contact was added is also displayed. Recipients can also be added manually – by entering their username, email address, or phone number in international format (+421 for Slovakia). You can also remove notification recipients by clicking x. Recipients marked as assignee, reporter and requested by cannot be removed. Contacts that have already been removed can be re-added by clicking +.
Create a New Request When Logged into CDESK, via Web Browser
Before submitting a new request, you need to log into the CDESK system – your CDESK administrator will provide you with the address and login details.
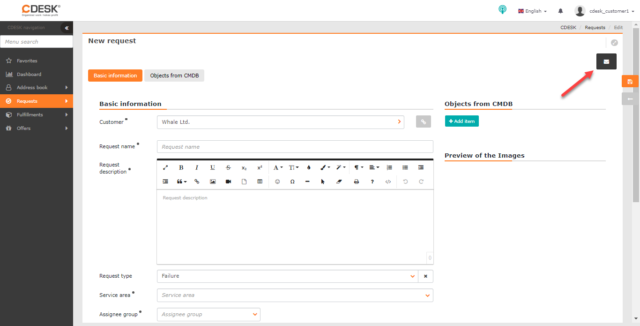
After logging into the CDESK system, a new request can be created in Requests -> List of requests, or via the quick button located in the top bar.
Click the +Add button in the list of requests to add a new request. If only the +Add from catalog button is displayed, continue with the Request from Catalog of Requests paragraph.
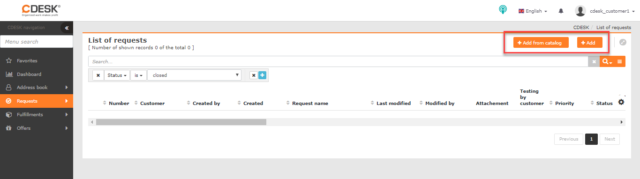
You can also add a request via the quick select button located on the top bar of CDESK.

Click the +Add button to open a new window with a form to enter the request. The meaning of individual fields is described in the paragraph Meaning of Fields for Entering Requests.
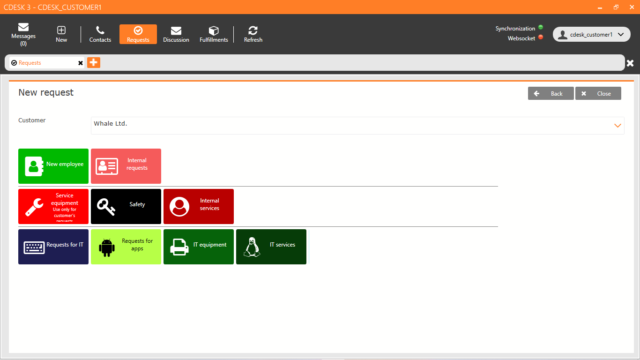
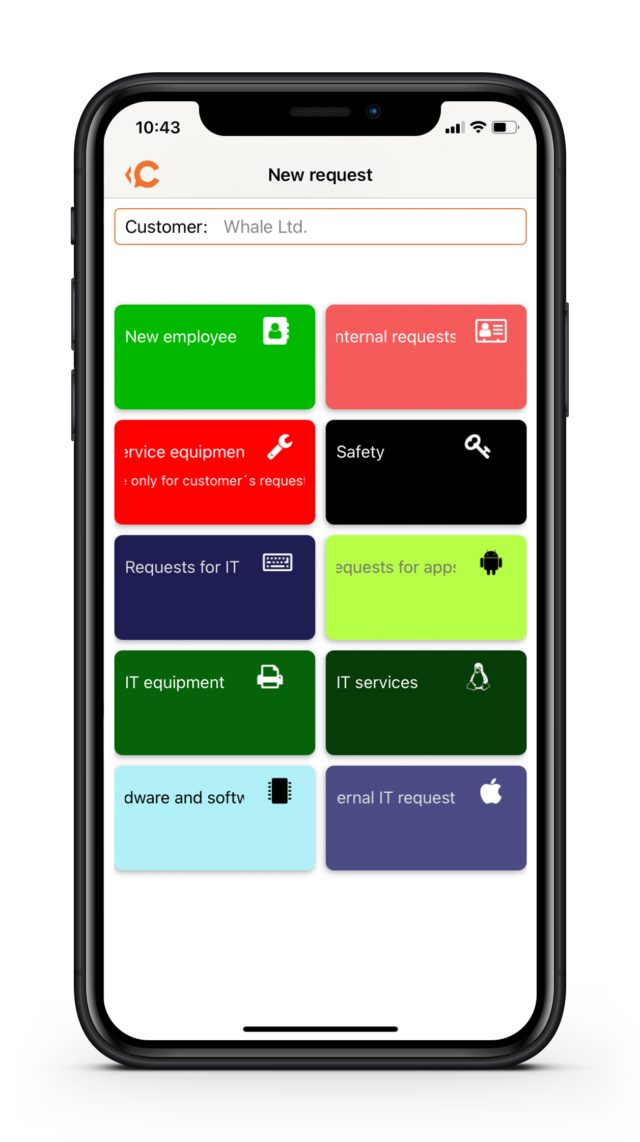
Request from the Catalog of Requests
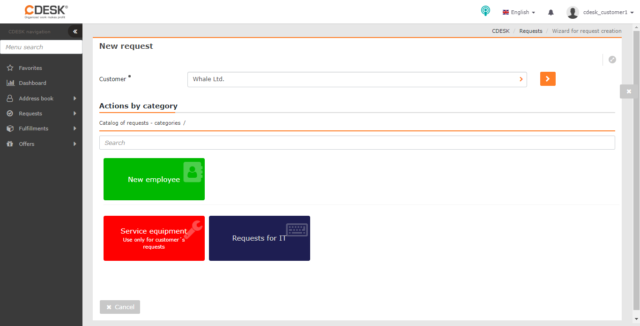
To add a request from the catalog of requests you need to be logged in. After logging into the CDESK system, you can create a new request from the catalog in Requests -> List of requests, by clicking on the +Add from catalog button.
The first step is to select a tile with associated templates. You can only select tiles assigned to your company.
When you click on a tile, a form will open to create a request. Depending on the template settings, some fields are pre-filled, some may be hidden. The meaning of each field is described above, in the section Meaning of Fields for Entering Requests.
Click Save to enter the completed request into the system.
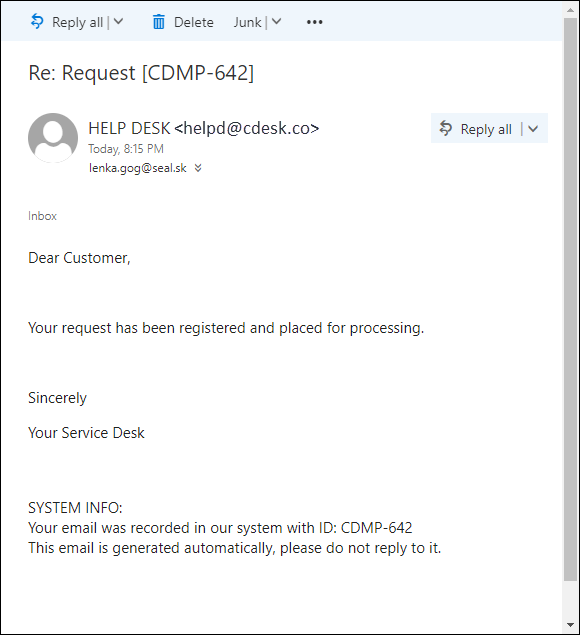
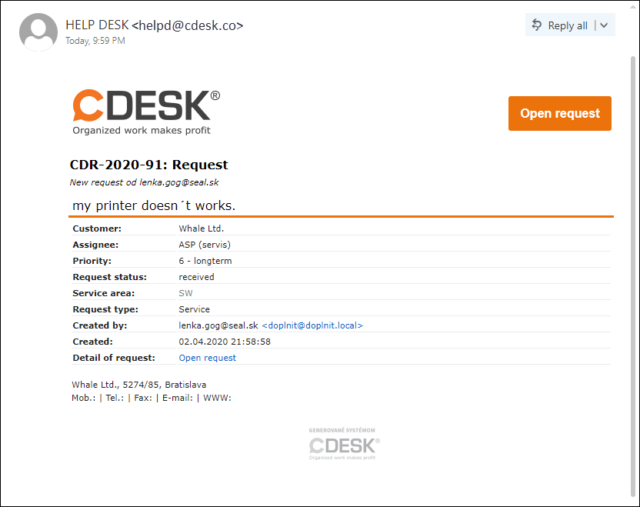
Create a New Request via Email (Message Processing)
Requests can be submitted by e-mail to a predefined public email address, from which emails are forwarded to the internal CDESK server address – either automatically or manually by the operator.
You may receive one or more of the following notifications after sending an email:
- Simple notification of receipt of your mail
- Standard confirmation of the creation of a new request from your mail – if the administrator of the environment has set the customer to receive a copy of the request in the default mail format
- Personalized confirmation of a new request from your mail – if the administrator of the environment has set up custom notification templates with simplified content
Create a New Request via Easyclick (CUSTOMER MONITOR)
This functionality requires the C-Monitor client to be installed and registered. This is the fastest way to make a request, usually related to the PC on which the C-Monitor client is installed. You can initiate a new request via Easyclick by double-clicking on the C-Monitor client icon in the taskbar, or by right-clicking on it and selecting Easyclick Requests -> Add New Easyclick Request (with screen).

If you double-click, a dialog box asks whether you want to take a screenshot of the current screen or not.
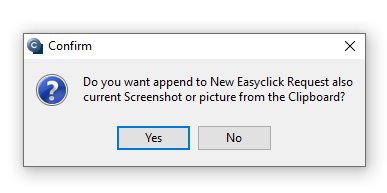
When you create a screenshot, you can select the part you want to include in the request.

After confirming the option, the CDESK application opens in the default web browser:
- If the catalog of requests is enabled and the creation of requests outside the catalog is disabled, the catalog is loaded as described in the Request from Catalog of Requests paragraph above.
- If the catalog of requests is disabled or creating requests outside the catalog is enabled, the form for entering a request opens. The meaning of each field is described in the Meaning of Fields for Entering Requests.
Click Save to submit the completed request.
Display of Submitted Easyclick Requests
By right-clicking on the C-Monitor client icon in the taskbar and selecting Easyclick Requests -> List of Easyclick Requests, it is possible to view all requests entered via Easyclick. The entered requests can be viewed (without the possibility of editing), or you can join the discussion to the request.

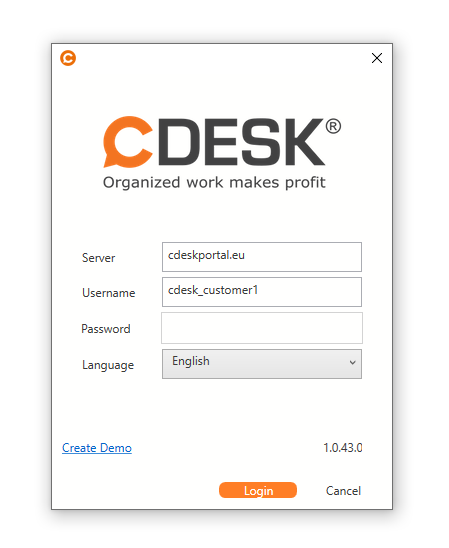
Create a New Request via the CDESK Client
The CDESK client brings you the CDESK system in the form of a desktop application.
You must log into the CDESK client application before entering a new request. Use the same login access as you use for the site
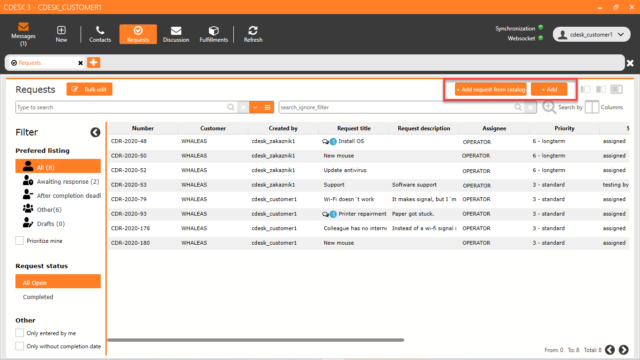
The CDESK client allows requests to be entered manually (so-called general requests) and via the catalog. Requests are created in the Requests module. The following options may be available:
- +Add – create a request by user logged into the CDESK client
- +Add request from catalog – create a request according to a predefined template from Catalog of Requests.
- +Add request from catalog and +Add
Create a General Request via the CDESK Client
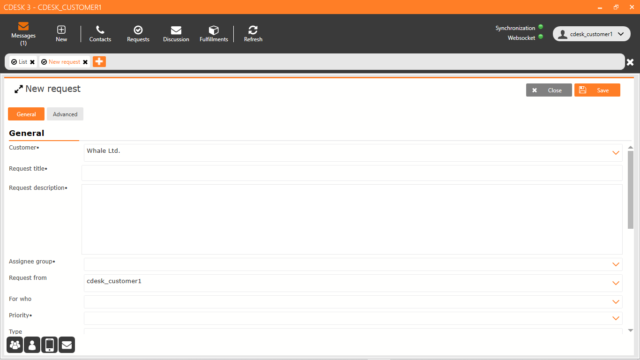
To add a general request, click the +Add button in the top right corner above the list of requests. Once clicked, a new window will open to enter the parameters of the request. The window is divided into two tabs: General and Advanced. The meaning of each field is described in the section Meaning of Fields for Entering Requests.
Create a Request from the Catalog of Requests via CDESK Client
To add a request from the catalog of requests, go to the Requestsmodule and click the +Add request from catalog, button located above the list of requests.
The first step is to select a tile with associated templates. You can only select tiles assigned to your company.
When you click on a tile, a form will open to create a request. Depending on the template settings, some fields are pre-filled, some may be hidden. The meaning of each field is described above, in the section Meaning of Fields for Entering Requests.
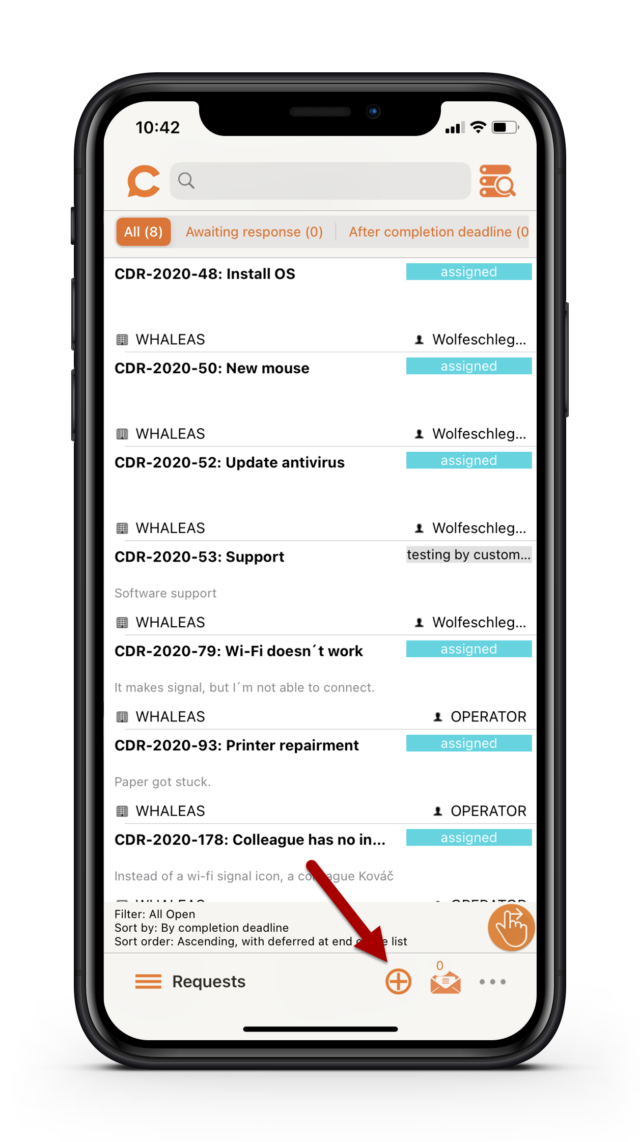
Create a New Request via Mobile App
You need to log into the CDESK application before entering a new request. Use the login access you have to the site.
Once logged into the CDESK system, you can add new requests using the quick select button on the bottom bar.
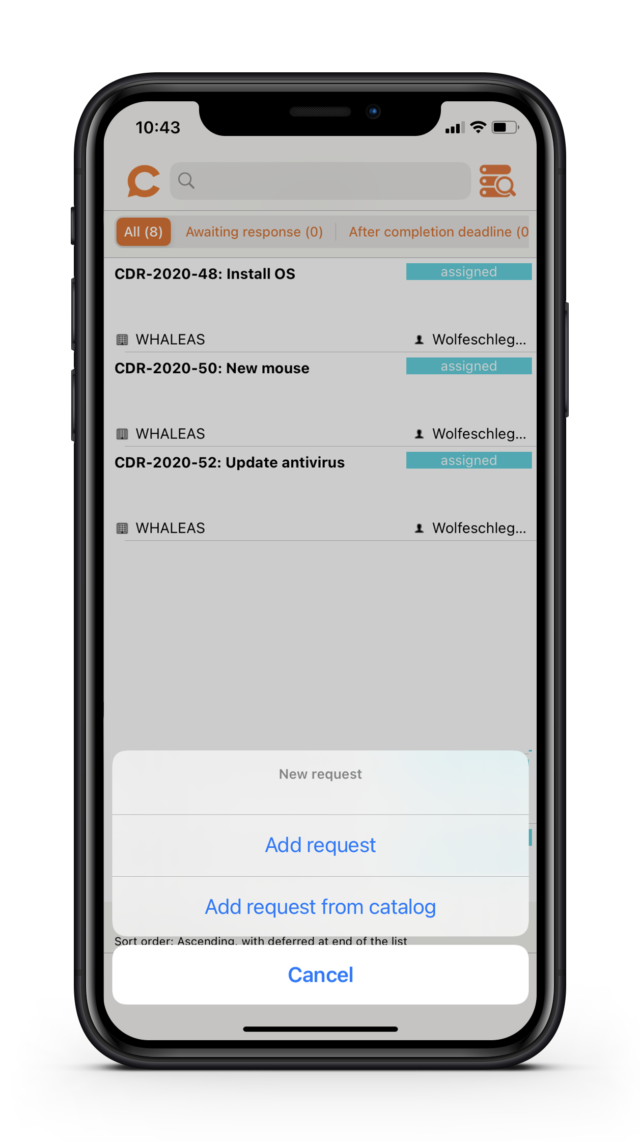
Select Requests, then Add Request. If only the Add Request from Catalog button is displayed, continue with the Request from the Catalog of Requests via Mobile App paragraph.
After selecting Add Request, the form for entering the request will open. The meaning of individual fields is described in the paragraph Meaning of Fields for Entering Requests.
Request from the Catalog of Requests via Mobile App
To add a request from the catalog of requests, click the quick select button and select Add Request from Catalog.
The first step is to select a tile with associated templates. You can only select tiles assigned to your company.
When you click on a tile, a form will open to create a request. Depending on the template settings, some fields are pre-filled, some may be hidden. The meaning of each field is described above, in the section Meaning of Fields for Entering Requests.
The Most Common Actions on the Request
Requests created by any of the methods described in the text above are displayed in Requests -> List of Requests, from where you can work with them further.
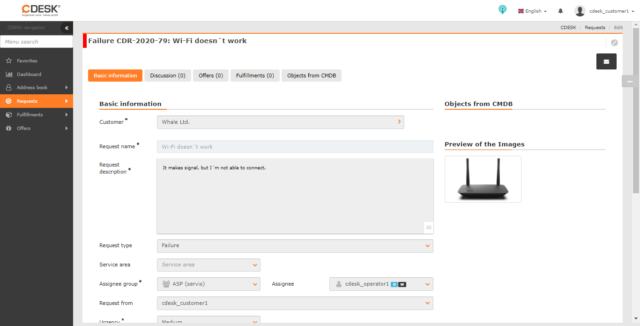
Double-clicking in the line of the request opens a window with a form similar to the one used to create request.
Once the request is saved, most of the fields on the request are blocked for the customer. However, the form will also be expanded with additional options:
- discussion with the operator
- approval of the request offers
- cost tracking using billing fulfillment on the request
- claim requests
- accept request completion
Discussion with the Operator
The discussion is used for mutual communication between the customer and the assignee
The tab becomes available after the request is saved. It contains a list of posts sorted from the newest to the oldest. These are the posts accessible to the customer account. Above the list there is a button +Discussion with the customer, which is used to add new posts.
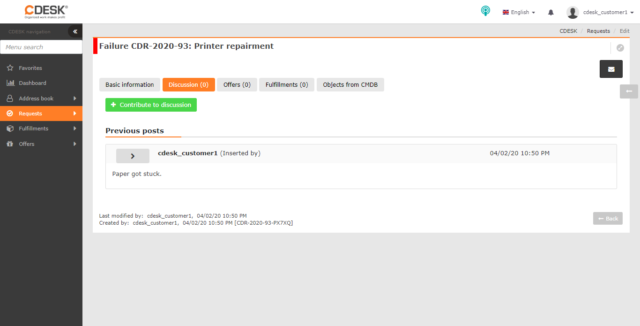
Click the + Discussion with the customer button to open a form for entering a post with the following fields:

To• – Possibility to manually add recipients of notification about the request discussion post – by selecting from the list or by typing e-mail address or phone number in international format (+421…)
This is the list of notification recipients:
- Automatically added recipient is the person who enters the request, the assignee and previous assignees of the request, the responsible person and the customer contacts that have enabled copies of emails from z requests in the contact settings
- Manually added
- recipient can be a user, customer contact, email address and phone number (recipient will be notified via SMS message – requires activation). These recipients are color coded to differentiate them from automatically added recipient × next to the contact.
Next, there is a field for the text of the post with the possibility to format the text.
On the right side of the window there is a field for adding a file, for example a screenshot or a photo. Click on it to open the dialog box to select the file,or search the file on your PC and drag&drop it to the box.
To send a post, click on Send the Discussion Post. The Discussion Preview button will give you a preview of the email notification before it is sent. To submit a post, click the Send button. Select Cancel to return to the Discussion tab.
Comment on Offers on Request
The Offers tab becomes available after the request is saved. It gives the customer the possibility to follow and comment on offers from the operator.
The offer will be made available to the customer when it is placed in the To be Accepted status. You are informed about the creation of a new offer via email notification.
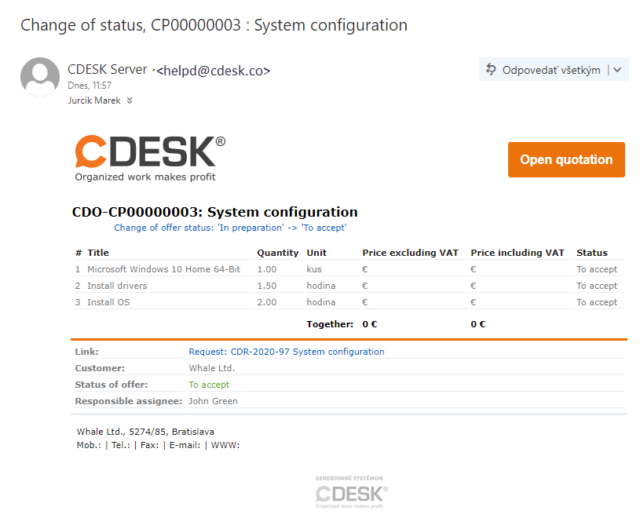
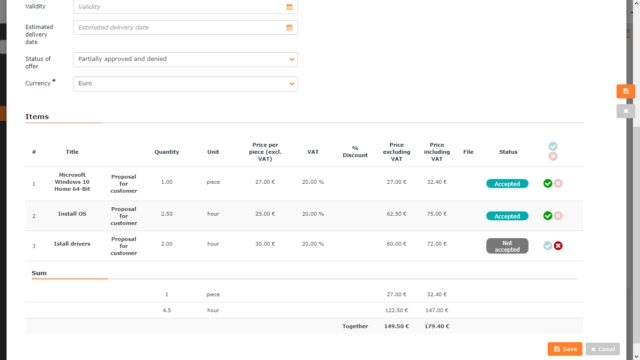
When you click on a specific offer in the list of offers, a new window with the offer parameters opens. The window is divided into two parts: Basic Information and Items. The Basic Information section contains the information entered by the operator. This cannot be changed by the customer.
The Items section displays the items you can approve or reject. You can approve all items in bulk by clicking on the icon ![]() , located above all items. Next to this is an icon that allows
, located above all items. Next to this is an icon that allows ![]() , you to reject all items in bulk.
, you to reject all items in bulk.

You can also comment on items individually. The approve/reject icons are also next to each item.
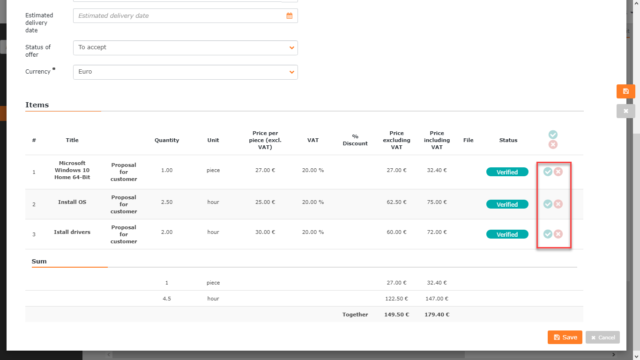
Depending on your statement, the offer may be switched to the following statuses:
- Accepted – After all items have been accepted. If the offer contains multiple items, this status is also entered if you accept at least one item and do not react to the remaining items.
- Partially Accepted and Rejected – Offer will be placed in this state if you accept some items and reject others.
- Rejected – After all items have been rejected. If the offer contains more than one item, this status is also entered if you reject at least one item and do not react to the remaining items.
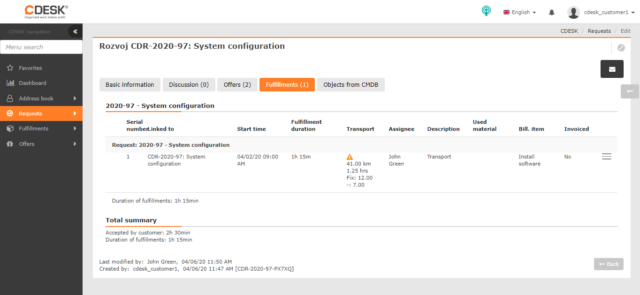
Invoice Fulfillments on the Request
Fulfillments will become available after the request has been saved. On this tab, the operator records the work done in working on the request. This allows you to keep track of the costs associated with fulfilling the request.
Completion of the Request When Logged into CDESK
After all actions have been completed, the operator switches the request to the Completed state. In this state, the buttons to accept/deny completion will become available on the request. If notifications are enabled, you are also notified of the option to accept the completion by email.
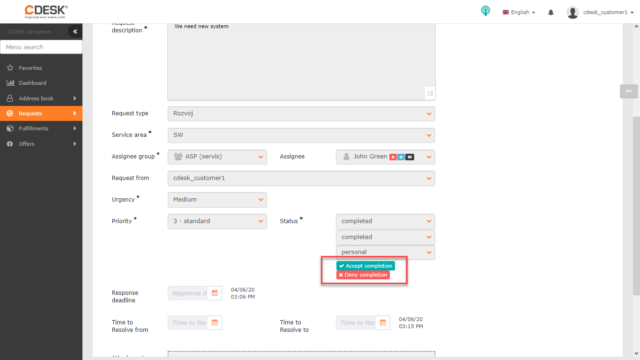
Selecting the Accept Completion option opens a window with the option to add a note to the acceptance, as well as the possibility to rate the assignee. After accepting the completion, the status of the request will change to completion accepted.
The operator can also complete the request by putting it in the Implemented state. However, when selecting this state, no accept/deny completion buttons are offered.
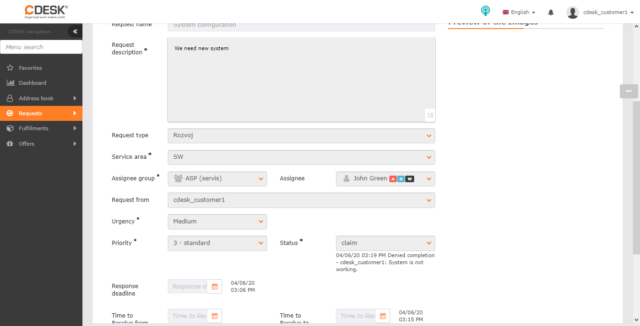
Denying – Claiming a Request When Logged into CDESK
When all actions have been completed, the operator switches the request to the Completed state. In this state, the accept/deny completion buttons will be available on the request. Selecting the Deny Completion option will open a window to indicate the reason for rejection. Indication of this reason is mandatory.
Depending on the settings of your environment, you can perform different actions after a request is denied:
- If the administrator of your environment has disabled the Claim status, rejecting the request will send it back to the In Progress status and the deadline counter will be reactivated.
- If the Claim status is enabled, when the completion is denied, the request is put into the Claim status.
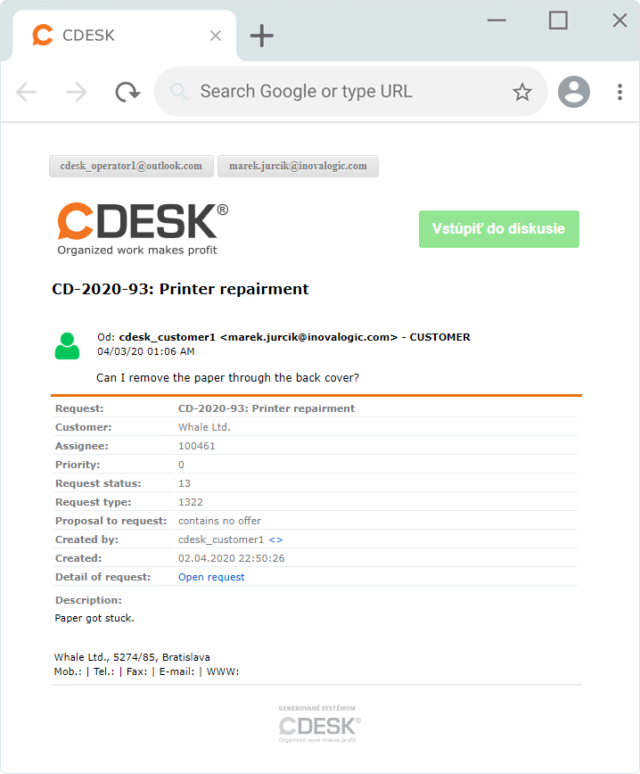
Completion of the Request via Email Notification
After the request is switched to the Completed status, you will receive an email notification of the request status change. If the Completion Accepted status is enabled in Global Settings, the notification will include buttons to accept/deny the request directly via email. In this case, there is no need to log into the system. This feature is intended primarily for customers who do not have access to CDESK.
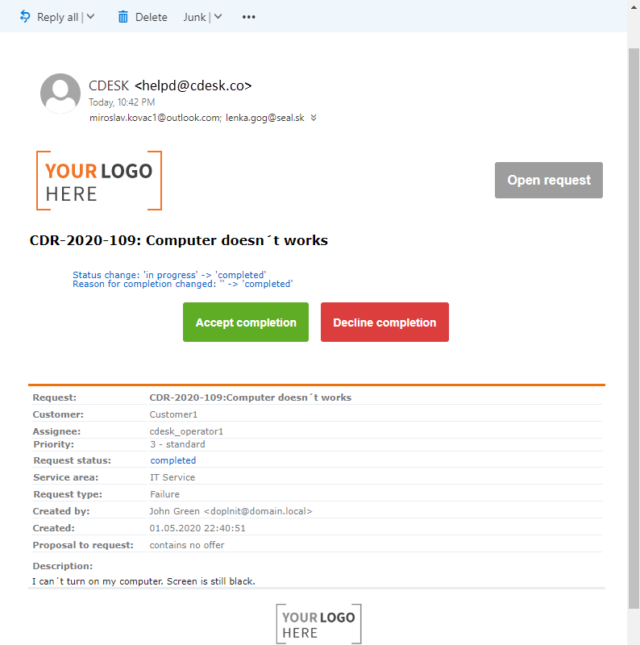
Acceptance of Request Completion via Email Notification
To accept the completion of a request via notification, click the Accept Completion button. This will then open a form to accept the completion in a new window of your default web browser.
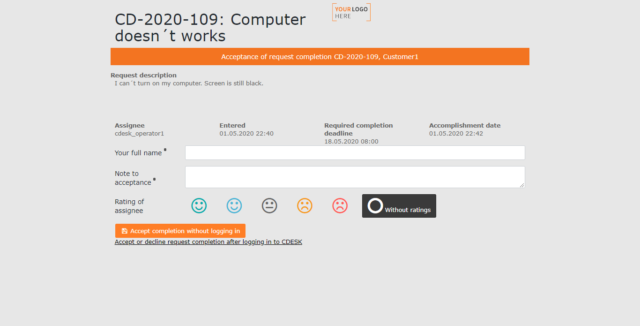
The top part of the form contains basic information about the request. You cannot change it. Below these are the fields you must fill in for the completion acceptance to be valid:
Your full name: Enter your first and last name
Note to acceptance: Enter the reason why you have decided to accept the termination request
Rating of assignee: Select the pictogram to rate the assignee’s work on the request. This is optional. If you do not wish to enter a rating, select Without rating.
After completing these fields, click Accept completion without logging in to accept the request. Below this button is a link to enter CDESK, which you can use if you have login credentials. Denying the completion of the request via CDESK is described HERE.
Denying of Request Completion via Email Notification
To deny the completion of a request via notification, click the Neakceptovať ukončenie button. A form will then open in a new window of your default web browser to reject the completion.

The top part of the form contains basic information about the request. You cannot change it. Below it, there are fields you must fill in for the rejection to be valid:
Your full name: Enter your first and last name
Reason for not accepting: Insert the reason why you have decided to reject the completion of the request
Once you have completed these fields, you can reject the request by clicking Deny completion without logging in. Below this button is a link to enter CDESK, which you can use if you have login credentials. Rejecting the completion of the request via CDESK is described HERE.