JIRA Connector
Advantages of Using JIRA Connector
The JIRA connector extends the possibilities of using CDESK in IT as well as other companies using services of programmers. It enables connection to JIRA software which is designed to organize programming work and project management. Thanks to this connection, it is possible to link CDESK requests to existing JIRA tasks or to create a new task directly from the request.
Currently the linking is fully functional with JIRA installed on the local server. The connection to the cloud version of JIRA will be completed based on demand

Setting Up CDESK and JIRA Connection
Adding JIRA Connector in CDESK and Activating JIRA REST API
To use the JIRA connector, it must first be added and configured. To add the JIRA connector, go to Global Settings -> Connectors, API and then click the +Add connector button.
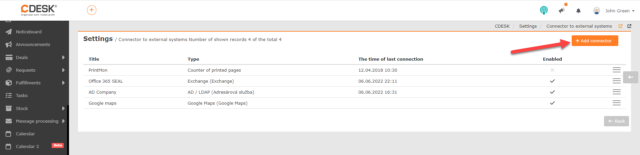
When clicked, a window will appear with a selection of connector types. Select JIRA. Click ->Continue to continue.

The connector configuration form is then displayed, which contains the following fields:
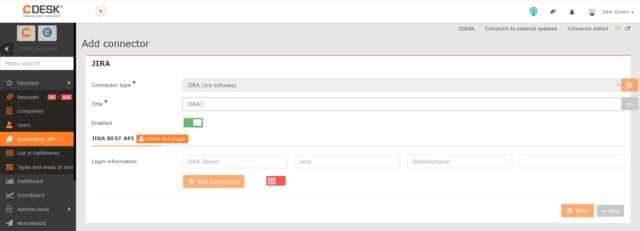
Connector type – when adding the JIRA connector, JIRA (Jira software) is automatically pre-populated in the field. This setting cannot be changed.
Title – name under which the connector appears in the list of connectors.
Enabled – to use the connector, place the switch in the on position ![]() .
.
Default Project – this field will only appear after JIRA and CDESK have been synchronized. Allows you to set which project will be pre-populated when new JIRA task is entered from the request. This project will also be preloaded in the filter and when linking request to existing JIRA task.
Default filter for status – this field is displayed after JIRA and CDESK have been synchronized. It allows you to set which JIRA tasks by status will be listed by default when linking a request to an existing JIRA task.
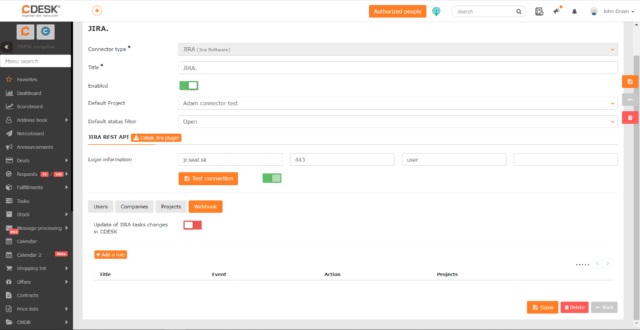
JIRA REST API
In order to use the CDESK JIRA connector, additional libraries need to be installed in your JIRA server. These can be downloaded by clicking on the Cdesk Jira plugin button.
They are used to make the CDESK server able to communicate with the JIRA system.
Then, in the Login Information section, fill in the JIRA server address, port number (443 is used by default), and administrator name and password for logging into JIRA. After filling in the details, the Test connection button becomes available. When clicked, additional fields become available in the form for pairing CDESK accounts and JIRA users. At the same time, the toggle next to the button is set to ON ![]() , indicating that the synchronization was successful.
, indicating that the synchronization was successful.
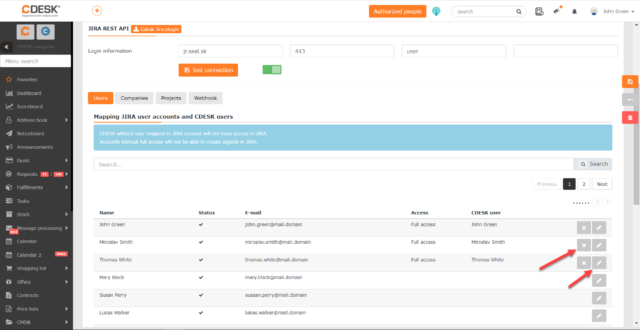
Mapping JIRA Accounts and CDESK Users
Linking CDESK users to JIRA accounts is possible on the Users tab. The user who does not have their CDESK account linked to a JIRA account will not be able to create new JIRA tasks from CDESK or link requests to existing JIRA tasks.
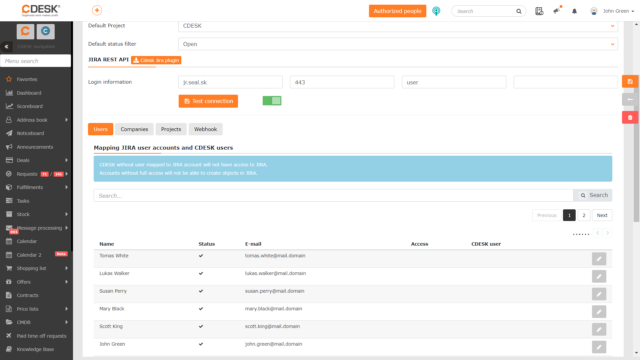
After successful synchronization, a list of all JIRA users is displayed in the tab. In the upper right corner, you can find a tool that allows you to scroll through the pages of the list. A specific user can be searched for using the search box. To link to a user in CDESK, click on ![]() at the end of the row of the user you want to link, and then select the desired user in the CDESK User column. To save the settings, click on
at the end of the row of the user you want to link, and then select the desired user in the CDESK User column. To save the settings, click on ![]() located at the end of the user row.
located at the end of the user row.
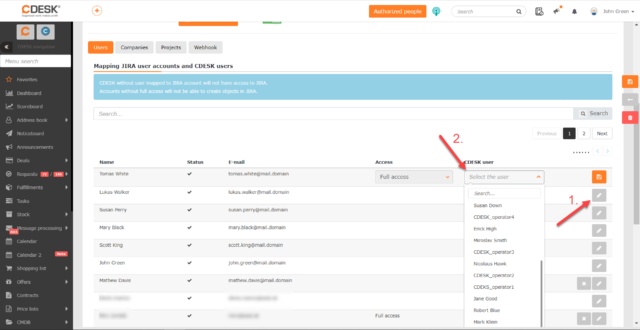
If you need to edit the link you set up, click ![]() at the end of that user’s row. You will then see the same box as when setting up links between accounts, and you can select a new CDESK user. If you want to remove the link, click on
at the end of that user’s row. You will then see the same box as when setting up links between accounts, and you can select a new CDESK user. If you want to remove the link, click on ![]() .
.
Selecting Companies for Matching JIRA Tasks
Linking to JIRA tasks is only possible on requests of those customers that are selected on the Companies tab in the JIRA connector. To assign a company, click the +Add Company button.
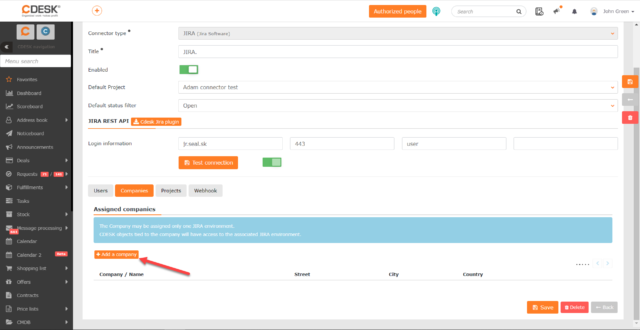
When clicked, a list of companies that are registered in Address Book -> Companies. To select a company, click on its name to add it to the list of assigned companies. Company can only have one assigned JIRA environment. CDESK requests tied to the company will have access to the assigned JIRA environment.

If you need to remove a company from the list, click on ![]() at the end of that company’s row.
at the end of that company’s row.

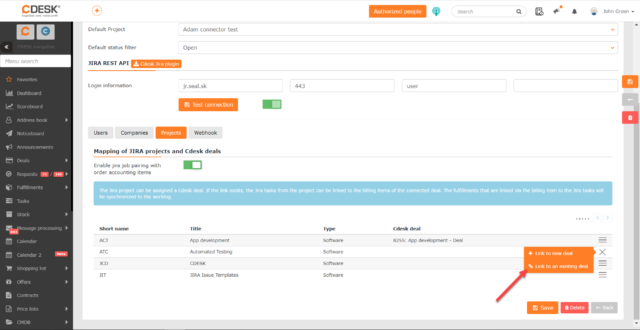
MMapping JIRA Projects with CDESK Deals
The CDESK JIRA connector allows you to transfer fulfillments from CDESK to the JIRA worklog. This is done by linking the JIRA task to the billing items under deals. Fulfillments that have a link through billing item to a JIRA task will be synchronized to the worklog. To achieve this, you need to link JIRA projects to CDESK deals and enable pairing of JIRA tasks with billing items. The linking of JIRA projects to deals can be set on the Projects tab in the JIRA connector.
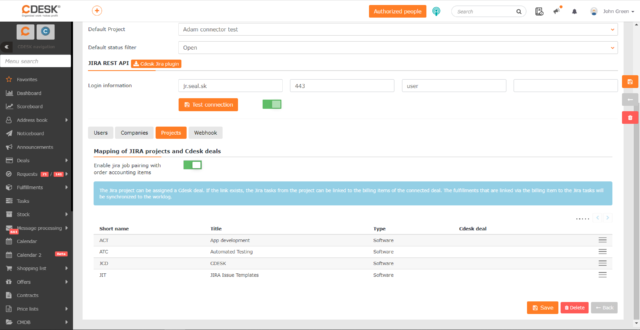
At the top of the tab, there is a toggle to Enable matching JIRA tasks with deal billing items. Putting the toggle switch to the on position ![]() ensures that if fulfillments have the same billing item set as the one on the linked deal, the time entered on these fulfillments will also be transferred to the JIRA task’s worklog. If the switch is set to off position
ensures that if fulfillments have the same billing item set as the one on the linked deal, the time entered on these fulfillments will also be transferred to the JIRA task’s worklog. If the switch is set to off position ![]() , such a transfer will not work.
, such a transfer will not work.
All JIRA projects are loaded in the tab after synchronization. To create a new CDESK deal that will be linked to the JIRA project, click on the menu icon ![]() at the end of the row for that project and select Link to New Deal. Once clicked, the form for entering a new deal appears. For more information on creating deals, see this article.
at the end of the row for that project and select Link to New Deal. Once clicked, the form for entering a new deal appears. For more information on creating deals, see this article.

Once the deal created, its name is displayed in the CDESK Deal column.
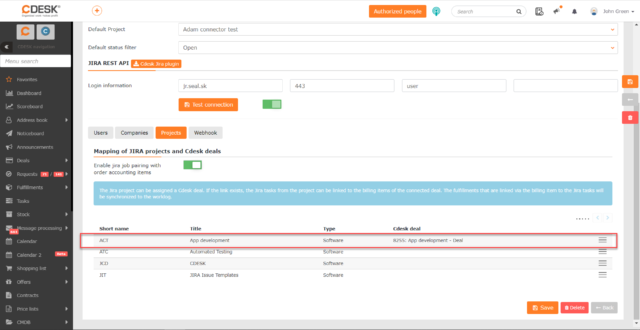
To link to an existing deal, click on the menu icon ![]() at the end of the project line and select Link to Existing Deal. Once clicked, a window with a list of deals appears. To select a deal, click on its name.
at the end of the project line and select Link to Existing Deal. Once clicked, a window with a list of deals appears. To select a deal, click on its name.
After successfully linking a deal to the JIRA project, it is possible to set up the linking of a specific JIRA task to the accounting tab. Start by double-clicking on the name of the linked task in the CDESK Task column. When clicked, a list of all JIRA tasks belonging to the JIRA project are displayed. At the top of the window, you can find a search box that allows you to search for a specific JIRA task. You can also use an advanced filter in the list, which allows you to filter the JIRA tasks according to the criteria you specify. For more information about working with the advanced filter, see this article.
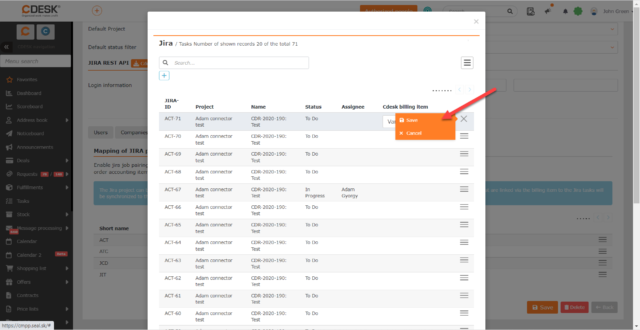
After searching for a specific task, you can set up a link to a new or existing billing item. To link to a new billing item, click on the menu icon ![]() at the end of the row of JIRA job and select Link to new billing item. Once clicked, a form will appear to enter the new billing item. For details on how to proceed with entering new billing items, see this article. After entering parameters for the new billing item, click Save button.
at the end of the row of JIRA job and select Link to new billing item. Once clicked, a form will appear to enter the new billing item. For details on how to proceed with entering new billing items, see this article. After entering parameters for the new billing item, click Save button.
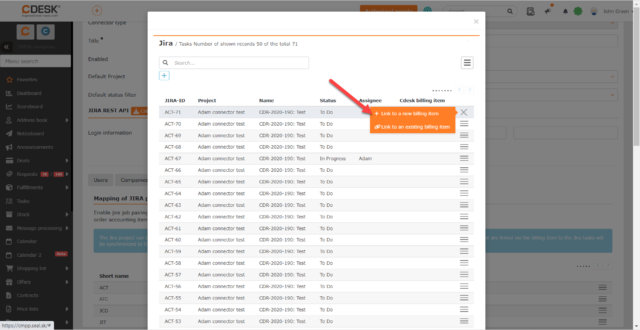
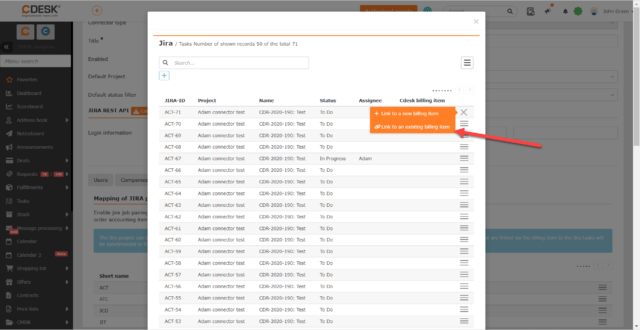
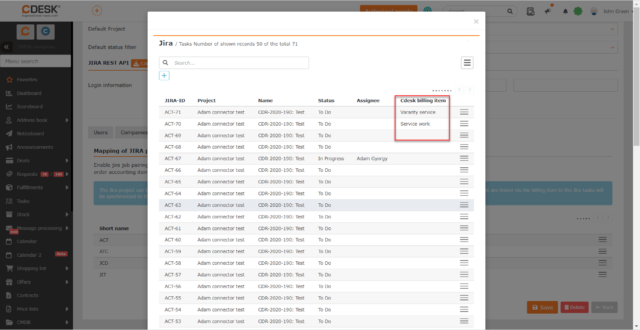
To link to an existing billing item, click on the menu icon ![]() at the end of the row for the JIRA task and select Link to existing billing item.
at the end of the row for the JIRA task and select Link to existing billing item.
When clicked, the CDESK Billing Item column displays a selection of billing items available for the customer that is set up on the selected deal. If the billing item is from a different deal than the one selected but it is available for the customer, the bracket after the title of the billing item provides information about which deal the billing item was taken from. Click to select a billing item from the list.
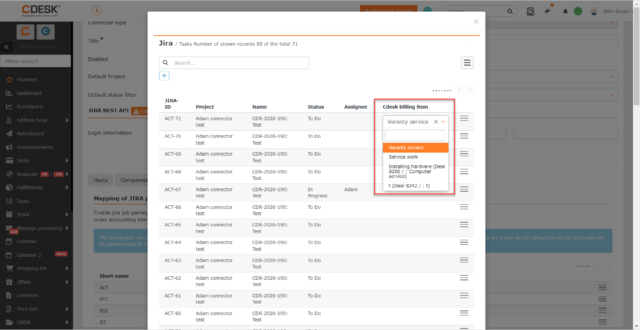
After selecting a billing item, you need to save this setting by clicking on the menu icon ![]() at the end of the row of the JIRA task and then selecting Save.
at the end of the row of the JIRA task and then selecting Save.
After saving the linking of a billing item to the JIRA task, the name of the billing item appears in the CDESK Billing Item column.
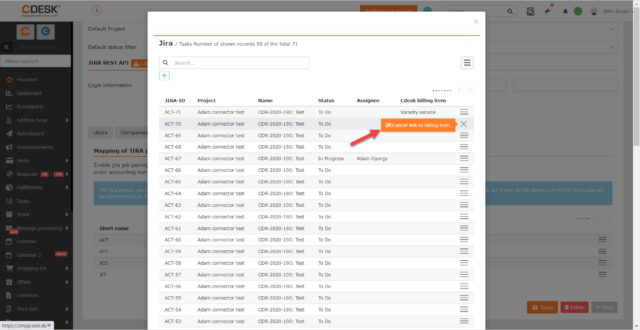
If you need to unlink to a billing item, click on the menu icon ![]() at the end of the row of the JIRA task and select Cancel link to billing item.
at the end of the row of the JIRA task and select Cancel link to billing item.
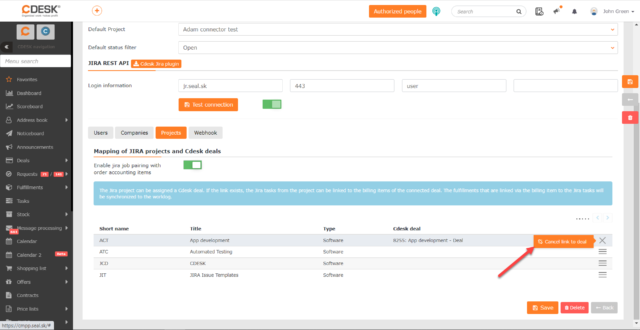
If you need to unlink directly to a deal, click on the menu icon ![]() at the end of the project line and select Cancel link to deal.
at the end of the project line and select Cancel link to deal.
Notifications of Changes on Linked JIRA Task
Once a CDESK request is linked to a JIRA job, the CDESK user can receive notifications of changes made to the JIRA task. Activating these notifications and setting what changes to notify can be configured in the Webhook tab of the JIRA connector.
Placing the Update of JIRA Tasks Changes in CDESK switch in the on position ![]() , ensures that CDESK receives information from JIRA about changes made to tasks. This link is important so that CDESK can subsequently send notifications to users. If this switch is disabled
, ensures that CDESK receives information from JIRA about changes made to tasks. This link is important so that CDESK can subsequently send notifications to users. If this switch is disabled ![]() , this link will not work and ultimately no notifications can be sent either. To set sending of notifications, click the +Add Rule button.
, this link will not work and ultimately no notifications can be sent either. To set sending of notifications, click the +Add Rule button.
When clicked, the fields for entering the rule parameters are displayed:
Title – enter a name that will be used to briefly describe the rule.
Event – select the event from the list that will send notifications. You can choose from the following options:
- Status change to – notification is sent when the status of the JIRA task changes. When this option is selected, a field appears to select the status. If the status in the JIRA task is selected, the user is notified. These are the statuses that are set in JIRA. If you do not select any specific status in this second field, notifications will be sent when any status change occurs.
- Change of assignee – notification is sent when assignee changes on the JIRA task.
Action – select Send notification.
Projects – select the project under which changes to JIRA tasks will be notified. Multiple projects can be selected for a single rule.
To save a rule, click on ![]() , located at the end of the rule line.
, located at the end of the rule line.
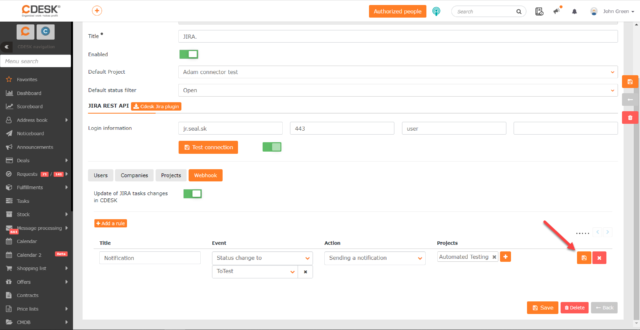
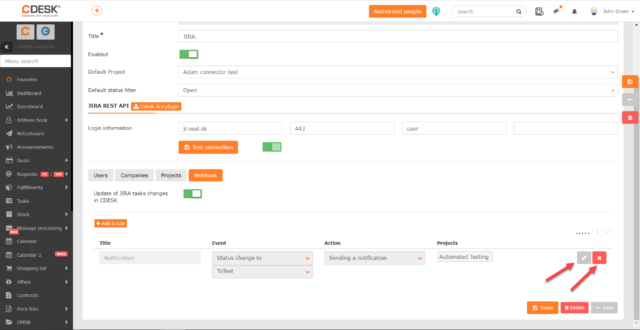
CDESK allows you to create multiple rules for sending notifications of changes on the JIRA task. All created rules are displayed in the list on the Webhook tab of the JIRA connector. If you need to edit a saved rule, click on ![]() at the end of the row for that rule. If you want to delete a rule, click
at the end of the row for that rule. If you want to delete a rule, click ![]() .
.
Setting a rule on the Webhook tab only sets the conditions for when notifications are sent. However, for the user to receive the notification, you still need to enable notification from the JIRA connector in Global Settings -> Notifications -> Basic Settings -> Requests -> Jira Connector field. In the Recipient of the Notification column, you need to set the roles that will be notified and then enable the toggle in the Email column. For the Jira connector, only mail notifications are currently available.

Entering JIRA Task via Requests in CDESK
Once the JIRA connector is configured, it can be used to create new JIRA tasks from requests, or to link requests to existing tasks. These actions can only be performed on saved requests. Also, they must be on the customer that was selected when configuring the JIRA connector on the Companies tab.
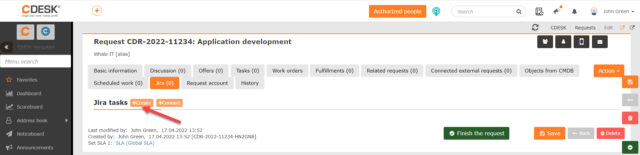
Adding and linking with JIRA tasks can be done on the Jira tab in the CDESK request. If the tab does not appear in the list, check permissions in: Users and Groups -> Users -> choose a specific user -> Specific user -> Permissions tab -> Requests -> Access to Tabs -> Jira.
Creating New JIRA Task
To create a new JIRA task that will be linked to the request, click the +Create button in the Jira tab.
When clicked, a form containing the following fields is displayed:
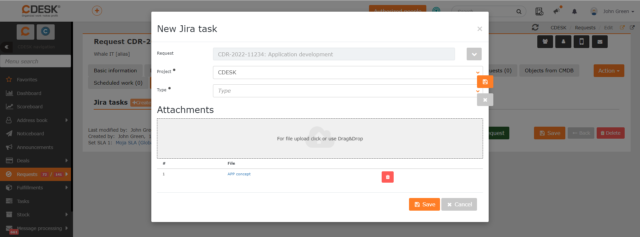
Request – the field will automatically pre-populate the number and name of the request from which the JIRA task is being created. Click on ![]() to view the request details. Click on
to view the request details. Click on ![]() again to close the detail.
again to close the detail.
Project – select the project in which the JIRA task will be included. The field can be pre-populated with the project that you set in the Default Project field when configuring the connector.
Type – select the JIRA task type. After selecting the request type, additional fields will be displayed, such as those used in JIRA for that type.
Attachments – in this section you can add attachments to the JIRA task. Also, attachments added to the original CDESK request will be transferred here. If you need to remove any of the attachments, click on ![]() .
.
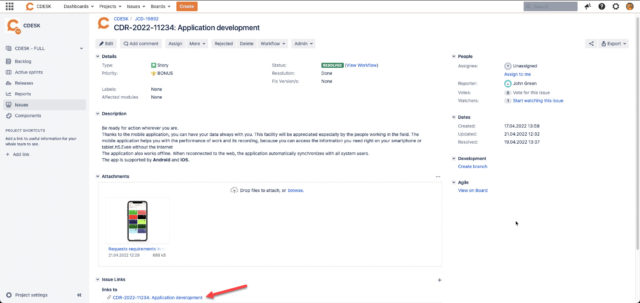
To create a new JIRA task, click the Save button located in the bottom right corner of the form. In the created JIRA task, you can find the information about the link to the CDESK request with the option to click through to the request.
Linking to Existing JIRA Task
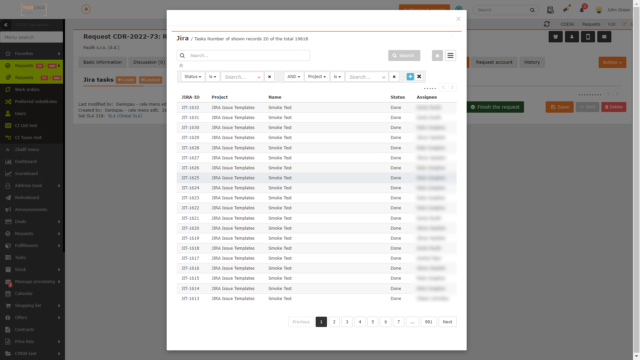
To link a request to an existing JIRA task, click the +Connect button in the JIRA tab.

When clicked, a modal window appears with a selection of JIRA tasks. The list can be pre-populated with a filter containing the task and project status, which you may have set when configuring the JIRA connector in the Default Project and Default Filter for Status fields. To create a link, click on the JIRA task title.
After linking, the JIRA task contains information about the link to the CDESK request with the option to click through to that request.
View and Work with Linked JIRA Tasks in CDESK
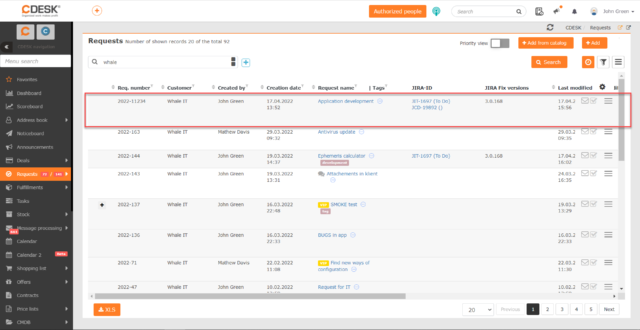
Information about the linked JIRA task is also displayed directly in the list of requests, where you can add columns JIRA-ID and JIRA Fix Version. Working with the list of requests is described in a separate text List of requests . Clicking on an entry in the JIRA-ID column shows the linked JIRA task in a new browser window.
When you open the request, the JIRA tab shows a list of all linked JIRA tasks. The following columns are displayed in the list:
- JIRA-ID
- Project
- Name
- Status
- Assignee
- Fix version
- Last change
- Last post
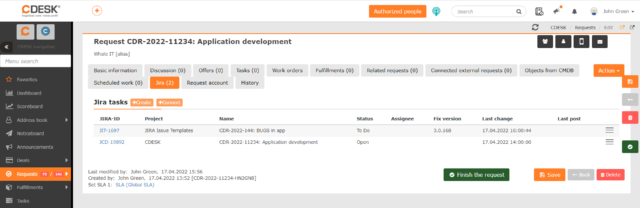
If necessary, the link with the JIRA task can be broken. To unlink, click on the menu icon ![]() at the end of the row of the task and select Cancel link.
at the end of the row of the task and select Cancel link.
