FREE APPROVAL
Page contents
Why Use Free Approval
Unlike the approval defined in the request template, a free approval can be added separately or to a specific request at any time since its creation. As a result, the free approval feature offers a dynamic and simple solution for any situation that requires approval. Free approval requires definition of only one rule that will globally determine the parameters of all free approval processes.
Establishing a Rule for Free Approval
In order to use free approval, you must first define an approval rule for it, under Approval -> Approval Rules. Access to this module depends on permissions. If it does not appear in the menu, check your permissions under Users and Groups -> Users -> choose a user -> Permissions tab -> Approval -> Approval Rules.
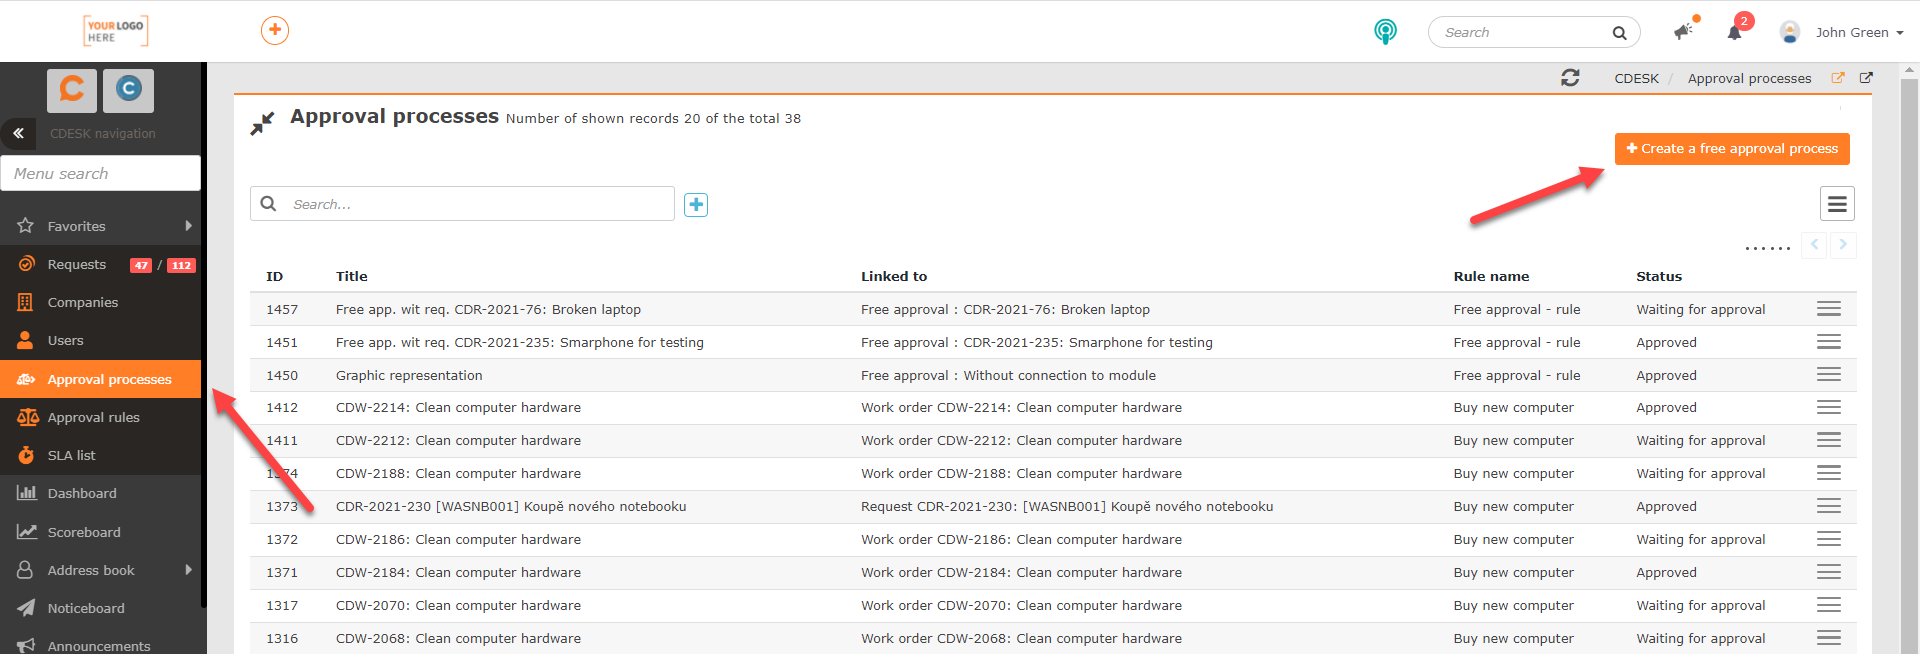
When you click on the Approval Rules module, a list of all approval processes used in CDESK is displayed. In the free approval process, only one rule is created, in which you only specify whether the note for approval and the note for refusal will be obligatory/optional.
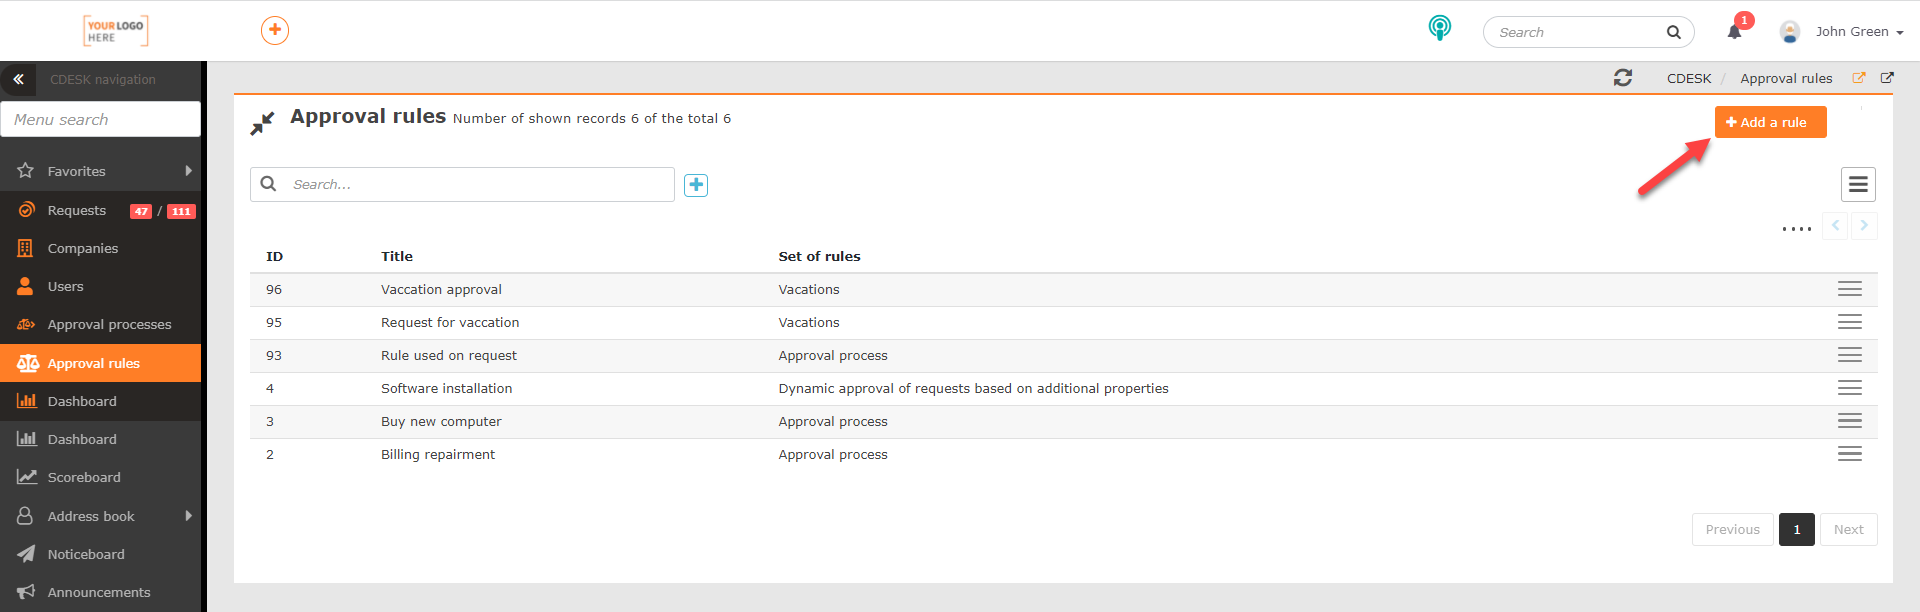
To create a new rule, click the + Add a Rule button located in the upper right corner above the list of approval rules. If the button does not appear, check the permissions for creating approval processes in Users and Groups -> Users -> choose a user -> Permissions tab -> Approval -> Approval Rules.
When you click on the button, a form containing the following fields will appear:
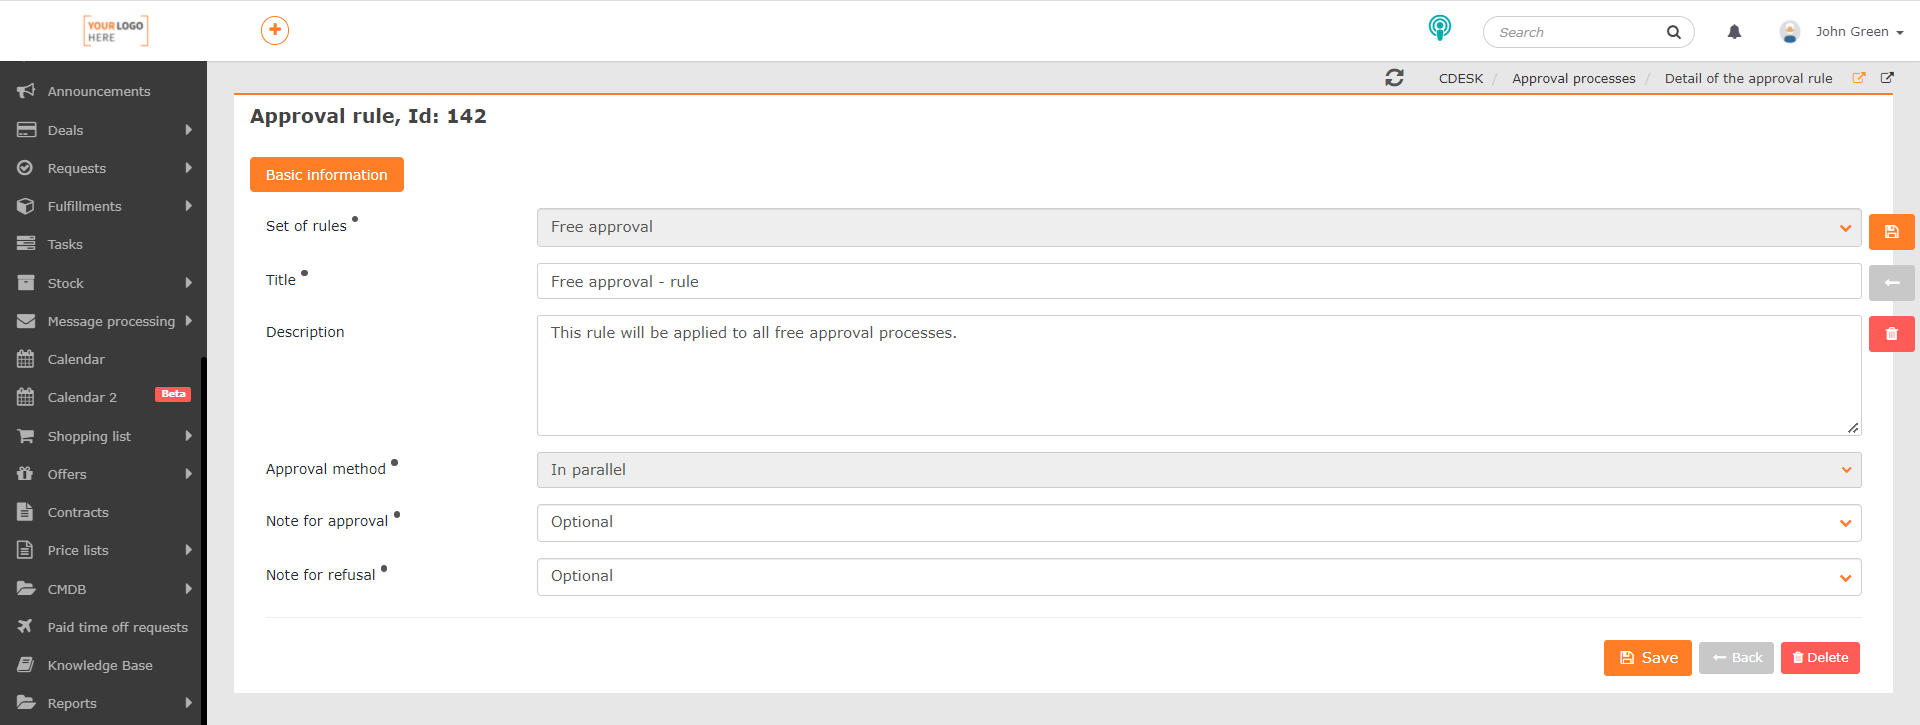
Set of Rules – when setting up a rule for free approval, select Free Approval.
Title – the name under which the rule will appear in the list of approval rules. It is used to briefly characterize the rule. The name does not carry over into the approval process itself.
Description – a field for inserting more detailed information about the approval rule. Completion of this field is optional. The description is not carried over into the approval process itself.
Approval Method – when you create a rule for free approval, In parallel is automatically filled in. This means that if the approval process for a free approval is linked to multiple approvers, each of them will be able to comment on the approval, regardless of whether other approvers have commented before them. That is, there is no limit to the order in which individual approvers will comment on the process. This setting cannot be changed in the case of free approval.
Note for approval
- Obligatory – any user who decides to approve the proposal will have to insert a note explaining their decision.
- Optional – approval of the proposal will be possible without the note.
Note for refusal
- Obligatory – any user who decides to reject a proposal will have to insert a note explaining their decision.
- Optional – refusal of the proposal will be possible even without the note.
To save the rule, use the Save button located in the bottom right corner. Once the rule created, it can be used in a free approval without a link to a module, or with a link to an already established request. For more information, see the paragraphs below: Free Approval without a Link to any Module and Free Approval with a Link to a Request.
Editing an Approval Rule
Once saved, the rule is added to the list of approval rules. It can be edited or deleted if necessary. Find the rule in the list, click on the menu icon ![]() , which is located at the end of the row for that rule, and select Edit. If the button is not displayed, you need to check the edit permissions in Users and Groups -> Users -> choose a user -> Permissions tab -> Approval -> Approval Rules.
, which is located at the end of the row for that rule, and select Edit. If the button is not displayed, you need to check the edit permissions in Users and Groups -> Users -> choose a user -> Permissions tab -> Approval -> Approval Rules.
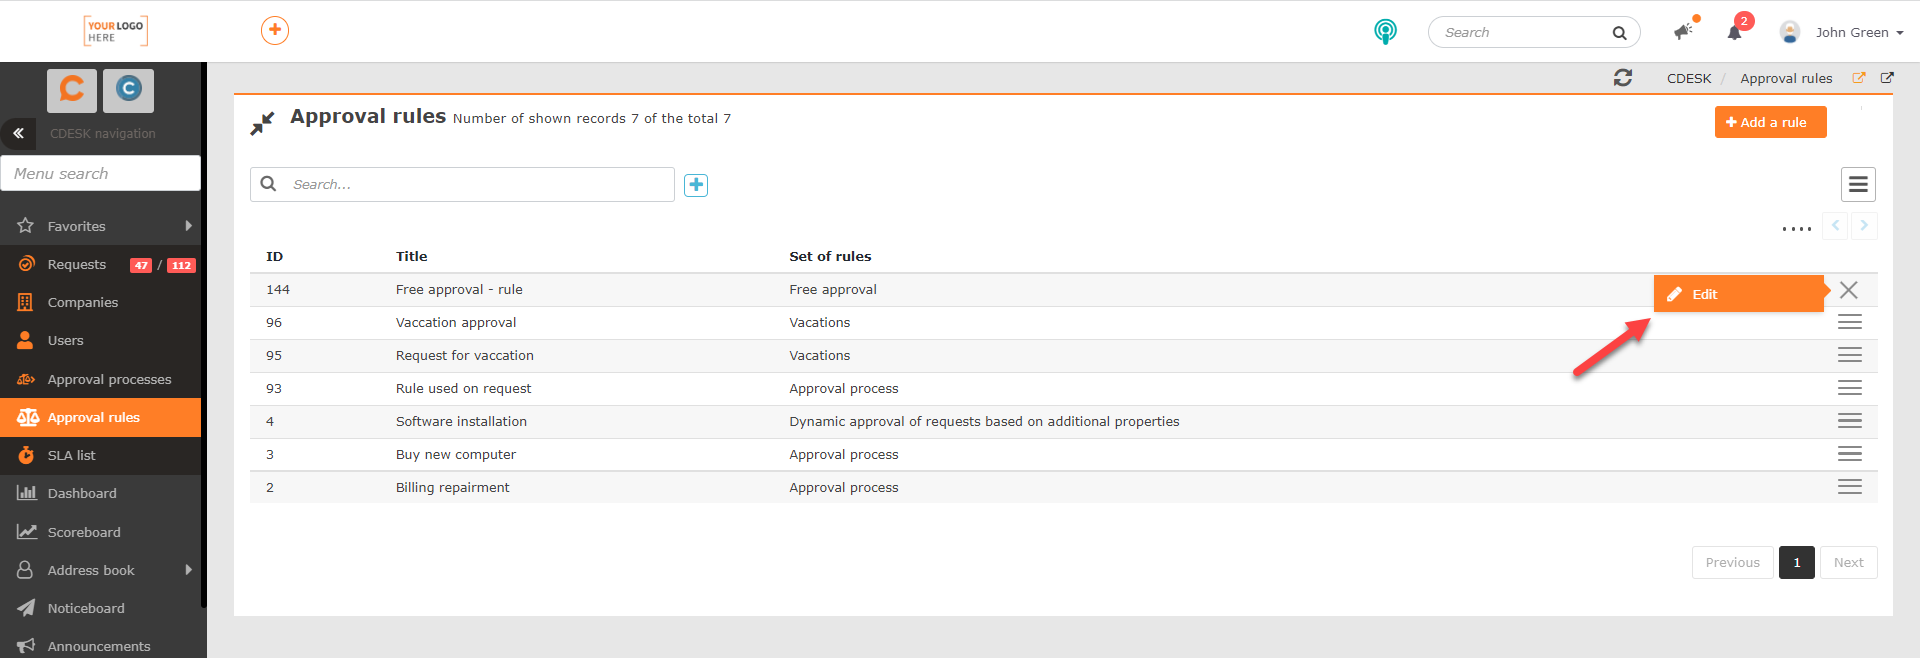
Click Edit to display the same form as when entering a rule. All fields except Set of Rules and Approval Method can be edited. To save the changes you have made, use the Save button in the bottom right corner. If you wish to delete a rule, click the Delete button, also located in the bottom right corner. The button to delete a rule is only displayed to users with delete permission. This permission can be set in Users and Groups -> Users -> choose a user -> Permissions tab -> Approval -> Approval Rules.
Free Approval without a Link to any Module
Establishing the Approval Process of the Free Approval without a Link
Once a rule for free approval created, it is possible to set up an approval process without a link to a module in CDESK. To create such an approval process, go to Approval -> Approval Processes. If the module does not appear in the menu, check the permissions under Users and Groups -> Users -> choose a user -> Permissions tab -> Approval. When you click on the module, a list of approval processes is displayed. To create a free approval process, click on the + Create a Free Approval Process button located in the top right corner of the list. If the button is not displayed, check your permission to create free approval processes (Users and Groups -> Users -> choose a user -> Permissions tab -> Approvals -> Free Approval – Records.)
When you click on the button, a form for entering the parameters of the approval process is displayed.
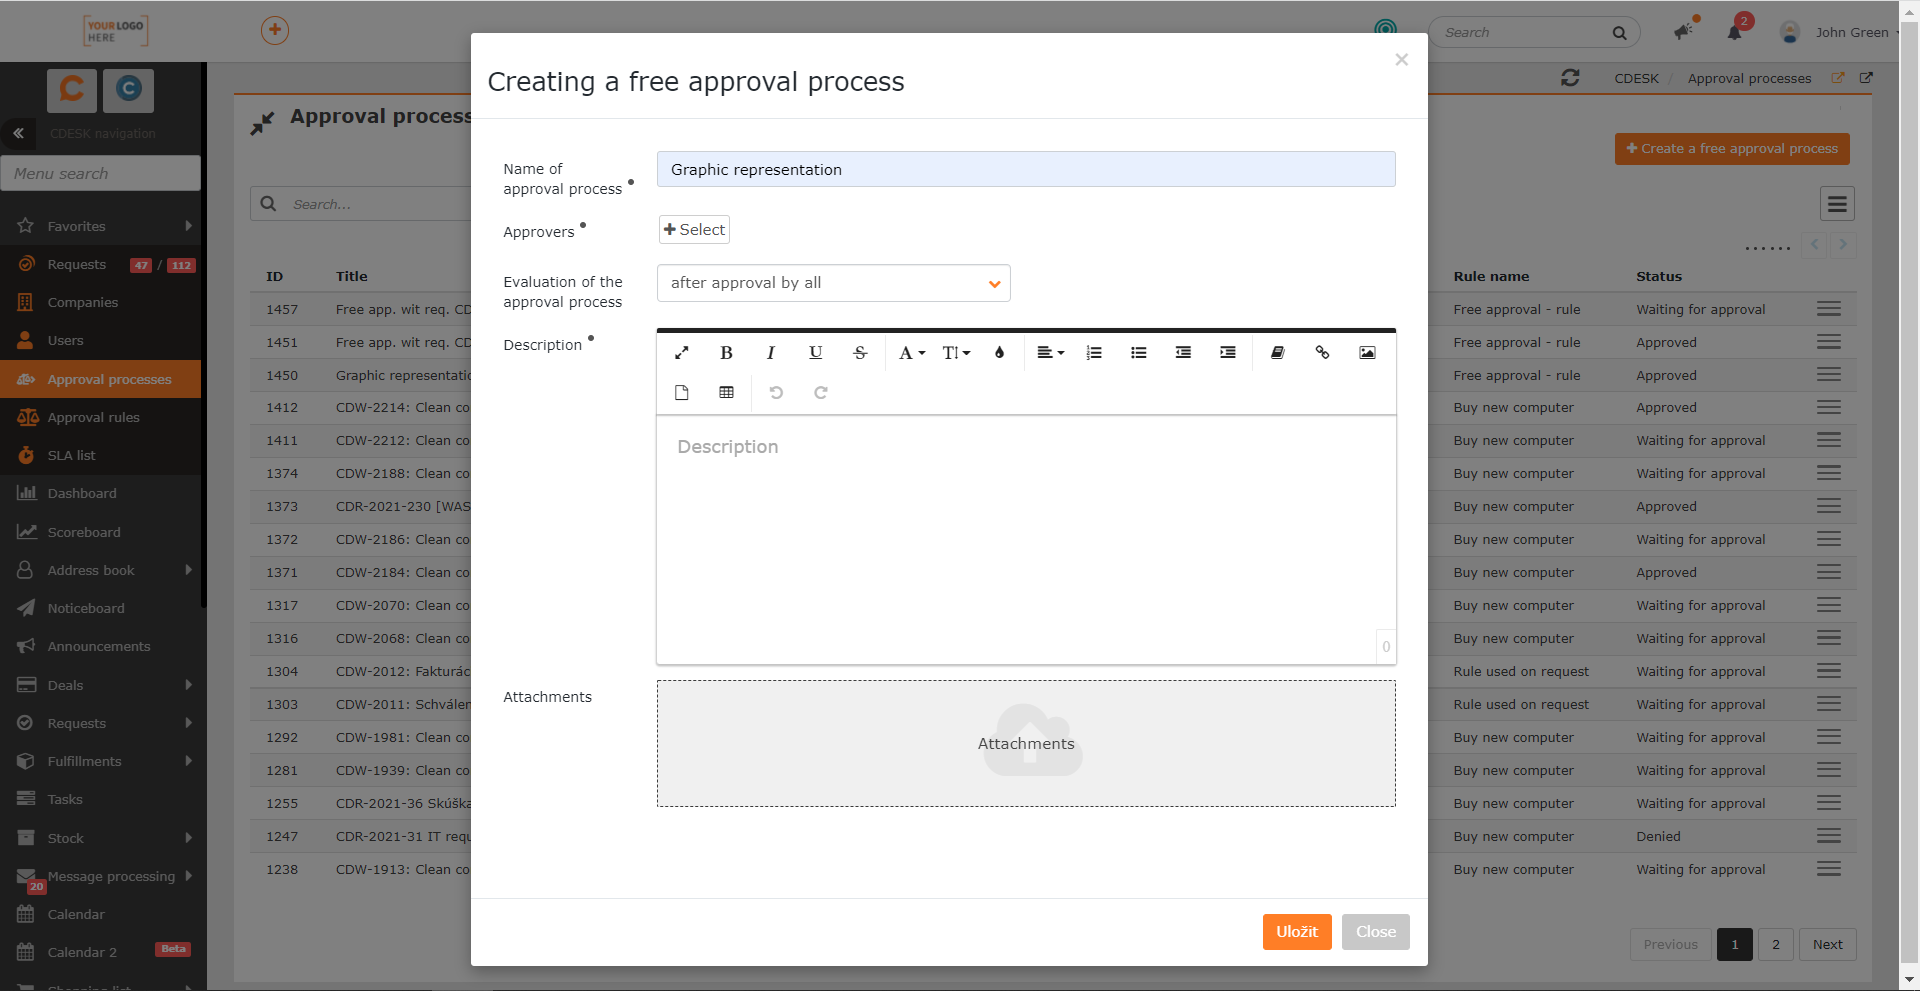
Name of the approval process – brief characteristics of the approval process.
Approvers – click the Select button to select the users who will comment on the process. Only users with the proper permissions are offered in the list of users. This permission can be set in Users and Groups -> Users -> choose a user -> Permissions tab -> Approvals -> Offer as an approver -> Free Approval. Multiple approvers can be set for a process.
Evaluation of the approval process – the following options are available in the selection:
- When approved by all – this option is only available if you set multiple approvers in the Approvers section. If you select this option, the approval process is closed only after each approver has commented.
- After the first approval – if this option is selected, the approval process is closed after one approver has already commented, even if several approvers have been selected for the approval process.
Description – field for inserting a more detailed specification of the subject of the approval process.
Attachments – field for inserting attachments. You can insert an attachment using the Drag&Drop function or click in the field to see an explorer in which you can select the desired attachment.
To save the approval process, click on the Save button located in the bottom right corner of the form. Click the Close button to close the form without saving the process.
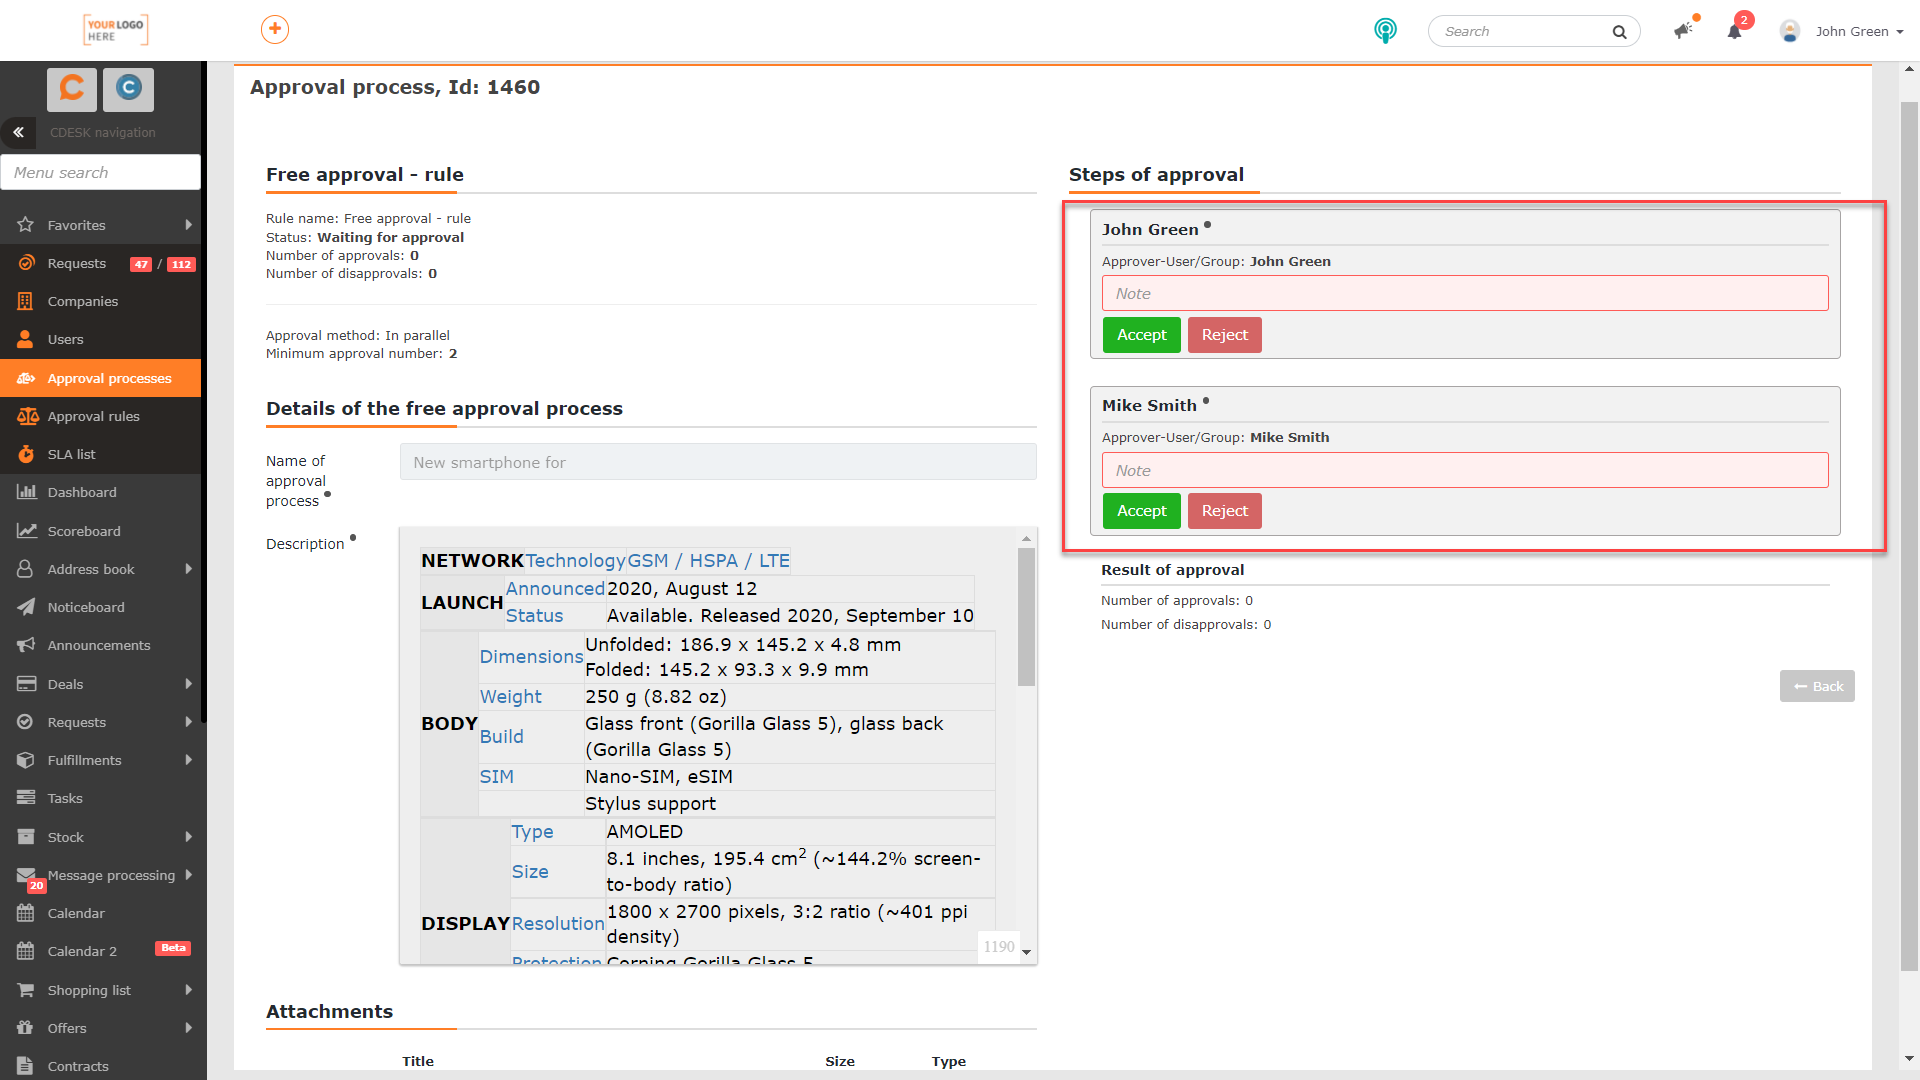
Comment on Free Approval Without a Link
Once saved, the free approval process will be displayed in the Approval Processes list in Approval -> Approval Processes. When the record is opened, a form is displayed that contains the approval process detail and the Steps of Approval section where selected users comment on the approval. The Accept button is used to accept the approval step. When the Reject button is clicked, the approval step for that user is rejected. The obligation to insert an accept/reject note depends on the settings of the free approval template.
Free Approval with a Link to the Request
Establishing a Free Approval Process with a Link to the Request
Free approval can also be used for a request in progress, where further steps requires approval. It may be, for example, an approval to purchase a new hard drive on a request related to a computer repair.
Free approval can only be added to an already created request and not during its creation. For the procedure of creating a request, see this text. To create an approval process on a request, click the Action button and select Create a Free Approval Process. If this option is not offered in the selection, you need to check if the user has been granted the permission to create free approval processes. (Users and Groups -> Users -> choose a user -> Permissions tab -> Approval -> Free Approval – Records.)
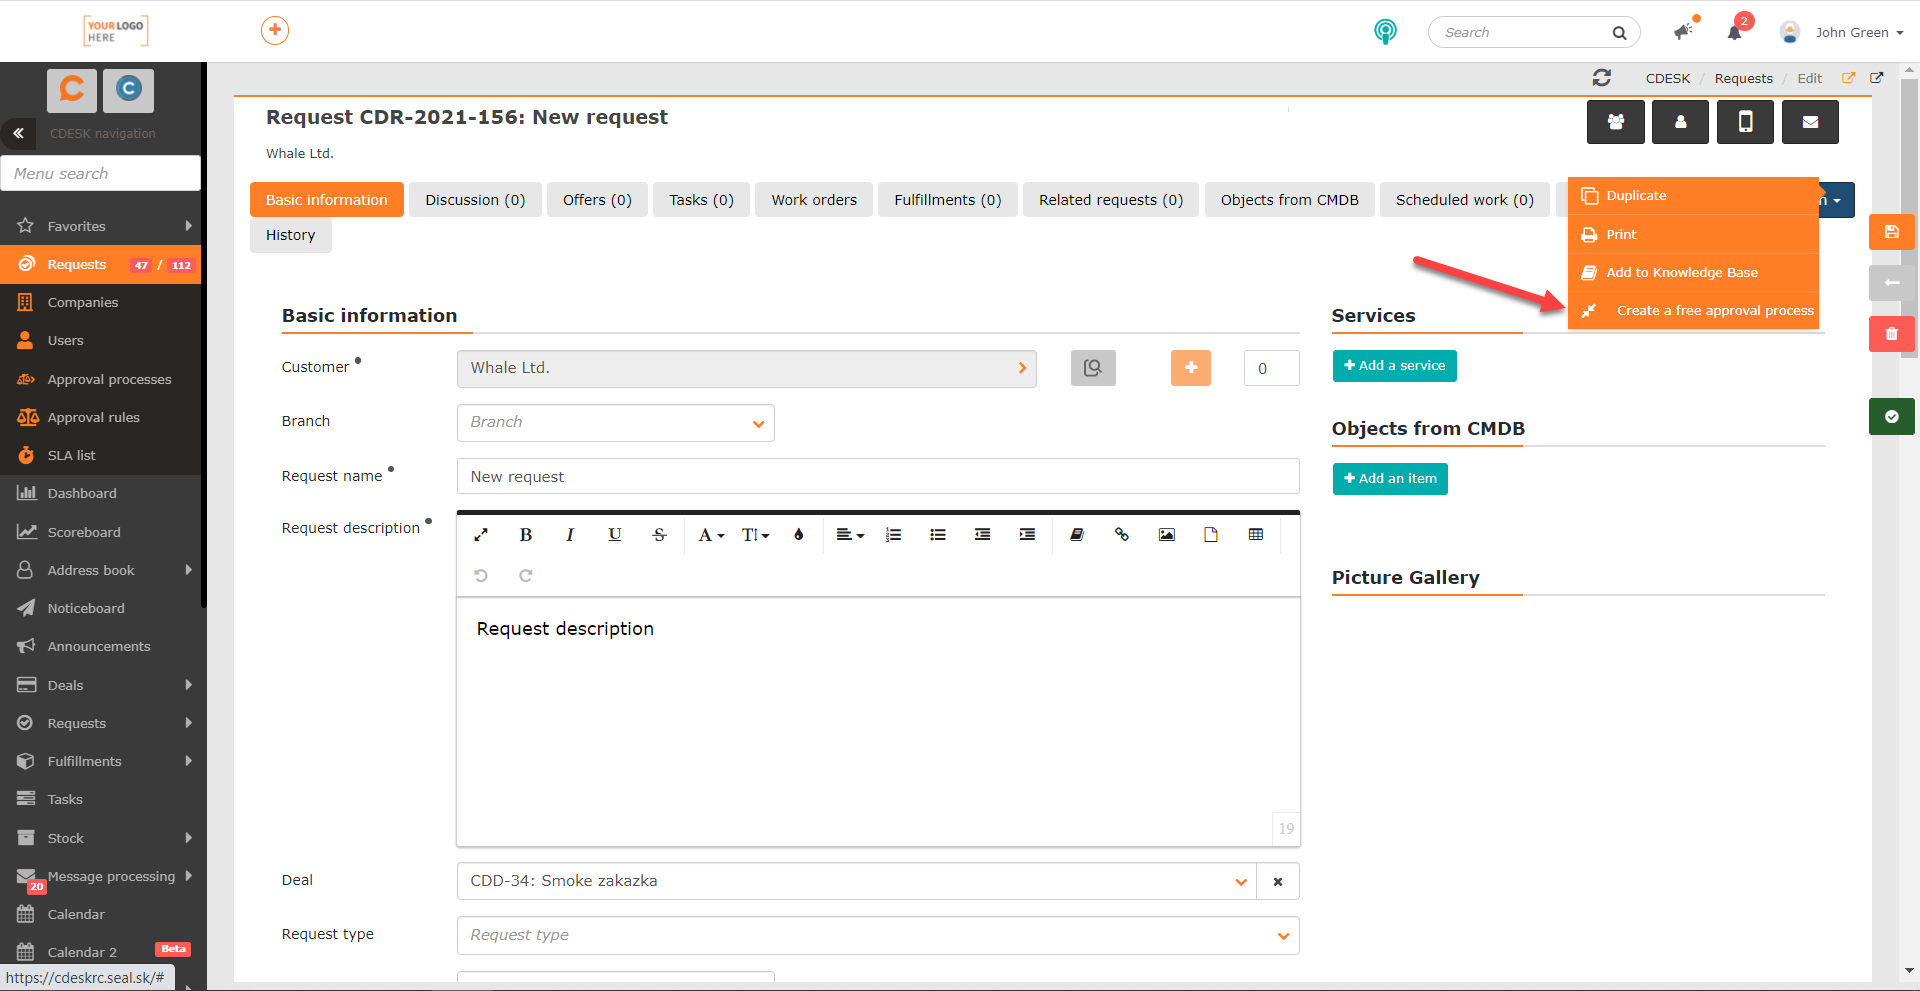
Clicking the Action button will display the same form as when creating a free approval process without a link to the module. In the Name of the Approval Process field, a name consisting of information that this is a free approval process, the request number and its name, is pre-populated. In the Description field, the description of the request from which the approval process is created is pre-populated.
Comment on the Free Approval with a Link to the Request
When a free approval process is added to the request, a button appears above the request form with the name of the approval process. If this button is colored blue, it means that the approval process is pending approval.
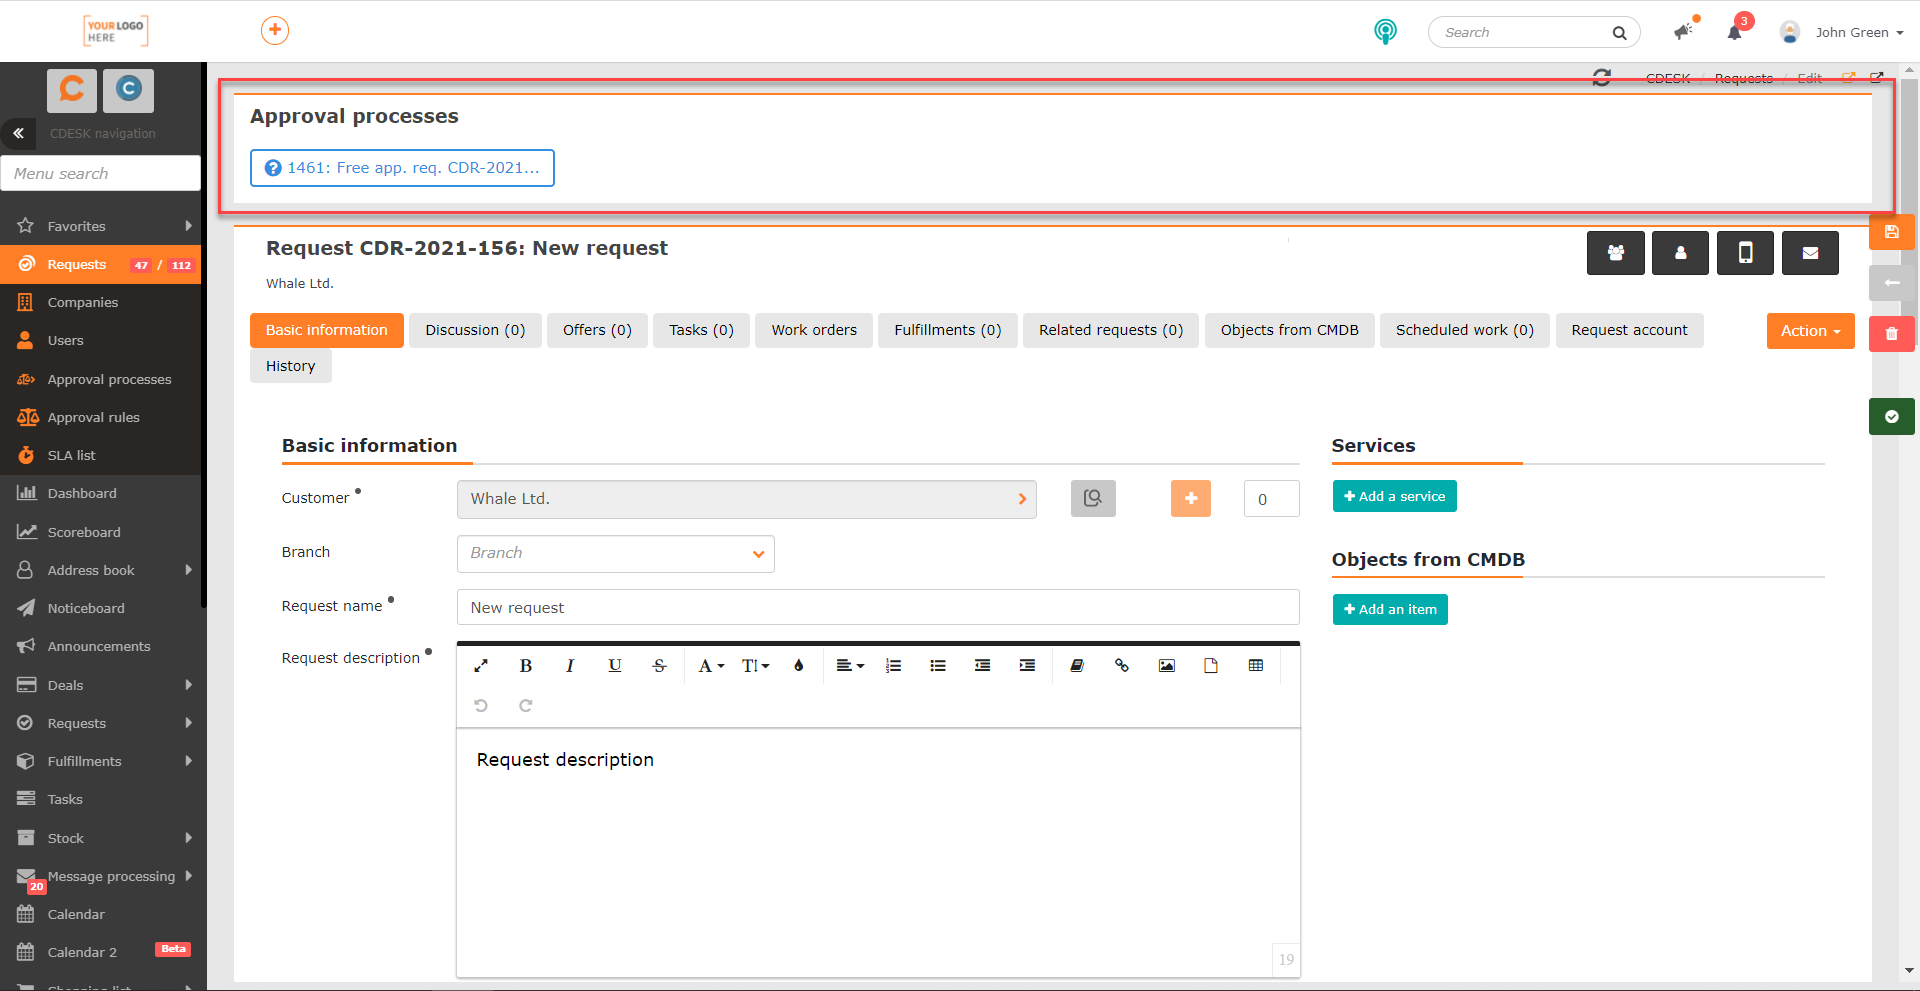
When you click on this button, a form will appear for you to comment on the process. The form is the same as for the free approval process, which is not linked to any module. For more information, see the text above.