WORKING WITH WORK ORDERS
Work Order Creation
How to create a work order is described in the text Create a Work Order, List of work orders.
The Most Common Actions on Work Orders
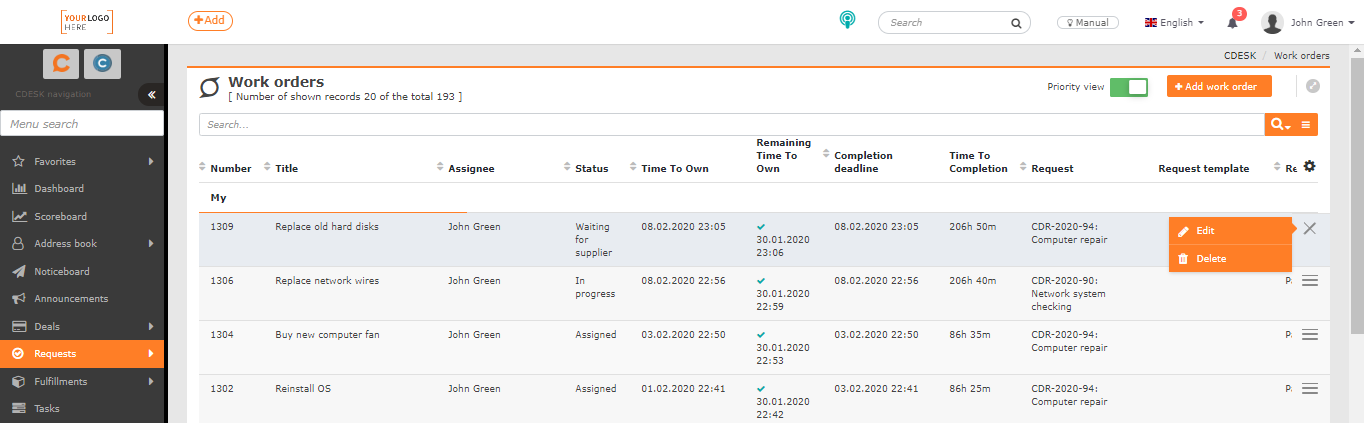
All created work orders are displayed in the Requests->List of work orders from where it is possible to work with them further.
Double click on the work order line or click on the context menu ![]() and choose Edit to open a window with a similar form as when creating a work order, extended by other options:
and choose Edit to open a window with a similar form as when creating a work order, extended by other options:
- add a note for assignees
- change the status of the work order
- add invoice and internal fulfillments
- add objects
- view links to related work orders
- work order history
Only a user with the appropriate authorization can edit work orders. Permissions can be set in Users and Groups-> a selected user-> Permissions tab -> Requests-> Work Orders-> Records.
A work order is not editable if it was generated automatically from the request template and is in the Created status. Such a work order will not be made available until the linked orders have been fulfilled.
If the work order is in the New status, it is not possible to change any fields in the work order except for the fields Assignee Group, Assignee, Internal Note and Attachments. After adding an assignee to the work order, all fields become editable.
Change of Dates in the Work Order
For each of the work order dates, the time is counted down until the deadline is met. If the deadline is met, the countdown stops and the feature evaluates whether the deadline was met on time. If it was, the ![]() flag is displayed, on the other hand if the deadline is exceeded, there appears
flag is displayed, on the other hand if the deadline is exceeded, there appears ![]() .
.
Each work order is set the Time to Own date and the Count in TTR.
Time to Own • – if the new order has been assigned to an assignee group, the countdown stops by adding a specific assignee. In case that the work order is assigned to an assignee at its creation, the countdown does not take place and the deadline is marked as fulfilled. In the list of work orders, the time until the time to own can be displayed in the following ways:
- date without any flag and color change – the time until which the work order should be assigned and yet it hasn´t
- date with the
 flag – the work order was assigned on time
 - date with the
 flag – the work order is in the Created state. It may have already been assigned, but its execution cannot begin unless the previous orders have been fulfilled
 - date with the
 flag – work order was not assigned in time
 - negative time numbers marked in red – the work order has not been assigned yet and is exceeded the assignment deadline

Count in TTR • – the countdown stops when the work order´s status changes to finished.
Description, Internal Note and Attachments
If the work order was created from a work order template, the Description field can be filled in automatically as required and can no longer be edited. This situation occurs if the Use the description from the request feature is turned on in the order template. If this feature is turned off or the work order was created through the request, the Description field is freely editable.
Internal note – this field is not available until the work order has been saved. The note is intended for the work order assignee. It is used to write notes that are not accessible to the customer. The Internal Note field can also be made available to customers using the permissions in Requests-> Work Orders-> Access to Fields-> Internal Note.
Status Change
In the section Global Settings->Requests->Work Orders it is possible to enable and use altogether 10 work order statuses:
- Created
- New
- Assigned
- In Progress
- Waiting for customer
- Waiting for supplier
- Finished
- Rejected
- Canceled
- Waiting for approval
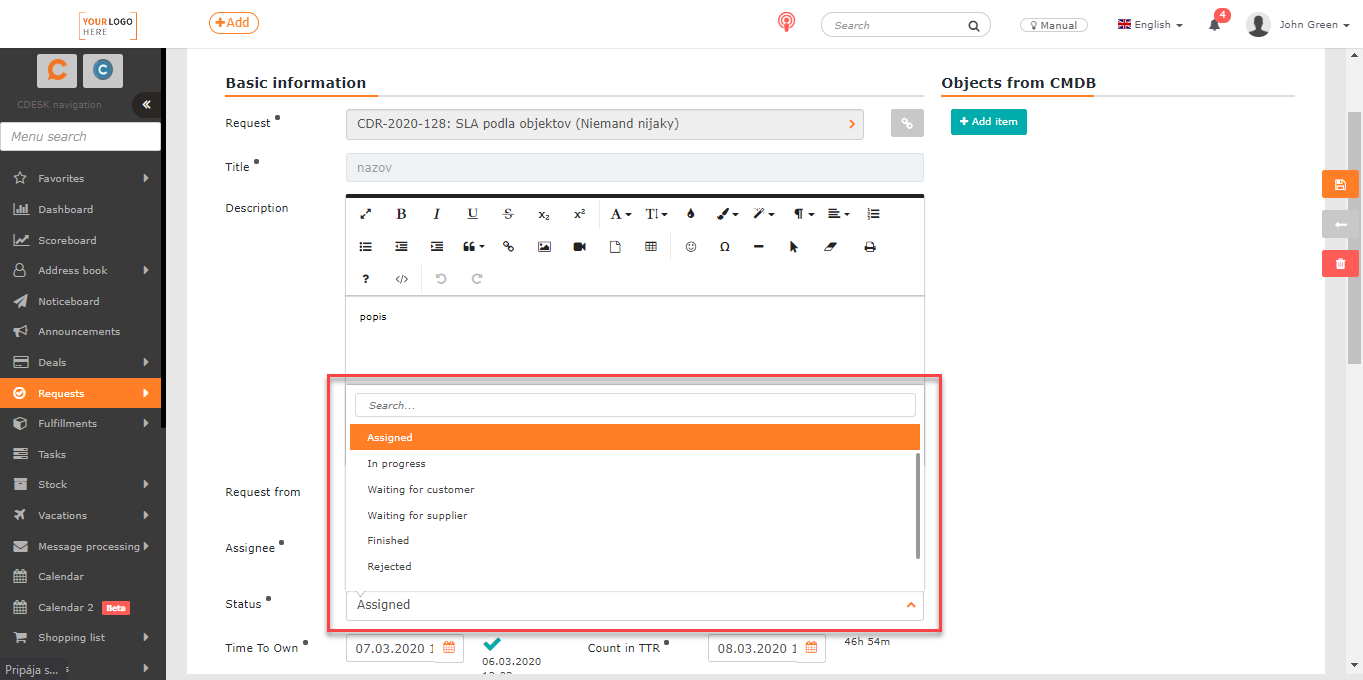
Status meanings are described in the text Work Orders – Settings.
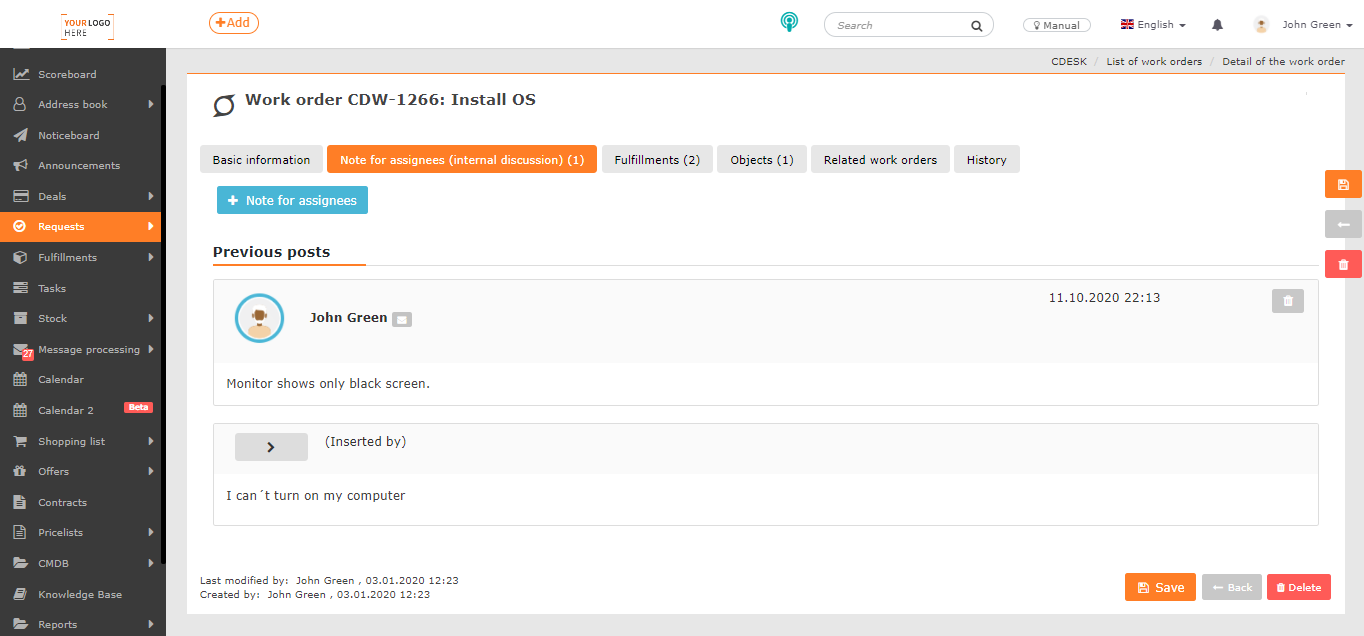
Note for Assignees (Internal Discussion)
It is possible to add posts in the tab, which will be visible only to the work order assignees. The tab is displayed only after saving the order.
Permissions to access the tab can be set in Users and Groups-> a selected user-> Permissions tab-> Requests-> Work Orders-> Records-> Access to Tabs-> Note for Assignees (internal discussion).
Permissions to access the records on this tab should be set individually. You can do so in Users and Groups-> a selected user-> Permissions tab-> Requests-> Work Orders-> Records-> Note for Assignees (internal discussion).
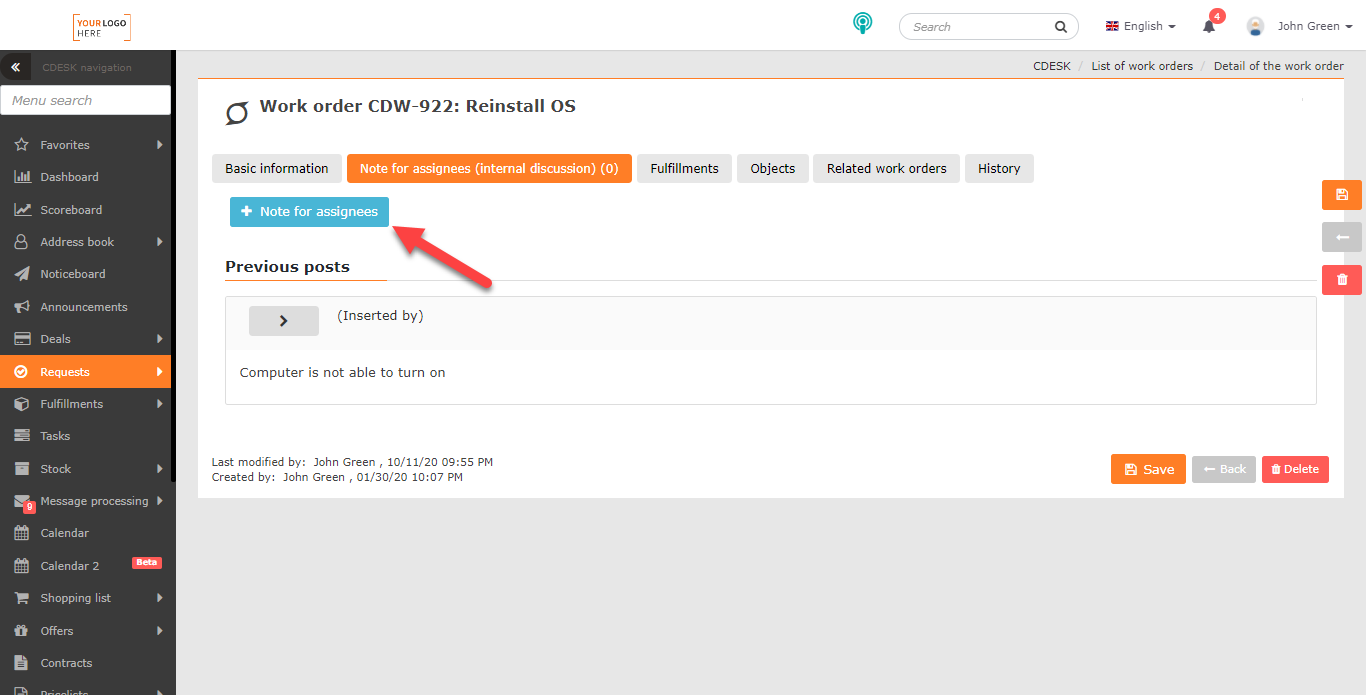
Add a Note for Assignees
To add new notes, use the +Note for assignees button in the upper left corner.
If the button to post doesn’t appear, make sure you’re authorized to add an internal discussion. The permissions can be set in Users and Groups-> a selected user-> Permissions tab-> Requests-> Work Orders-> Records-> Note for Assignees (internal discussion).
Click on the +Note for assignees button to open a new window with the form for entering a note.

The form contains the following fields:
To – here you can manually add recipients of the note for assignees notifications. Choose recipients from the list or enter an email address manually.
This is followed by the list of notification recipients:
- Automatically added recipient can be an assignee of a work order, assignee of a linked request and other users with access to the discussion, who added a post.
- Manually added recipients can be other assignees / operators / administrators registered in CDESK or a manually added e-mail address. These recipients are color-coded differently from the automatically added ones.
All contacts intended to receive notifications are also notified for all subsequent posts until they are removed from the list by clicking ![]() which appears next to the contact.
which appears next to the contact.
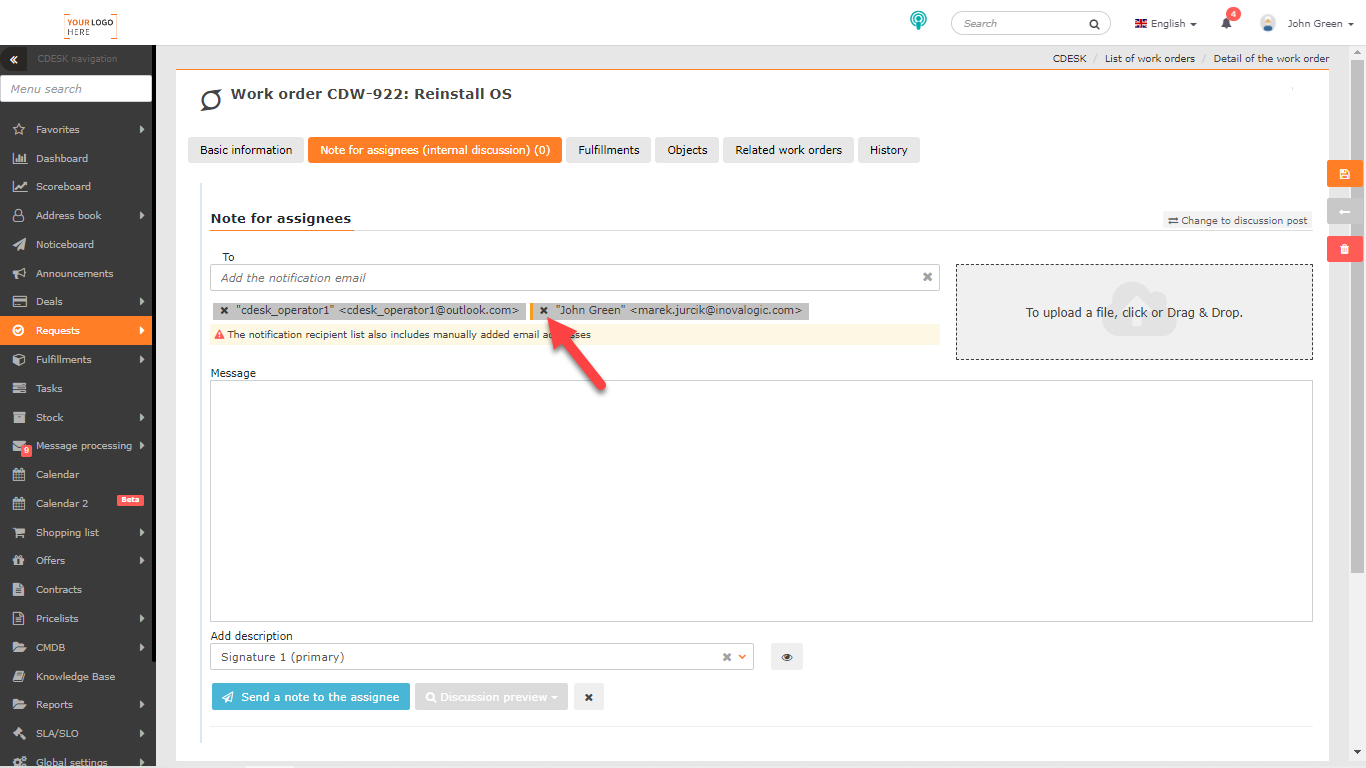
There follows a field for writing a message with the possible text formatting and a field for selecting a signature predefined in the user settings.
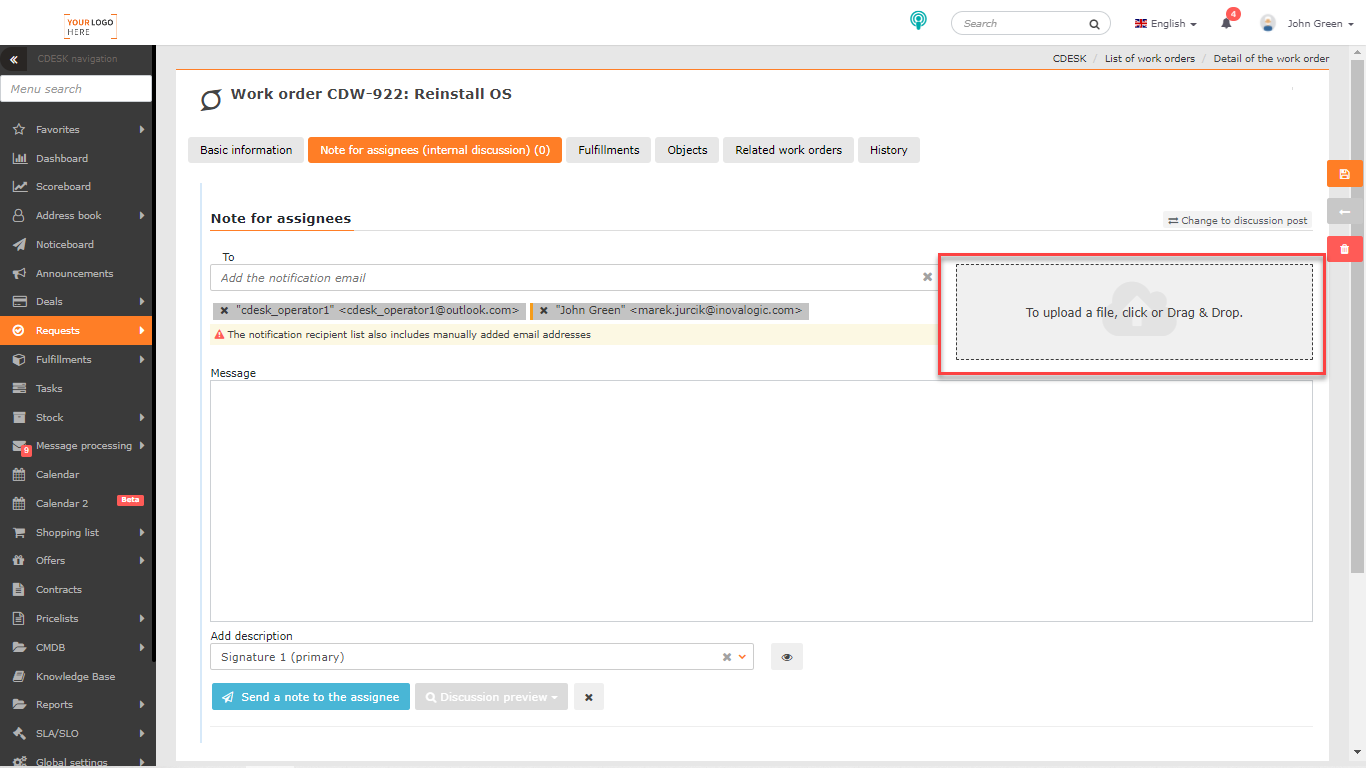
In the right part of the window, there is a field for adding files, such as screenshots or photos. Click on it to open a dialog box for selecting a file, or search for a file in your PC and drag & drop it to the field.
Send the note by clicking on Send the note to the assignees.

If you want the note to be available as a discussion in the linked request, click the Change to discussion post button in the upper right corner. The type of note will change without loosing the content, but the notification will be sent to all users who have access to the customer discussion in the linked request.
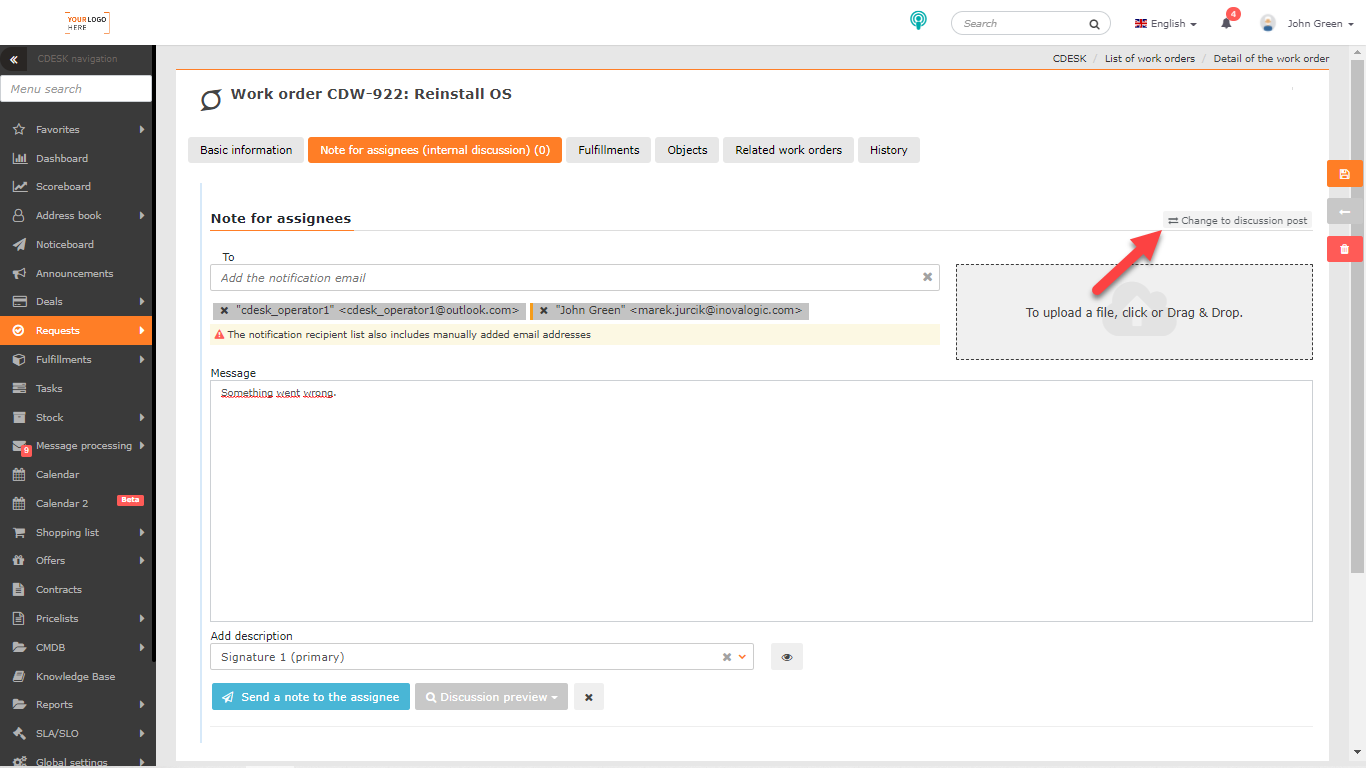
The Notification preview button is meant to show the preview of e-mail notifications before sending.

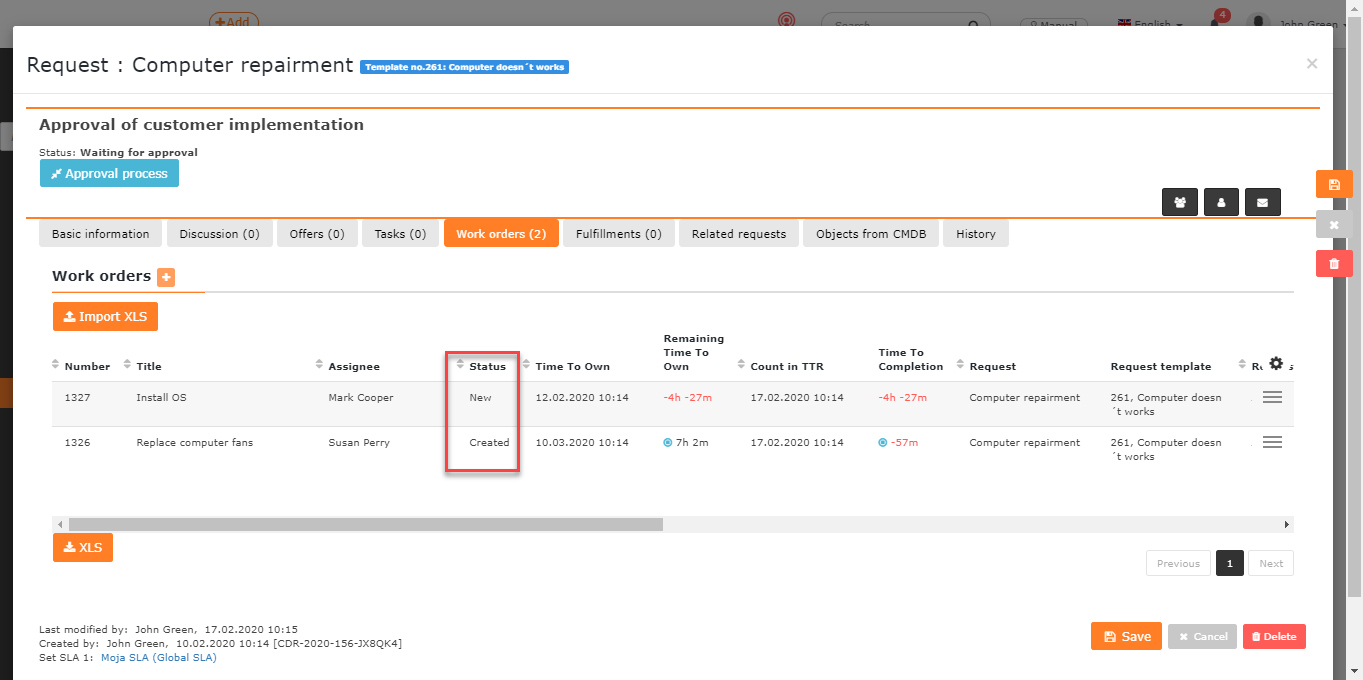
Fulfillments
The Fulfillments tab does not appear in the work order until the work order has been saved. Fulfillments serve for keeping transparent records of the work performed when working on a work order. The Fulfillments tab is only available when the Fulfillments module is enabled in Global Settings->Fulfillments. If the tab still does not appear, make sure you are authorized to access it. Permissions can be set in Users and Groups-> a selected user-> Permissions tab-> Requests-> Work Orders-> Records-> Access to tabs-> Fulfillments. It is also necessary to set permissions for access to the Fulfillments module itself in Users and Groups-> a selected user-> Permissions tab-> Fulfillments.
The fulfillments added to the work order are also added to the linked request.
A new fulfillment can be added to the work order directly from the order by clicking on +Add a fulfilment. A window for filling in the fields will open. The meaning of individual fields, as well as the way how to work with fulfilments, are described in more detail in the article Fulfillments.
Use the +Add an internal fulfillment button to add a fulfillment to the work order that is not visible to your customers. If necessary, you can make internal fulfillment available to customers in Permissions-> Fulfillments-> Internal Fulfillments. For more information on internal fulfilments, click HERE.

Objects
Objects in the work order can be selected only if the Selection of Objects is enabled in Global Settings->Requests->Requests. To select from objects, first you need to define for the customer at least one group from Devices, Catalog of Provided Services or the General Category in the CMDB.

If the work order was created from a template, you need to check if the set permission allows you to add objects to the order, or what object groups are permitted.
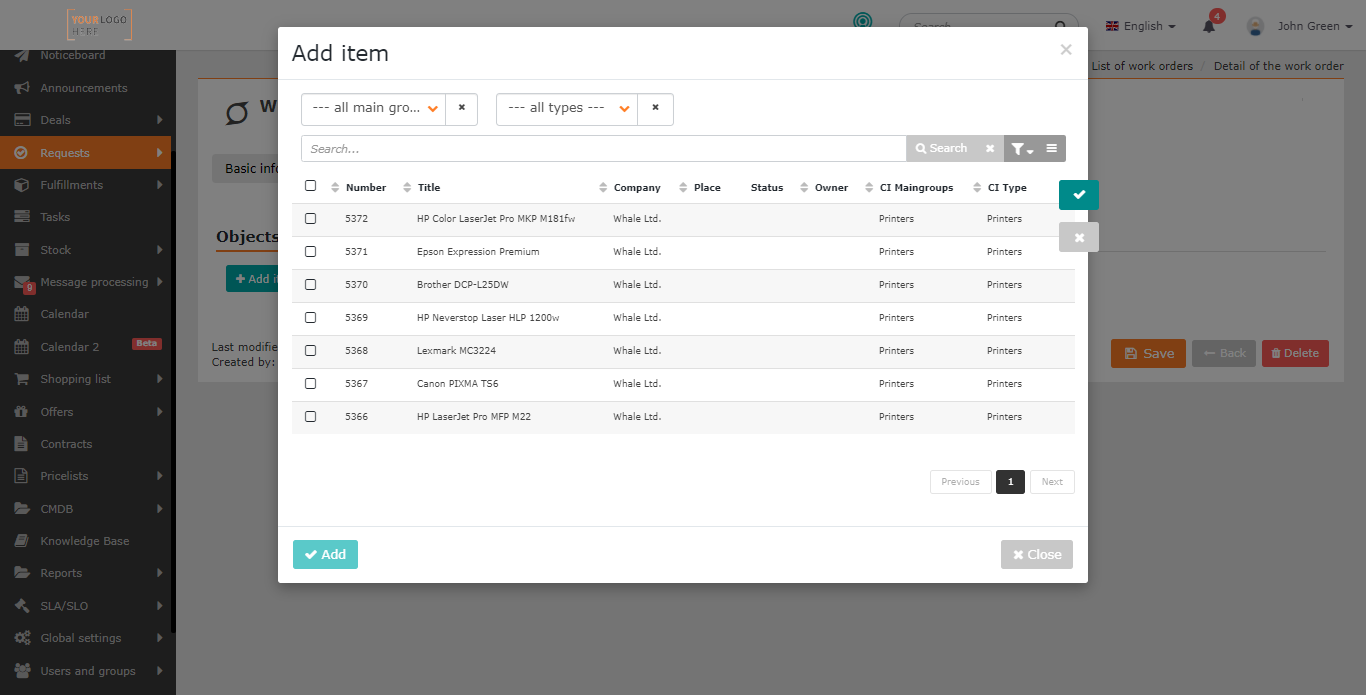
If there are objects defined for the customer, click on +Add an item to add them to the work order.
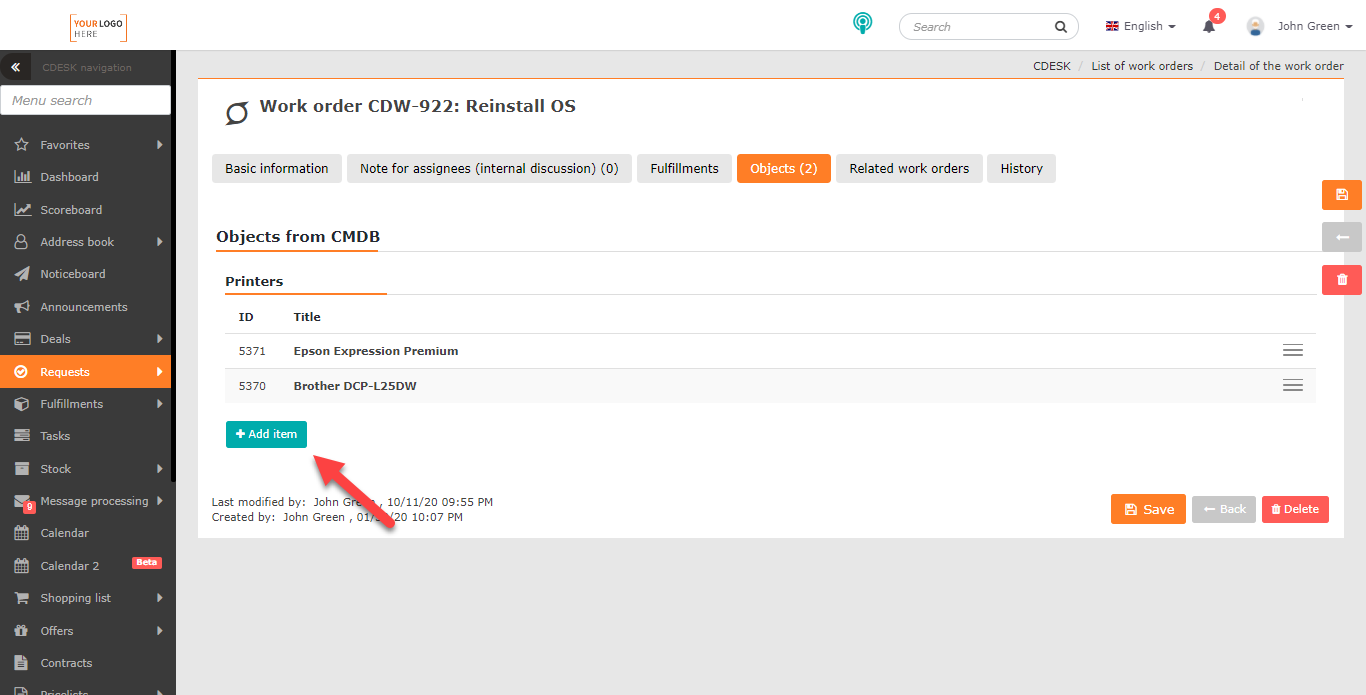
The window to choose objects by the main group or the CI type opens. Then objects of the chosen category are listed. Check objects you want to select and click on Add to add them to the request. Click on the Close button to close the window without adding any items.
If the function Insert automatically all CIs from the request into the work order is turned on in Global Settings->Requests->Work Orders, all objects from the request are transferred to the work order. Also other objects can be added to the work order.
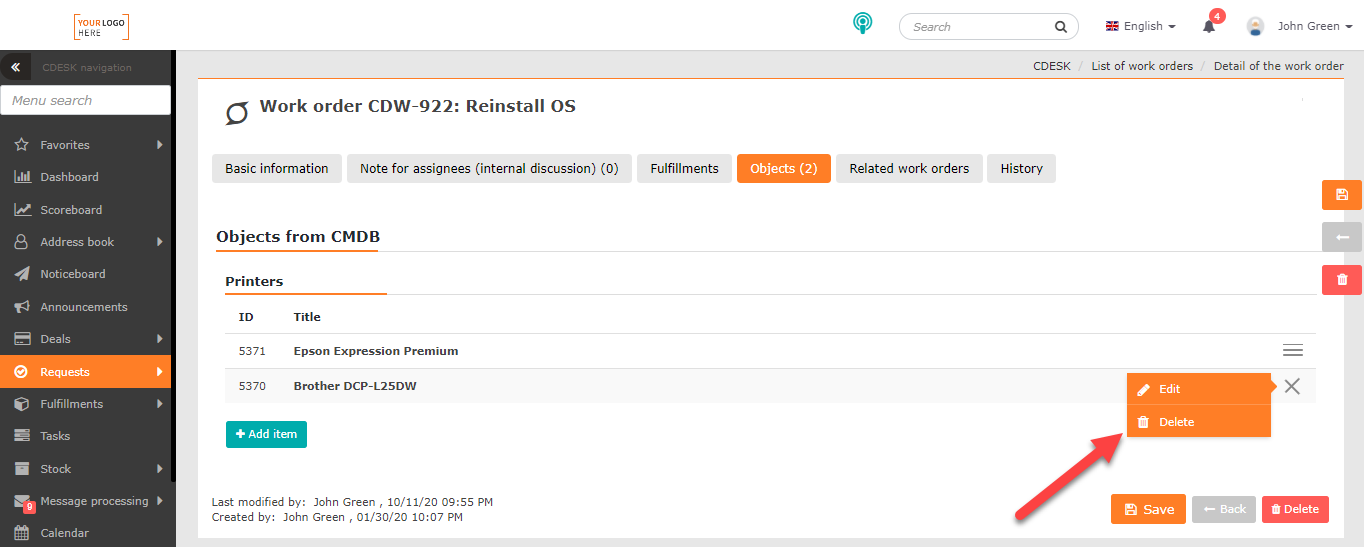
Select Delete in the context menu ![]() to delete an object in the work order.
to delete an object in the work order.
Objects tab is subject to permission and can be enabled / disabled for selected users or groups in CDESK. The permissions can be set in Users and Groups->a selected user-> Permissions tab->Requests->Work Orders->Records->Access to tabs->Fulfillments.
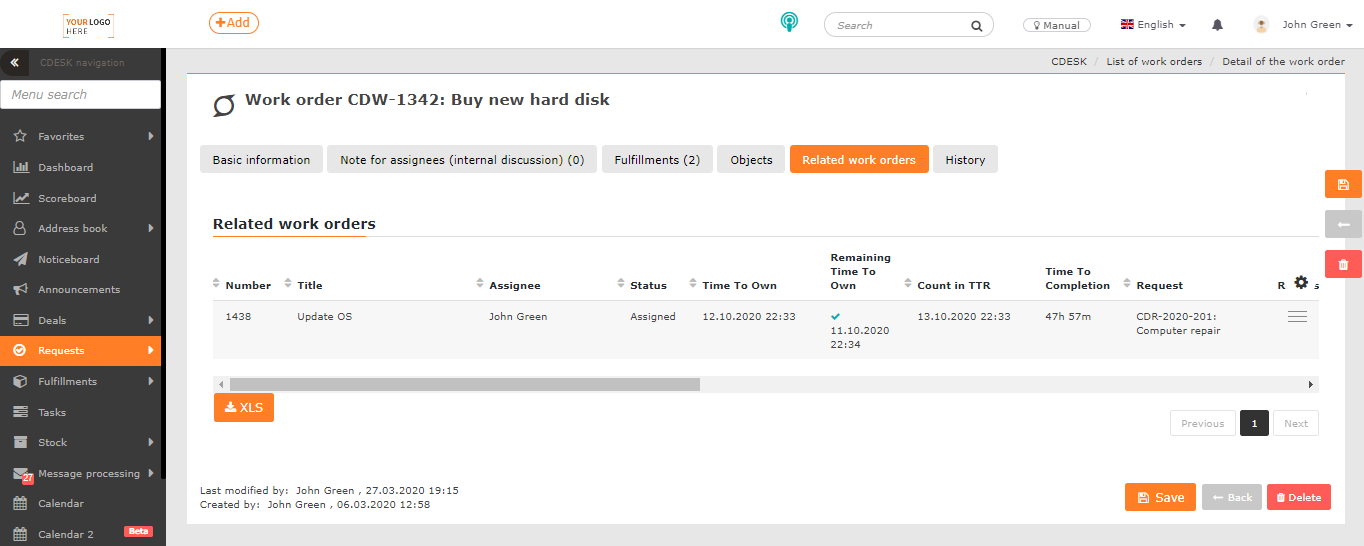
Related Work Orders
The tab appears only after saving the work order. It displays other work orders linked to the same request.
The Related work orders tab is subject to permission and can be enabled / disabled to selected users or groups in CDESK. The permissions can be set in Users and Groups->a selected user-> Permissions tab->Requests->Work Orders->Records->Access to tabs->Related Work Orders.
Export Related Work Orders
To export related work orders, use the XLS button in the down left corner under the list of orders.

Click to open a modal box with selection of columns that will appear in the export. See more on export in the article List of Work Orders.
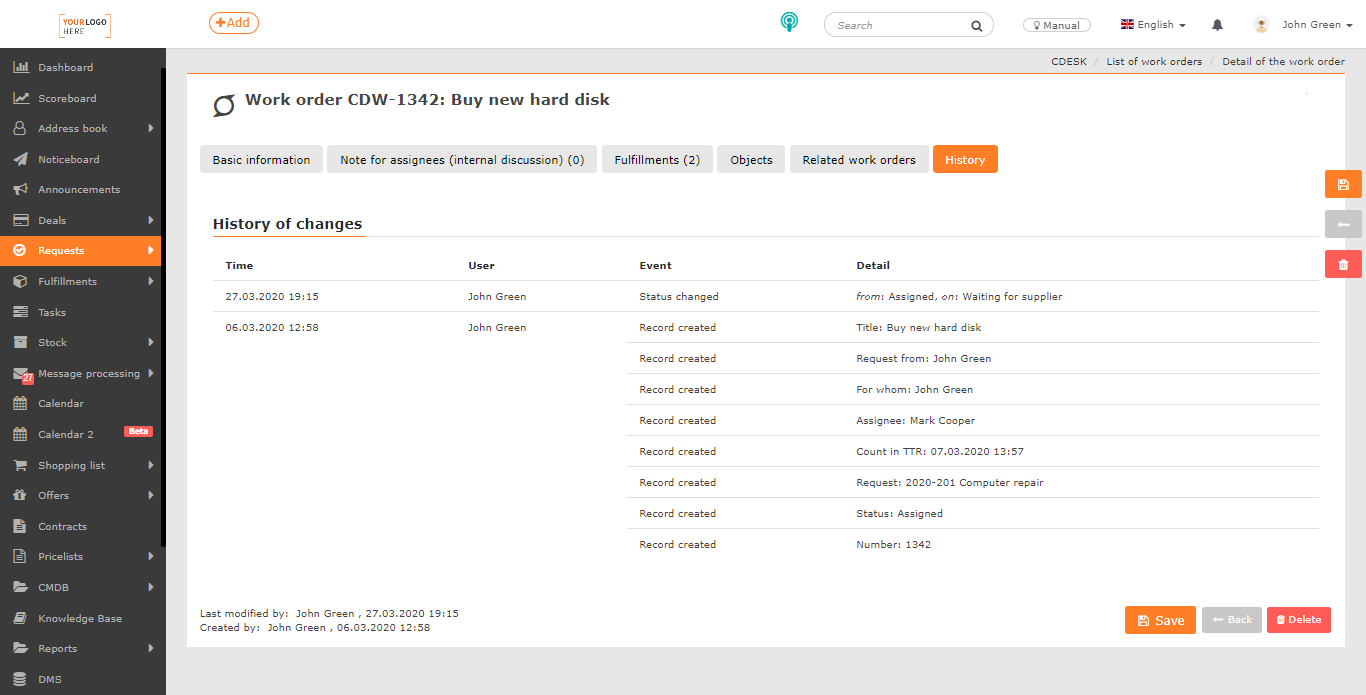
History
The History tab appears only after saving the work order. Here you can find all performed and saved changes in the work order, such as:
- Changes of – priority, type, service area, status, assignee, date, etc.
- Information on notifications – recipients of the notification about the work order creation
The History tab is subject to permission and can be enabled / disabled to selected users or groups in CDESK. Permissions can be set in Users and Groups-> a selected user-> Permissions tab->Requests->Work Orders->Records->Access to tabs->History.